Lighting / Fixtures
Installation Guide for Wayfair Antique 1920s Vintage 5-Light Chandelier
Step-by-step installation and wiring guide for the Wayfair Antique 1920s Vintage 5-Light Chandelier. Includes safety instructions, assembly steps, and wiring diagrams.
Quick answers from the manual
Quick answer
- This document provides assembly and installation instructions for the Wayfair Antique 1920s Vintage 5-Light Chandelier, including safety warnings and wiring procedures. p. 1
Key actions
- Shut off power at the circuit breaker before starting installation. p. 1
- Connect black wire to black, white to white, and ground to grounding terminal. p. 1
First start
- Restore power and test the light for proper operation after installation is complete. p. 1
Where to find it in the PDF
- Installation Instructions p. 1
Table of contents
Quick Guide from the Manual
This document provides the necessary steps to assemble and install the Wayfair Antique 1920s Vintage 5-Light Chandelier. Before beginning, ensure the power is turned off at the circuit breaker. If you are unfamiliar with electrical wiring, it is strongly recommended to have the fixture installed by a qualified electrician.
Safety Instructions
- Do not install or use the light fixture if any part is missing or damaged.
- Ensure electricity is turned off at the main fuse or circuit breaker box before wiring.
- Make certain no bare wires are exposed outside the wire connectors.
- All wiring must conform to national and local electrical codes.
Step-by-Step Installation
- Secure the threaded pipe to the connector using a nut. Thread the center piece, socket cup, and round tube sequentially onto the pipe, and secure with a hanging ring.
- Secure another threaded pipe to a connector using a nut. Thread the pumpkin-shaped metal sphere onto the pipe and secure with the decorative finial.
- Loosen the quick link to adjust chain and cord length. Thread the cord through the chain, crystal top, and canopy. Connect one end of the chain to the screw collar loop and the other end to the fixture's hanging ring.
- Secure the mounting bracket to a UL-listed junction box using the provided screws.
- Wiring Connections: Use wire connectors to connect the black (hot) wire to the black wire, the white (neutral) wire to the white wire, and the ground wire to the grounding terminal. Ensure no exposed conductors remain outside wire connectors or outside the junction box.
- Secure the canopy to the mounting bracket using the screw collar loop.
- Place the glass shade over the socket and secure it with the locking ring.
- Install the light bulb into the socket (bulb not included). Do not exceed the maximum wattage.
- Restore power and test the light for proper operation.
Manufacturer information
Wayfair LLC
Practical help
Common problems
Fixture missing parts or damaged
Do not install or use the light fixture.
Unfamiliar with electrical wiring
Have the fixture installed by a licensed electrician.
Before use
- Ensure power is turned off at the circuit breaker
- Read all instructions carefully
- Verify all parts are present and undamaged
- Ensure the junction box is UL-listed
Images and diagrams
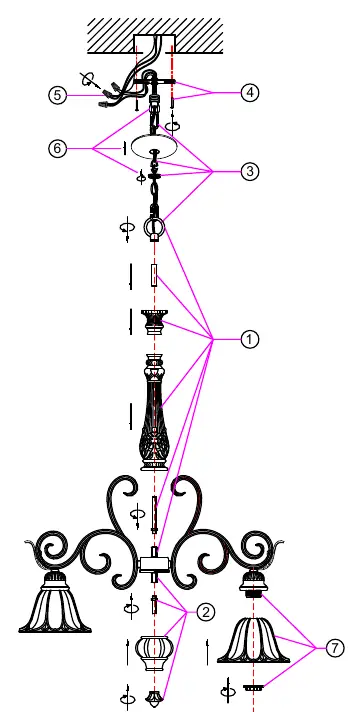
- The diagram illustrates the assembly sequence of the chandelier components, including the threaded pipes, center piece, socket cup, and glass shade.
- The diagram shows the connection points for the chain, canopy, and hanging ring.
Model compatibility
- Must be installed to a UL-listed junction box.
- Bulb is not included.

Manual page author
Michael Turner
Technical manual editor
Reviews PDF manuals for structure, safety notes, and practical product details so readers can find the right information quickly.