Furniture / Sofas & Couches
Installation Guide for Wayfair Latitude Run Emorie Sectional Sofa
Step-by-step assembly instructions for the Wayfair Latitude Run Emorie 2-Piece Upholstered Sectional Sofa. This guide covers unpacking, leg attachment, handrail installation, backrest assembly, and connecting sofa modules.
Quick answers from the manual
Quick answer
- This document is an installation guide for the Wayfair Latitude Run Emorie sectional sofa, detailing the assembly of legs, handrails, backrests, and module connections. p. 1, 2, 3
Key actions
- Attach legs to the bottom of the sofa bases. p. 2
- Connect sofa modules using connector screws. p. 2
First start
- Unzip the bottom of the sofa bases to retrieve the legs. p. 1
Where to find it in the PDF
- Parts List and Initial Steps p. 1
- Assembly Steps 5-9 p. 2
- Final Assembly and Configuration p. 3, 4, 5
Table of contents
Manual images
Click an image to enlargeQuick Assembly Guide
This guide provides the necessary steps to assemble the Wayfair Latitude Run Emorie sectional sofa. Ensure you have all parts listed below before beginning assembly. The process involves unpacking, attaching legs, installing handrails, inserting backrests, and connecting the sofa modules.
Parts List
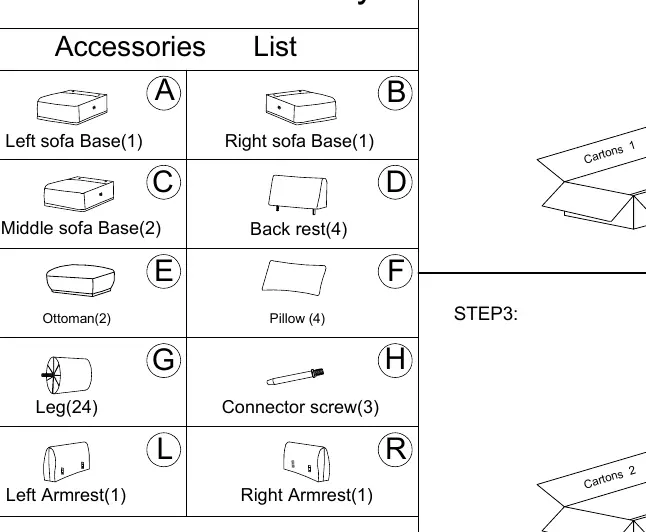
- A: Left sofa base (1)
- B: Right sofa base (1)
- C: Middle sofa base (2)
- D: Back rest (4)
- E: Ottoman (2)
- F: Pillow (4)
- G: Leg (24)
- H: Connector screw (3)
- L: Left Armrest (1)
- R: Right Armrest (1)
Assembly Instructions
Step 1: Unpacking
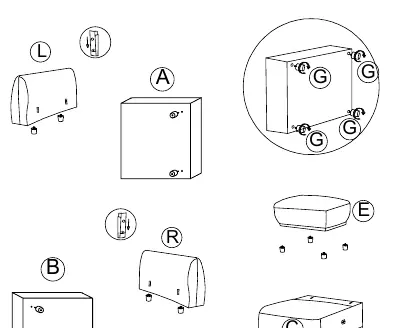
Unzip the bottom of the sofa bases to remove the legs (G) and other components stored inside.
Step 2-4: Preparation
Organize the cartons and components as shown in the diagrams. Ensure you have the correct number of legs and parts for each section.
Step 5: Attaching Legs
Screw the legs (G) clockwise into the holes located at the bottom of each sofa base.
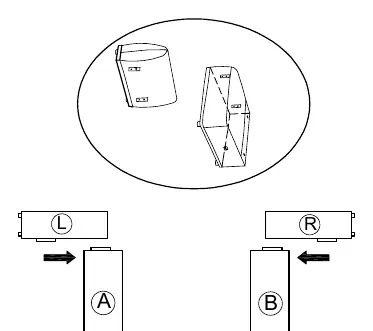
Step 6: Installing Handrails
Stand the sofa upright. Ensure the sofa and the wooden frame on both sides of the handrail are flat. Move the handrail from the bottom to the top so that the handrail latch is securely inserted into the latch of the seat frame.
Step 7: Inserting Backrests
Insert the backrests (D) into the corresponding sofa seats.
Step 8: Connecting Sofa Modules
Turn the connector screws (H) clockwise into the black fittings located on the right side of the sofa to join the sections together.
Step 9: Final Connection
Connect the remaining sofa sections as shown in the diagram.
Step 10: Finishing Touches
Place the four pillows (F) onto the assembled sofa.
Manufacturer information
Wayfair LLC
Practical help
Common problems
Handrail feels loose or unstable
Ensure the handrail latch is fully inserted into the latch of the seat frame by moving it from the bottom to the top.
Sofa sections are not connecting properly
Verify that the connector screws (H) are turned clockwise into the black fittings on the side of the sofa.
Before use
- Verify all parts (A-R) are present according to the parts list.
- Locate legs (G) inside the zippered compartments at the bottom of the sofa bases.
- Ensure you have sufficient floor space for assembly.
- Check that all connector screws are tightened.
Images and diagrams
- The diagrams illustrate the latch mechanism used to secure the handrails to the seat frame.
- Connector screws are depicted as the primary method for joining separate sofa modules.

Manual page author
Emily Carter
User documentation editor
Prepares concise manual descriptions and highlights the most useful setup, operation, and maintenance information for readers.