Lighting / Fixtures
Installation Guide for Wayfair Bathroom Vanity Unit BV B120 Series
Quick installation guide for Wayfair bathroom vanity units (models BV B120 J24, E24A, and E24B). Includes assembly steps, hardware lists, dimensions, and care instructions.
Table of contents
Manual images
Click an image to enlargeImportant Information
This manual covers the installation of Wayfair bathroom vanity units, specifically models BV B120 J24, BV B120 E24A, and BV B120 E24B. Before beginning assembly, ensure you have all hardware components listed in the manual and the necessary tools. The assembly requires careful attention to hole positions and the correct use of cam locks and screws.
Care and Maintenance
- Dust the furniture regularly with a soft, dry cloth.
- Avoid using household cleaners, abrasives, or products containing lemon, vinegar, or other acids that may damage the finish.
- Protect the unit from excessive exposure to sunlight, extreme temperature changes, and moisture.
- Do not place hot appliances, such as curling irons or hair dryers, directly on the countertop.
- Wipe up any spills immediately to prevent damage.
Assembly Instructions
The assembly process involves several key stages depending on your specific model:
General Assembly Steps
- Hardware Preparation: Identify all parts (A-O) and organize them. Ensure you have a screwdriver, drill, hammer, and silicone sealant.
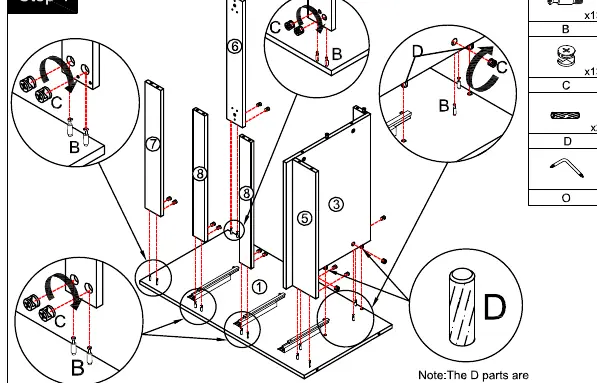
- Panel Assembly: Use the provided cam locks (B+C) and screws to connect the side panels, base, and top. Ensure the cam lock arrow points toward the steel rod for a secure fit.
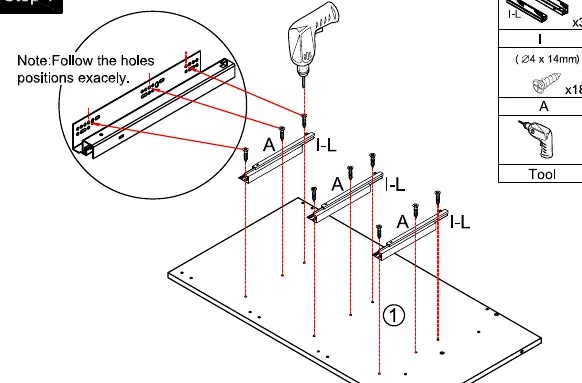
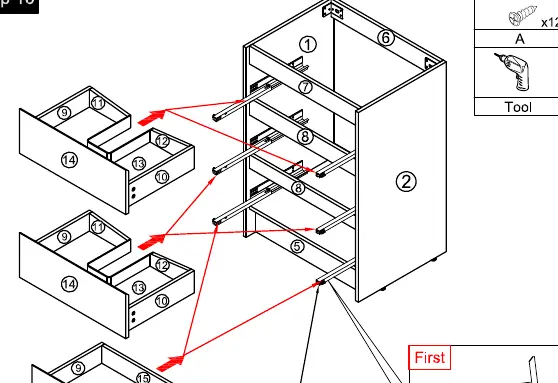
- Drawer/Door Installation: For drawer models, attach the rails (I-L) to the side panels first, ensuring they are aligned with the pre-drilled holes. For door models, attach hinges (G) to the doors and the cabinet frame.
- Final Mounting: Secure the vanity to the wall using the provided brackets (F) and anchors (E) to prevent tipping.
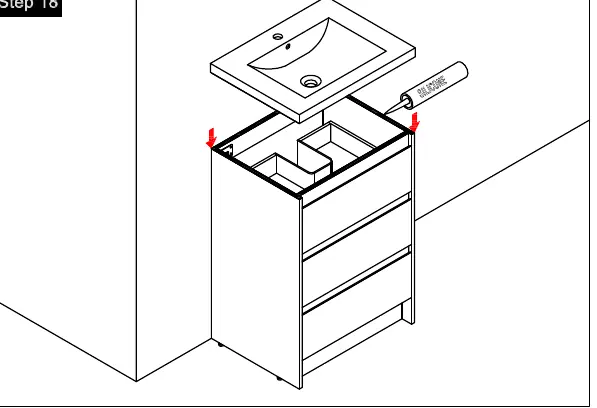
- Sink Installation: Apply silicone sealant to the top edges of the cabinet before placing the sink/countertop.
Adjustments
- Drawer Rails: If drawers are not level, use the height adjustment feature on the rails (approx. 3mm adjustment).
- Doors: Use the screws on the hinges to tighten or loosen the door position for proper alignment.
Manufacturer information
Wayfair LLC
Practical help
Common problems
Cam lock does not secure the panel
Check the screw installation depth. Ensure the cam lock arrow points directly toward the steel rod before tightening.
Drawer rails are misaligned
Verify that the rails were installed following the exact hole positions indicated in the manual. Use the 3mm height adjustment feature on the rail if necessary.
Doors are uneven
Adjust the door position by tightening or loosening the screws on the hinge mechanism.
Before use
- Verify all hardware parts (A-O) are present according to the specific model list.
- Ensure you have a screwdriver, power drill, hammer, and silicone sealant ready.
- Clear a large, flat workspace to assemble the unit.
- Check the wall surface for suitability for mounting anchors.
- Ensure the sink is properly sealed to the countertop to prevent water leakage.
Specs in practice
- Cam Lock (B+C)
- The primary fastener for connecting wooden panels. Requires correct orientation of the arrow toward the steel rod.
- Adjustable Feet (H)
- Allows for leveling the vanity on uneven bathroom floors.
- Plastic Anchor (E)
- Used for securing the vanity to the wall to prevent tipping.
Model compatibility
- This manual applies to models: BV B120 J24, BV B120 E24A, and BV B120 E24B.
- Ensure the model number on your packaging matches the specific assembly steps in this guide.

Manual page author
David Miller
Documentation analyst
Organizes user manual content into clear summaries, with attention to model details, product context, and everyday usability.