Garden / Seasonal Decorations
10FT x 10FT Outdoor Pergola Gazebo
Assembly guide for the 10FT x 10FT Outdoor Pergola Gazebo. Includes safety warnings, parts list, and step-by-step installation instructions.
Table of contents
Manual images
Click an image to enlargeQuick guide from the manual
This manual provides instructions for the assembly of the 10FT x 10FT Outdoor Pergola Gazebo. If you have any questions or concerns regarding your purchase, you can contact support via email at [email protected] or by text at +1 628-263-4608.
Important: A minimum of three healthy adults are required to move and install the pergola. Do not attempt to assemble or use the pergola in moderate or heavy wind conditions.
Warnings and Cautions
- Do not mount the pergola yourself if you are unsure about the location, do not understand the manual, or lack the necessary tools and technical knowledge. Contact a professional.
- Keep children and pets away from the working area during assembly.
- The product is only suitable for installation on a plain cement wall or stable brickwork.
- Do not climb on the pergola or hang heavy objects from it.
- The warranty does not cover damage from extreme weather (heavy rain, high winds) or heat sources like BBQs.
- Always keep the pergola louvers open and secure during heavy winds.
Required Tools
Before starting, ensure you have the following tools available:
- Pistol Drill
- Tape Measure
- Screwdriver
- Ladder
Parts and Hardware
The package includes various components labeled A1 through P, and hardware labeled AA through FF. Before beginning, verify that all parts listed in the packing list are delivered and intact. If any parts are missing or damaged, do not install the product and contact support immediately.
Assembly Instructions
Follow these steps sequentially to assemble your pergola:
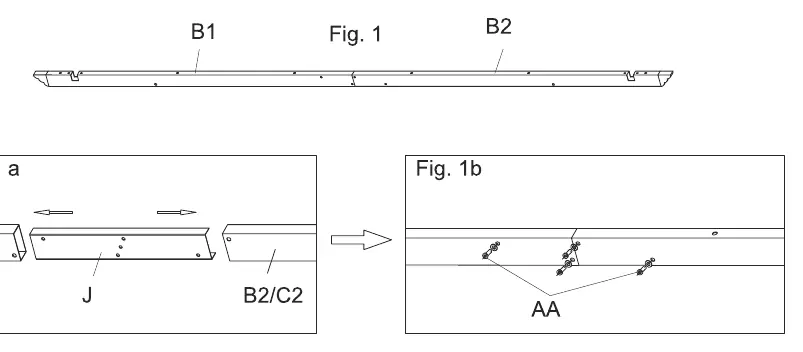
- Step 1: Assemble the cross beams using parts B1, B2, C1, C2, and J, securing them with bolts (AA).
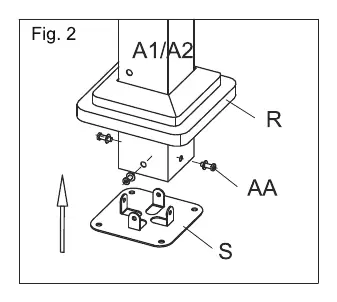
- Step 2: Attach the post decorations (R) and post hooves (S) to the posts (A1/A2) using bolts (AA).
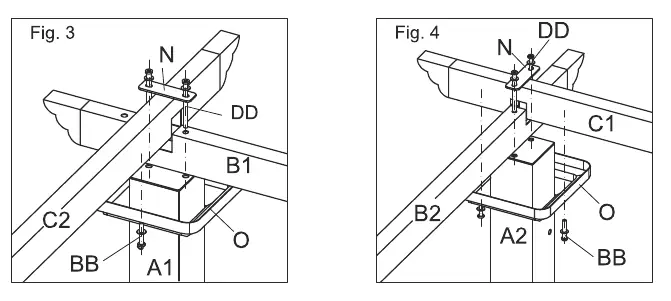
- Step 3: Connect the cross beams to the posts using connectors (N), brackets (O), and bolts (BB/DD).
- Step 4: Install corner supports (H1/H2) to the frame using bolts (AA) and secure the posts to the ground using anchors (FF).
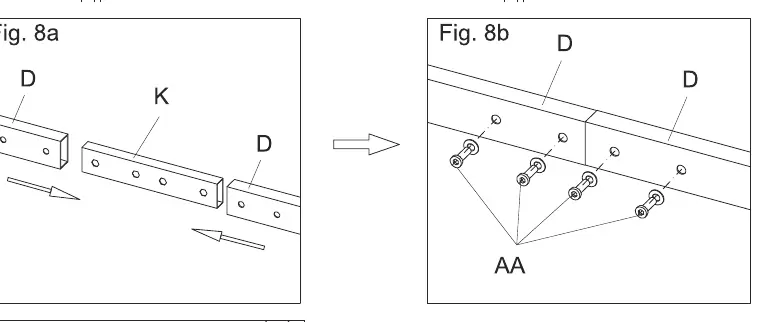
- Step 5: Install the roof tubes (D) across the frame using connectors (K) and bolts (AA/CC).
- Step 6: Attach the guide tubes (F) to the frame using brackets (G) and bolts (AA).
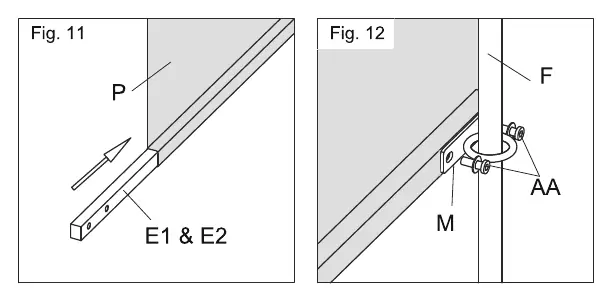
- Step 7: Install the shade fabric (P) onto the frame using pulling rods (E1/E2) and brackets (M).
- Step 8: Finalize the fabric installation by clicking the pulling rods (E1/E2) into place.
Manufacturer information
Wayfair LLC
Practical help
Common problems
Missing or damaged parts
Do not install the product. Contact customer support immediately via the provided email or text number.
High winds or extreme weather
Do not assemble or use the pergola. Always keep louvers open and secure the structure during heavy winds to avoid damage.
Unstable installation surface
The pergola is only suitable for plain cement walls or stable brickwork. If the surface shows cracks, consult a professional.
Before use
- Ensure 2-3 healthy adults are available for assembly.
- Verify all parts from the parts list are present and undamaged.
- Prepare necessary tools: drill, tape measure, screwdriver, and ladder.
- Ensure the installation surface is stable (cement or brick).
- Read all instructions thoroughly before starting.
Specs in practice
- M6x12 / M6x35 / M6x55 / M6x75
- Different lengths of bolts used for specific assembly steps.
Images and diagrams
- Steps 1-8 illustrate the sequential assembly of the frame, roof structure, and fabric shade.
- Figures 1-13 provide detailed views of bolt placement and component connections.
Model compatibility
- Suitable for installation on plain cement walls or stable brickwork only.

Manual page author
Emily Carter
User documentation editor
Prepares concise manual descriptions and highlights the most useful setup, operation, and maintenance information for readers.