Furniture / Sofas & Couches
Assembly Instructions for Latitude Run Metallo Sectional Sofa
Complete assembly and care guide for the Latitude Run Metallo sectional sofa. Includes step-by-step instructions for attaching legs, assembling cushions, and maintenance tips to keep your furniture in top condition.
Quick answers from the manual
Quick answer
- Assemble the sofa by attaching the plastic legs to the base using the provided washers, then place the seat and back cushions. Do not use power tools to avoid damaging the wood. p. 1, 2, 3, 4
Key actions
- Attach legs to the base p. 2, 7
- Place cushions p. 3, 8
- Connect sections p. 4, 9
Problems and fixes
Hardware is loose
Periodically check to make sure all connections are tight, Re-tighten if necessary.
p. 5, 10Maintenance and reset
- Clean with a soft brush p. 5, 10
Technical specifications
| Parameter | Value | Meaning | Pages |
|---|---|---|---|
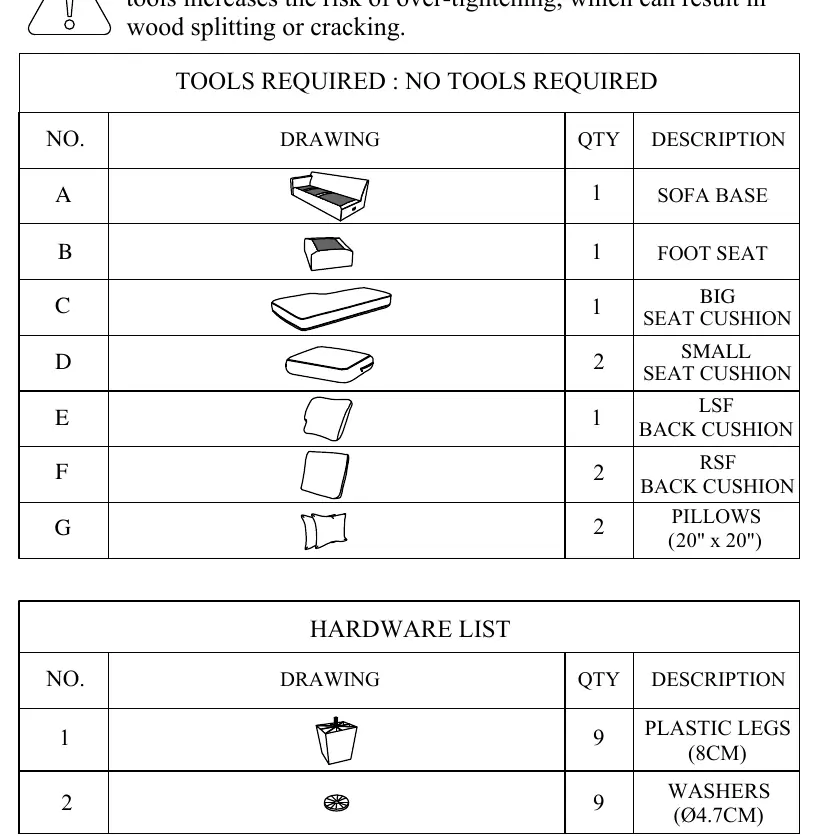
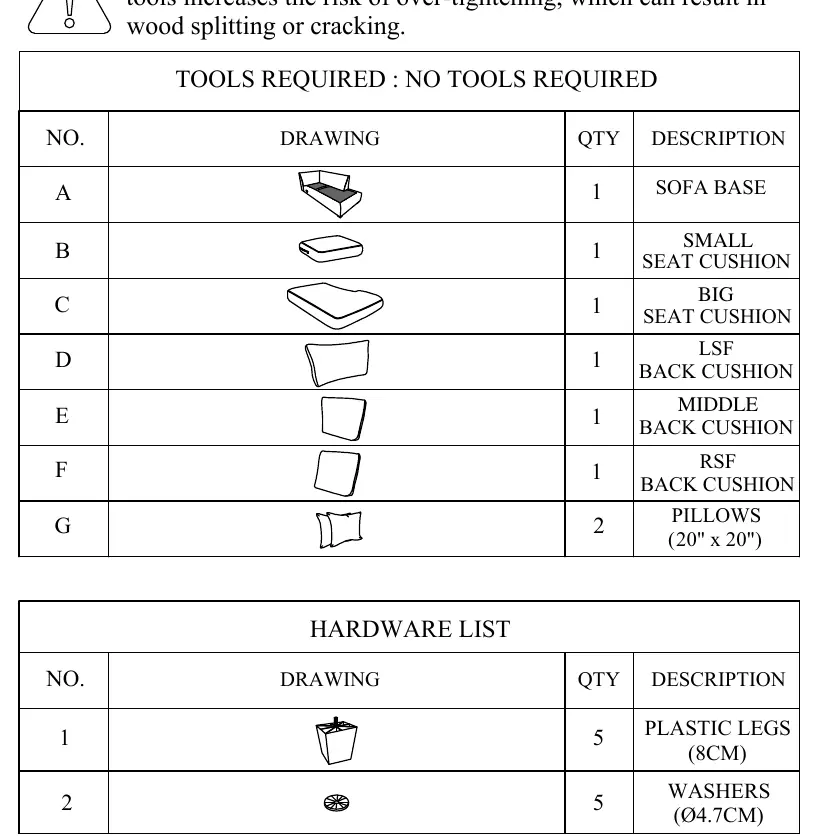
| Leg Height | 8cm | Height of the plastic legs. | p. 1, 6 |
| Washer Diameter | 4.7cm | Diameter of the washers. | p. 1, 6 |
Where to find it in the PDF
- Left Side Sofa Chaise Parts List p. 1
- Assembly Steps (Left Side) p. 2, 3, 4
- Right Side Corner Chaise Parts List p. 6
- Assembly Steps (Right Side) p. 7, 8, 9
- Care Instructions p. 5, 10
Table of contents
Manual images
Click an image to enlargeImportant Information
Before beginning assembly, please note that no power tools should be used. The use of power tools increases the risk of over-tightening, which can result in wood splitting or cracking. Ensure you have a clear, clean space to assemble your furniture.
Assembly Instructions
The assembly process is similar for both the Left Side Sofa Chaise and the Right Side Corner Chaise configurations. Follow these steps:
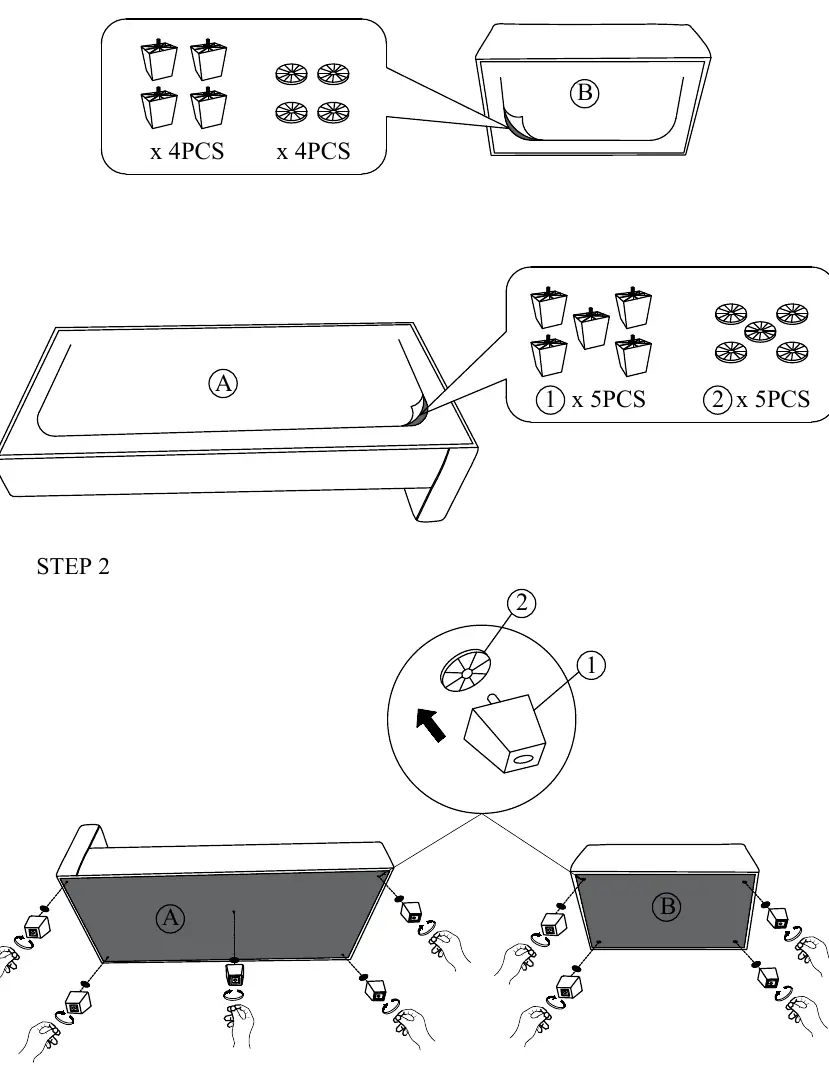
Step 1: Preparing the Base
Locate the sofa base (A). Turn the base over to access the bottom mounting points. Prepare the plastic legs (1) and washers (2).
Step 2: Attaching Legs
Attach the plastic legs (1) to the bottom of the sofa base (A) and foot seat (B). Ensure a washer (2) is placed between the leg and the base for each leg. Tighten securely by hand.
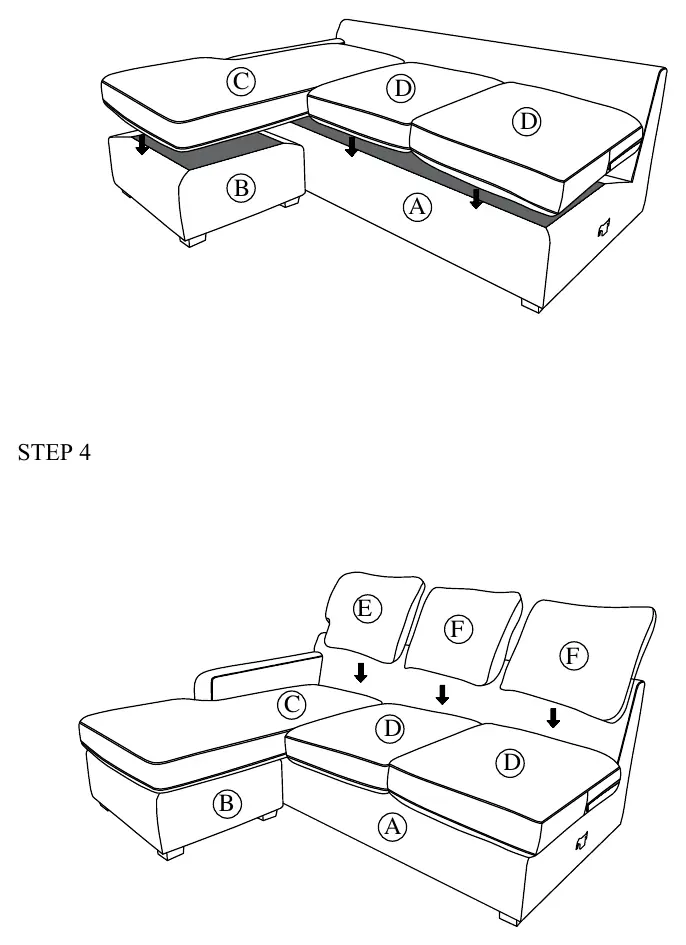
Step 3: Placing Cushions
Once the legs are attached, turn the base upright. Place the seat cushions (C, D) onto the sofa base (A) and foot seat (B) as indicated in the diagrams.
Step 4: Back Cushions and Pillows
Attach the back cushions (E, F) to the rear of the sofa base. Finally, place the decorative pillows (G) onto the sofa.
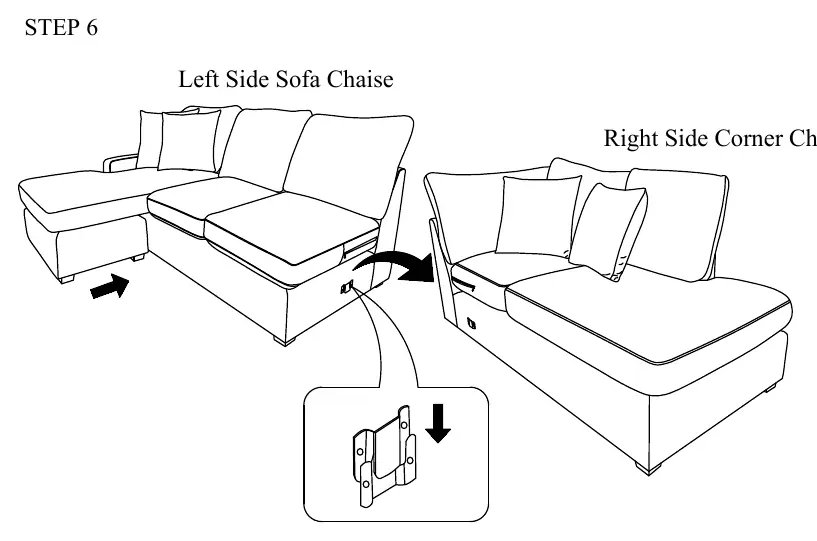
Step 5: Connecting Sections
If you are connecting multiple pieces, use the provided metal brackets to secure the sections together. Ensure all connections are tight.
Care and Maintenance
To maintain the original appearance of your Chenille & Corduroy furniture, follow these guidelines:
- Avoid direct exposure: Keep furniture away from direct sunlight, heating, and air conditioning outlets to prevent fading and damage.
- Placement: Do not place furniture too close to windows, radiators, or vents.
- Cleaning: Vacuum or wipe with a soft brush to remove dust.
- Hardware maintenance: Hardware may loosen over time. Periodically check to ensure all connections are tight and re-tighten if necessary.
- Floor protection: For items used on wooden floors, hard surfaces, or carpets, it is recommended to install protective pads under all legs and supports to prevent damage, scratches, and discoloration.
Manufacturer information
Wayfair LLC
Practical help
Common problems
Wood splitting or cracking
Do not use power tools for assembly. Tighten all hardware by hand.
Hardware loosening over time
Periodically check all connections and re-tighten if necessary.
Fabric fading or damage
Avoid placing furniture in direct sunlight or near heating/air conditioning outlets.
Before use
- Clear a large, clean area for assembly.
- Verify all parts listed in the parts list are present.
- Ensure you have the correct number of legs and washers.
- Do not use power tools.
- Consider using protective pads on the bottom of legs if placing on hard floors.
Specs in practice
- Washer Diameter
- 4.7cm diameter washers used for leg installation.
Images and diagrams
- Step 1 & 2: Shows the orientation of the sofa base and the correct placement of legs and washers.
- Step 3 & 4: Illustrates the placement of seat and back cushions onto the base.
- Step 6: Demonstrates how to connect the sofa sections using the metal brackets.
Model compatibility
- The instructions cover both Left Side Sofa Chaise and Right Side Corner Chaise configurations.
- Recommended for use on wooden floors, hard surfaces, or carpets with protective pads.

Manual page author
David Miller
Documentation analyst
Organizes user manual content into clear summaries, with attention to model details, product context, and everyday usability.