Computers / Mobile Computers
Zebra 2-Slot Charger Quick Reference Guide
Quick reference guide for the Zebra 2-Slot Charger. Includes setup, mounting instructions, charging procedures, and LED status indicators for the RS2100 scanner.
Quick answers from the manual
Quick answer
- The 2-Slot Charger is used to charge the RS2100 scanner. It connects via USB-C and can be mounted on a table or wall. p. 3, 4
Key actions
- Connect the charger to a power supply with a USB port rated for at least 1A using a USB-C to USB-A cable. p. 4
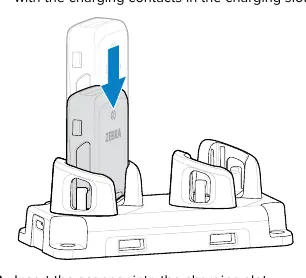
- Insert the scanner into the charging slot until the release tabs click into place. p. 7
First start
- Connect the USB-A end of the cable to the power supply, plug the power supply into an outlet, and connect the USB-C end to the charger. p. 4
Show 3 more answers Show less
Problems and fixes
Red blinking LED
Over temperature or bad battery.
p. 7Technical specifications
| Parameter | Value | Meaning | Pages |
|---|---|---|---|
| Max Operating Temperature | 40°C | Maximum ambient temperature for safe operation. | p. 8 |
Where to find it in the PDF
- Introduction and Features p. 3
- Connecting the Charger p. 4
- Mounting Instructions p. 5, 6
- Charging and LED Indicators p. 7
Table of contents
Manual images
Click an image to enlargeQuick guide from the manual
This guide provides instructions for the Zebra 2-Slot Charger (CRD-RS2X-2SCGH-01), designed for the RS2100 scanner. It covers setup, mounting, and charging procedures.
Features
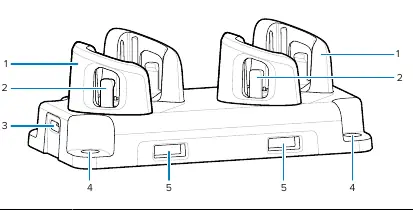
The charger features two charging slots, a USB-C port for power, and mounting holes for both screws and cable ties.
Connecting the Charger
Connect the charger to a power source using a USB-C to USB-A cable. The power supply must be rated for at least 1A. Zebra recommends using the AC Adapter (p/n PWR-WUA5V12W0XX).
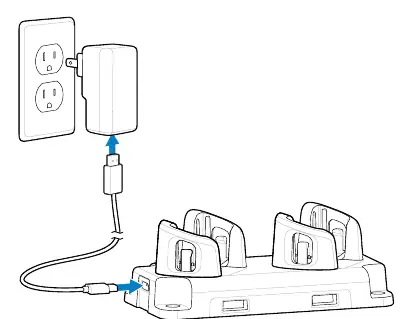
- Connect the USB-A end of the cable to the power supply.
- Connect the power supply to an outlet.
- Connect the USB-C end of the cable to the port in the charger.
Mounting
The charger can be placed on a tabletop or mounted to a vertical surface.
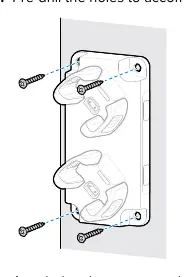
Mounting with Screws
Use four M5 screws at least 10 mm long. Mark the surface through the mounting holes, pre-drill, and attach the charger securely.
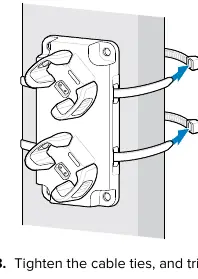
Mounting with Cable Ties
Use two cable ties (max 8 mm wide and 3 mm thick) to secure the charger to a narrow surface like a pole. Ensure the charger is mounted no more than 2 m above the floor.
Charging a Scanner
To charge the scanner, insert it into a charging slot until the release tabs click into place. The scanner will beep and the LED will indicate the status.
- Amber (solid): Charging (0–96%)
- Green (solid): Charged (97%)
- Red (blinking): Over temperature or bad battery
Manufacturer information
Zebra Technologies
Practical help
Common problems
Red blinking LED
Indicates over temperature or a bad battery.
Before use
- Verify you have a USB-C to USB-A cable.
- Ensure power supply is rated for at least 1A.
- Check that the scanner is an RS2100 model.
Show more Show less
Images and diagrams
- Figure 1 identifies the charging slots, slot tabs, USB-C port, and mounting holes.
- Figure 2 illustrates the connection path from the wall outlet to the charger.
Model compatibility
- Designed for RS2100 scanner.
- Requires Zebra approved power supply (e.g., PWR-WUA5V12W0XX).

Manual page author
Michael Turner
Technical manual editor