Garden / Playground Equipment
User Manual for ZIPRO Jump Pro 16FT IN Trampoline
Quick guide and assembly instructions for the ZIPRO Jump Pro 16FT IN trampoline. Includes safety rules, technical specifications, and maintenance tips.
Quick answers from the manual
Quick answer
- The ZIPRO Jump Pro 16FT IN is a recreational trampoline for outdoor home use. Assembly requires two adults and approximately 8 meters of free space. p. 17, 20
Key actions
- Assemble the frame and legs p. 4, 5, 6, 7
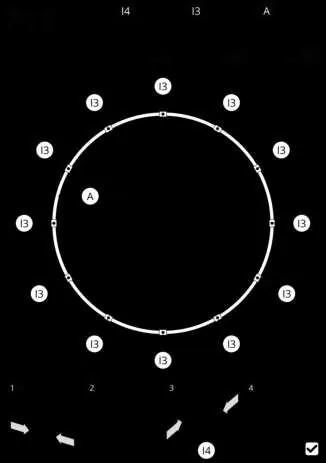
- Assemble the safety net p. 11, 12, 13, 14
First start
- Ensure the trampoline is on a flat surface, preferably grass. Check that all connections are tightened after assembly. p. 18, 21
Problems and fixes
Trampoline is unstable
Ensure it is on a flat surface and all connections are tightened.
p. 18, 21Technical specifications
| Parameter | Value | Meaning | Pages |
|---|---|---|---|
| Frame diameter | 496 cm | Size of the trampoline frame | p. 17, 20 |
| Maximum load | 150 kg | Maximum weight capacity | p. 17, 20 |
Where to find it in the PDF
- Assembly Instructions p. 3, 4, 5, 6
- Safety Rules p. 17, 20
Table of contents
Manual images
Click an image to enlargeQuick guide from the manual
The ZIPRO Jump Pro 16FT IN is a recreational trampoline designed for outdoor home use. Assembly requires two adults and approximately 8 meters of free space. Ensure the trampoline is placed on a flat, level surface, preferably on grass. Do not place the trampoline on hard surfaces like concrete, as this may damage the frame and void the warranty.
Safety rules
- One person at a time: Simultaneous use by multiple people increases the risk of collision and injury.
- No somersaults: Performing flips or somersaults is strictly prohibited as it can lead to serious injury or death.
- Entrance: Always close the entrance before jumping.
- Shoes: Remove shoes before entering the trampoline to prevent damage to the mat.
- Children: Children under 3 years old must not use the trampoline. Children must be supervised by an adult at all times.
- Environment: Keep the area within 2 meters of the trampoline free from electrical wires, branches, fences, and other garden toys.
Assembly instructions
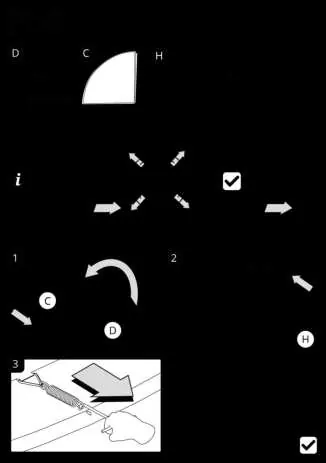
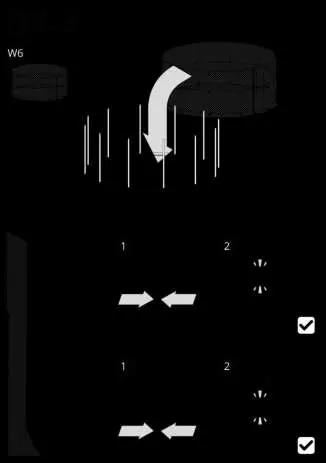
The assembly process involves building the frame, attaching the legs, installing the jumping mat with springs, and finally setting up the safety net and ladder. Follow the numbered diagrams in the manual (F.0 to F.7 for the frame, IN.0 to IN.5 for the safety net).

- Ensure all connections are properly tightened after assembly.
- Use the provided spring pulling tool (H) to attach the springs (D) to the mat (C) and frame (A).
- Do not use parts from sources other than the manufacturer.
Maintenance and care
- Check all connections regularly to ensure they remain tightened.
- The safety net should be replaced every 2 years.
- If the trampoline needs to be moved, it must be carried horizontally by at least 4 people.
- Protect the trampoline from water, moisture, wind, and extreme temperatures.
Technical data
- Frame diameter: 496 cm
- Total height: 260 cm
- Net height: 180 cm
- Mat distance from ground: 80 cm
- Maximum load: 150 kg
Warranty information
The product is covered by a 24-month warranty from the date of sale. The warranty covers hidden defects caused by the manufacturer's fault. To claim the warranty, you must present a valid, correctly completed warranty card and proof of purchase.
Practical help
Common problems
Trampoline is unstable
Ensure it is on a flat, level surface and check that all frame connections are properly tightened.
Clothing or jewelry getting caught
Avoid wearing loose clothing or jewelry while using the trampoline.
Mat damage
Remove shoes before entering and do not place sharp objects on the mat.
Before use
- Ensure the mat is dry
- Empty pockets of keys, phones, etc.
- Verify the entrance is closed
- Check that all connections are tightened
- Ensure no hazards (wires, branches) are within 2 meters
Specs in practice
- Frame diameter
- 496 cm
- Maximum load
- 150 kg
- Total height
- 260 cm
Images and diagrams
- F.0-F.7: Frame and leg assembly steps
- IN.0-IN.5: Safety net and ladder assembly steps
Model compatibility
- For domestic use only
- For outdoor use only
- Not for children under 3 years

Manual page author
David Miller
Documentation analyst
Organizes user manual content into clear summaries, with attention to model details, product context, and everyday usability.