Garden / Playground Equipment
User Manual for Bebe Stars 140cm Trampoline
Quick guide for the Bebe Stars 140cm trampoline. Includes assembly instructions, safety precautions, maintenance tips, and parts list for model 140CM.
Table of contents
Manual images
Click an image to enlargeImportant Information
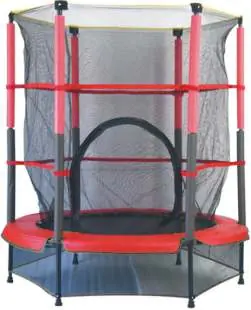
Before assembling the trampoline, ensure you have a clean, dry, and spacious area. It is essential that the installation site is completely flat and level; uneven ground can cause frame movement and stress, potentially damaging the product or causing injury. This trampoline is intended for children aged 3 to 6 years, with a maximum user weight of 80kg.
Safety Precautions
To minimize the risk of injury, strictly follow these safety rules:
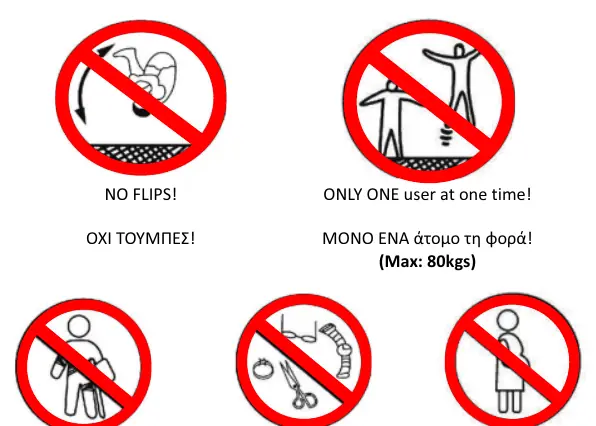
- No flips or somersaults: Landing on your head or neck can cause paralysis or death.
- One user at a time: Multiple users increase the risk of collision and injury.
- Clearance: Maintain a minimum clearance of 3m from the ground to the top and 2.4m on all sides.
- Preparation: Remove all hard and sharp objects before jumping.
- Prohibitions: Do not use if injured or pregnant.
- Supervision: Never leave the child unattended.
Parts List
Ensure all parts are present before starting assembly:
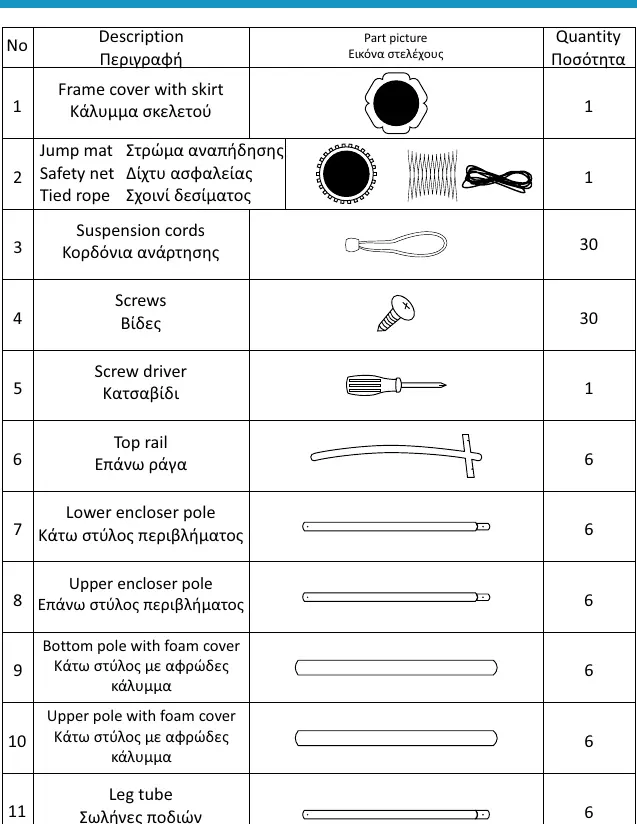
- Frame cover with skirt
- Jump mat, Safety net, and Tied rope
- 30 Suspension cords
- 30 Screws and 1 Screw driver
- 6 Top rails
- 6 Lower and 6 Upper enclosure poles
- 6 Bottom and 6 Upper poles with foam cover
- 6 Leg tubes
Assembly Instructions
The assembly process involves constructing the frame, attaching the mat, and installing the enclosure.
Frame and Mat Assembly
- Connect the 6 top rails to form a circle.
- Insert the 6 leg tubes into the sockets on the top rail frame and secure them with screws. Do not over-tighten.
- Turn the frame over so the legs point downward.
- Lay the jump mat in the center. Use the suspension cords to attach the mat to the frame. Always connect a cord, then switch to the opposite side to ensure even tension.
Enclosure Assembly
- Attach the pad cover over the suspension cords, aligning the openings with the pole sockets.
- Assemble the enclosure poles by inserting the upper pole into the lower pole and securing with screws.
- Insert the pole assemblies into the frame sockets.
- Attach the enclosure mesh to the poles using the nylon patches and hook-and-loop fasteners. Ensure the mesh hangs straight and is not twisted.
Cleaning & Maintenance
Regular maintenance is required to keep the trampoline safe:
- Cleaning: Use a soft wet cloth. Do not use aggressive detergents, alcohol, bleach, or abrasive particles. Wipe dry afterwards.
- Checks: At the beginning of each season and at regular intervals, check all nuts and bolts for tightness, inspect spring-loaded joints, and check for tears in the mat or padding.
- Storage: If weather conditions are poor, disassemble and store the trampoline. In winter, remove snow and store the mat and safety net indoors to prevent damage from low temperatures.
- Moving: If relocation is required, lift the frame horizontally with at least 4 people.
Manufacturer information
Bebe Stars by Gillis
Practical help
Common problems
Uneven ground
The site must be completely flat and level to prevent frame stress and potential injury.
Missing or damaged parts
Do not install or use the product if any parts are missing or damaged.
Weather damage
Disassemble and store the trampoline during bad weather or winter to protect parts from extreme temperatures and snow load.
Frame bending during transport
Avoid moving the assembled trampoline. If necessary, have at least 4 people lift the frame horizontally.
Before use
- Inspect legs for proper attachment or cracks.
- Inspect springs if loose or damaged.
- Inspect mat for tears or worn stitching.
- Inspect frame for sagging or cracks.
- Ensure all adhesive tapes, belts, buckles, and straps are properly fastened.
- Check that the enclosure mesh is securely attached and not twisted.
Specs in practice
- Maximum User Weight
- 80kg (Do not exceed).
- Safety Clearance
- 3m height clearance and 2.4m clearance on all sides.
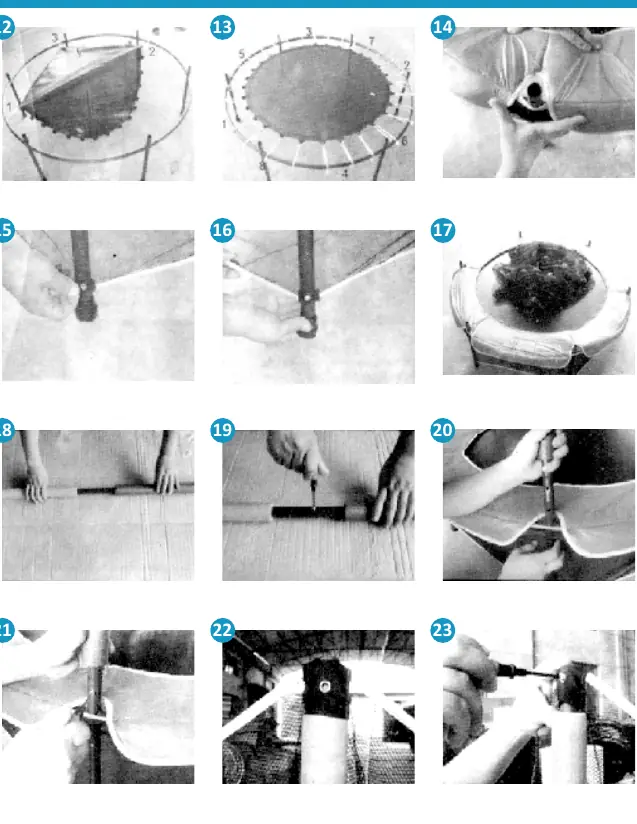
Images and diagrams
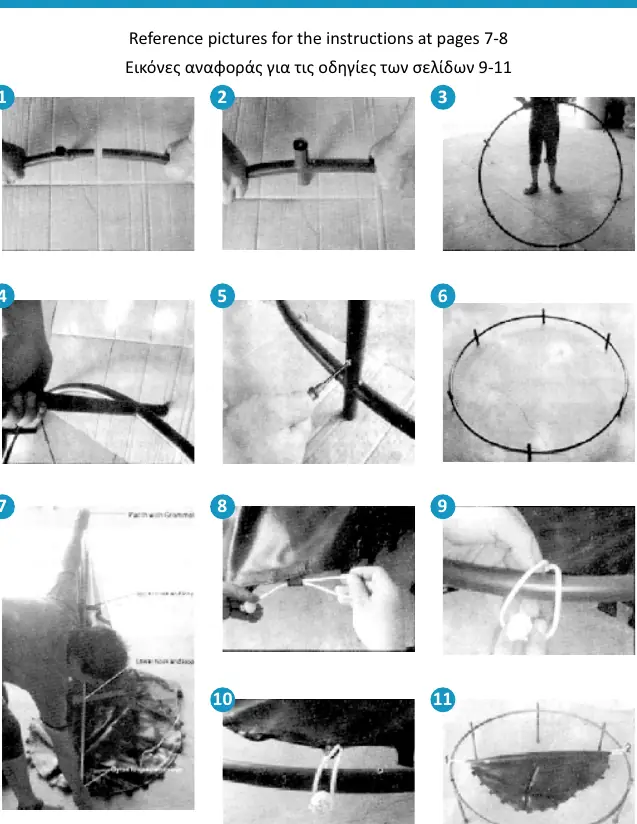
- Steps 1-3: Constructing the circular top rail frame.
- Steps 7-13: Attaching the jump mat using suspension cords in a cross-pattern to ensure even tension.
- Steps 18-21: Assembling and installing the enclosure poles into the frame sockets.
- Steps 22-25: Securing the safety net mesh to the enclosure poles.
Model compatibility
- Do not use any unauthorized parts with this trampoline.

Manual page author
Michael Turner
Technical manual editor
Reviews PDF manuals for structure, safety notes, and practical product details so readers can find the right information quickly.