Furniture / Chairs & Seating
Assembly Instructions for Costway 2-in-1 Climbing Triangle with Slide
Assembly guide for the Costway 2-in-1 Climbing Triangle with Slide. Includes safety warnings, parts list, and step-by-step installation instructions.
Quick answers from the manual
Quick answer
- The Costway 2-in-1 Climbing Triangle with Slide is a children's play structure that requires adult assembly. It must be used on a flat, stable surface under adult supervision. p. 2
Key actions
- Assemble the main frame components (A-E) using 10 screws (Q). p. 9
- Assemble the ladder sections (F, G, J and H, I, K) using screws (Q). p. 11, 12
First start
- Ensure the product is assembled on a flat, stable surface and that all parts are securely fastened. p. 2
Maintenance and reset
- Regularly check and maintain the most important parts, such as fasteners and anchors. p. 2
Where to find it in the PDF
- Safety Warnings p. 2
- Parts List p. 8
- Assembly Steps p. 9, 10, 11, 12
Table of contents
Quick guide from the manual
This document provides assembly instructions for the Costway 2-in-1 Climbing Triangle with Slide. The product is intended for home use only and requires assembly by an adult. Ensure the product is placed on a flat, stable surface and is regularly checked for maintenance.
Safety Warnings
- Age Restriction: Not suitable for children under 3 years.
- Supervision: Must be installed and used under adult supervision.
- Choking Hazard: Keep all small parts and packaging materials away from babies and children.
- Tipping Hazard: Lack of proper attachment may cause a risk of tipping or falling.
- Installation: Ensure all parts are correctly installed. Incorrect installation can lead to danger.
Parts List
The package includes various wooden components (A-M) and hardware (N-R). Before starting, remove all packaging, separate, and count all parts to ensure nothing is missing.
Assembly Instructions
Follow these steps to assemble the climbing triangle and slide:
Step 1
Assemble parts A, B, C, D, and E using 10 screws (Q).
Step 2 & 3
Insert nut (P) into parts (L) and (M). Ensure the "-" mark on the nut faces the straight edge of the part.
Step 4
Assemble parts F, G, and J using 10 screws (Q).
Step 5
Assemble parts H, I, and K using 10 screws (Q).
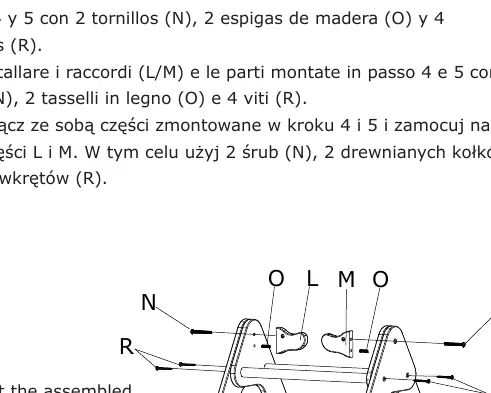
Step 6
Assemble fittings (L/M) and the parts completed in steps 4 and 5 using 2 screws (N), 2 wood dowels (O), and 4 screws (R).
Step 7
Put the assembled slide in place and use it with the climbing ladder.
Manufacturer information
Costway
Practical help
Common problems
Tipping or falling hazard
Ensure the product is placed on a flat, stable surface and check that all parts are correctly installed and maintained.
Choking hazard
Keep all small parts and packaging materials away from babies and children.
Before use
- Ensure assembly is performed under adult supervision.
- Verify all parts and hardware are present.
- Assemble near the area where the product will be used to avoid moving it after assembly.
- Ensure the installation surface is flat, steady, and stable.
- Regularly check and maintain important parts like fasteners and anchors.
Images and diagrams
- Steps 1-7 provide a visual sequence for connecting the wooden components using the provided screws and dowels.
- Pay attention to the orientation of nuts (P) in steps 2 and 3, where the "-" mark must face the straight edge of the part.
Model compatibility
- Product is for home use only.
- Not suitable for children under 3 years.

Manual page author
Michael Turner
Technical manual editor
Reviews PDF manuals for structure, safety notes, and practical product details so readers can find the right information quickly.