Power / USB Chargers
StarTech.com 10X-CHARGING-STATION 10-Port USB-C Charging Station
Quick guide for the StarTech.com 10X-CHARGING-STATION. Learn how to install, mount in a rack, connect devices, and understand LED status indicators for this 350W USB-C charging station.
Table of contents
Manual images
Click an image to enlargeQuick guide from the manual
This document provides essential instructions for the StarTech.com 10X-CHARGING-STATION. It covers the installation of the device in both desktop and rack-mount configurations, as well as operational guidelines regarding the Smart Power Allocation feature and LED status indicators.
Product Overview
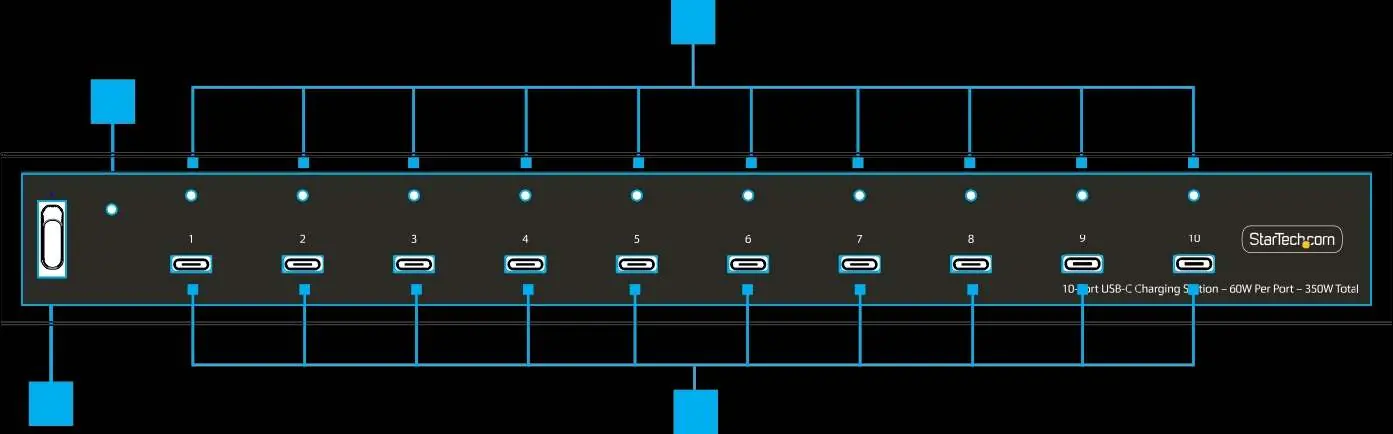
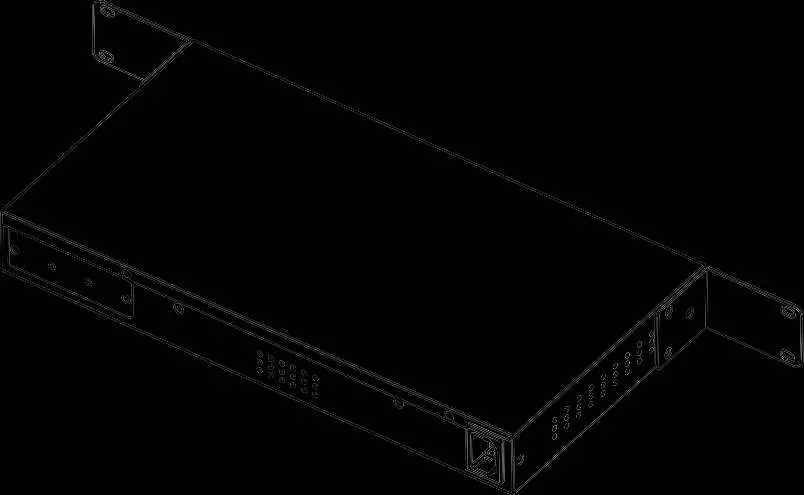
The charging station features 10 USB-C ports, each capable of delivering up to 60W. The total power budget for the unit is 350W. The front panel includes status LEDs for each port, while the rear panel contains the power input and ventilation outlets.
Smart Power Allocation
The device utilizes intelligent power allocation. When the total aggregate power draw reaches 350W, the ports with the lowest current consumption will be deactivated to prioritize devices requiring more power. Normal operation resumes automatically once the aggregate power requirements drop below 290W.
LED Status Indicators
- Blue (Solid): Slow charging.
- Blue (Slow Blink): Charging at less than 1A.
- Blue (Fast Blink): Charging at 1A or more.
- Red: The specific USB-C port has been disabled due to Smart Power Allocation or Overcurrent Protection (OCP). If the light remains red after a hot-plug connection, power cycle the unit using the power switch.
Installation
Desktop Installation
To use the device on a desktop, attach the included snap-on feet to the retention slots on the bottom of the unit. Ensure the rubber pads are attached to prevent sliding.
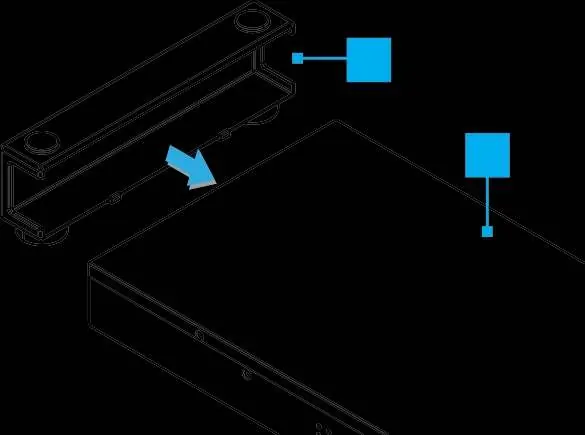
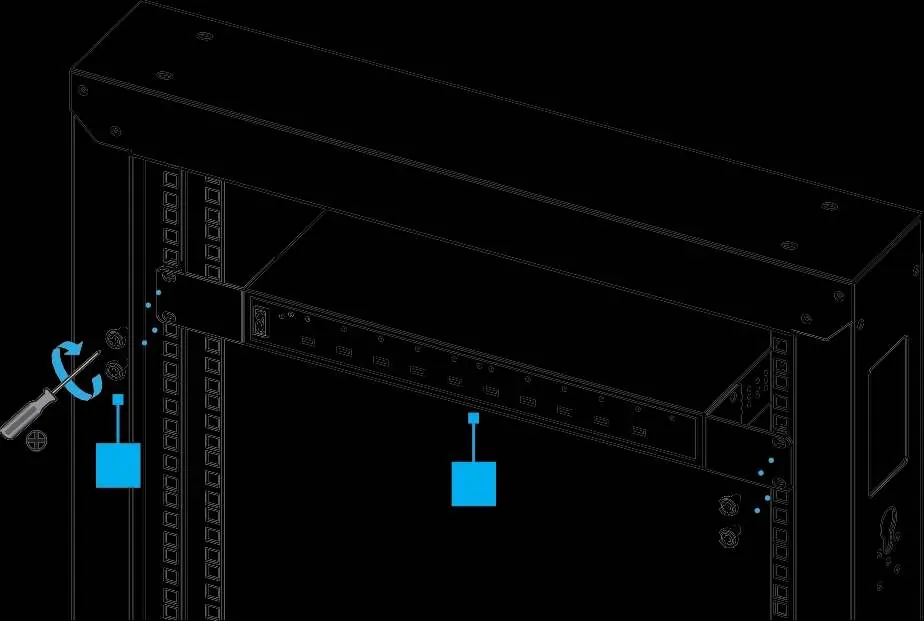
Rack Mounting
- Attach the rack-mount ears to the sides of the charging station using the provided M3x5mm screws and a PH1 Phillips screwdriver.
- Position the unit in the 19-inch rack.
- Secure the unit to the rack using the provided M5x12mm screws and a PH2 Phillips screwdriver. Use cage nuts if the rack columns do not have threaded holes.
Safety and Maintenance
- Ensure there is sufficient space around the ventilation holes to allow for heat dissipation and maintain safe internal temperatures.
- Never operate the product if parts are missing or damaged.
- Do not touch the product while connected to power if the circuit board or electrical cables are exposed.
- Consult the server rack manufacturer to determine the correct type and size of mounting holes.
Official resources from the manual
Practical help
Common problems
LED indicator is solid red
The port has been disabled due to OCP or Smart Power Allocation. Power cycle the charging station using the power switch.
Device not charging
Check if the total power draw has exceeded 350W. The unit may have disabled ports to prioritize other devices. Operation resumes when load drops below 290W.
Before use
- Verify all package contents: 10-port charger, 2 rack ears, 6 M3 screws, 4 M5 screws, 4 cage nuts, 2 snap-on feet, and power cable.
- Ensure you have a Phillips screwdriver (PH1 for M3 screws, PH2 for M5 screws).
- Check if your server rack has threaded M5 holes or requires cage nuts.
- Ensure adequate ventilation space around the unit.
Specs in practice
- Per Port Max
- 60W (20V/3A) maximum output per port.
Images and diagrams
- Front View: Identifies the 10 USB-C ports and their corresponding status LEDs.
- Isometric View: Shows the power input, ventilation holes, and mounting points.
- Rack Mount: Illustrates the attachment of rack ears and securing the unit to the rack.
Model compatibility
- Designed for 19-inch server racks or desktop use.

Manual page author
Emily Carter
User documentation editor
Prepares concise manual descriptions and highlights the most useful setup, operation, and maintenance information for readers.