Home / Weather Stations & Thermometers
Installation Guide for Acurite 11197-VN1HSPCB Temperature and Humidity Sensor
Step-by-step installation guide for replacing the temperature and humidity sensor in your Acurite 5-in-1 weather station. Includes compatibility checks and safety instructions.
Table of contents
Quick guide from the manual
This document provides instructions for replacing the temperature and humidity sensor module within an Acurite 5-in-1 Weather Sensor. Ensure you have a Phillips head screwdriver before beginning.
Compatibility and Requirements
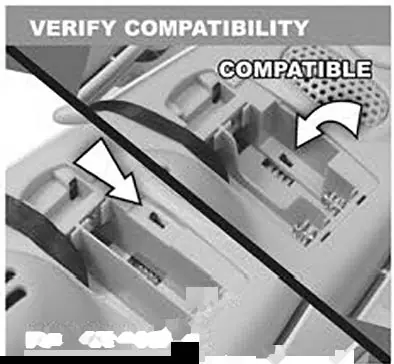
This replacement sensor is specifically designed for Acurite 5-in-1 Weather Sensors. It is not compatible with legacy 5-in-1 sensors. You can verify compatibility by checking the battery compartment for an A-B-C switch.
Installation Steps
- Prepare the device: Remove the batteries from the 5-in-1 sensor to prevent damage from electrostatic discharge.
- Open the housing: Remove the 4 outer screws and separate the upper and lower portions of the sensor.
- Access the sensor: Carefully remove the black cover and set it aside.
- Remove the old sensor: Unplug the old temperature and humidity sensor by grasping the base of its white plug and gently removing it. Discard the old sensor.
- Install the new sensor: Slide the new sensor into place. Hold the base of the white plug and gently plug it into the connector.
- Reassemble: Carefully reinstall the black cover, put the two halves of the sensor back together, and reinstall the four outer screws.
Safety and Disposal
Please dispose of old electronic parts in an environmentally safe way and in accordance with your local laws and regulations. If no local regulations exist, dispose of the old sensor in a waste bin for electronic devices or visit a local recycling center.
Manufacturer information
AcuRite
Practical help
Common problems
Sensor not compatible
Check for the A-B-C switch in the battery compartment. This replacement is not compatible with legacy 5-in-1 sensors.
Before use
- Ensure you have a Phillips head screwdriver.
- Remove batteries from the 5-in-1 sensor to prevent electrostatic discharge.
- Verify your 5-in-1 sensor is compatible (check for A-B-C switch).
Images and diagrams
- The installation involves opening the 5-in-1 sensor housing, unplugging the old sensor module, and connecting the new one.
Model compatibility
- Requires an Acurite 5-in-1 Weather Sensor.
- Not compatible with legacy 5-in-1 sensors.

Manual page author
David Miller
Documentation analyst
Organizes user manual content into clear summaries, with attention to model details, product context, and everyday usability.