Electronics / Monitors
AcuRite 02050CAUDI Weather Station Instruction Manual
Quick guide for the AcuRite 02050CAUDI weather station, covering sensor and display setup, calibration, backlight settings, and troubleshooting.
Table of contents
Manual images
Jump to the sectionQuick guide from the manual
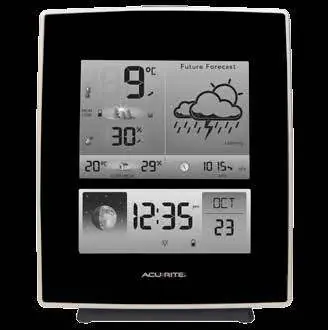
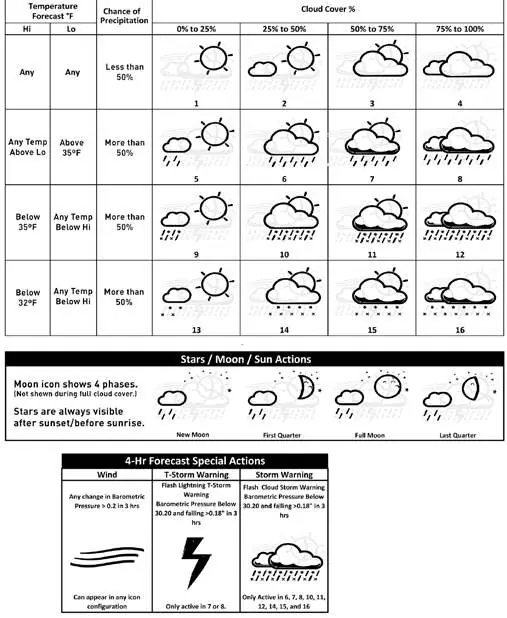
This document provides instructions for setting up and operating the AcuRite 02050CAUDI weather station. Key steps include matching the A-B-C switch on both the sensor and display unit, installing batteries, and allowing the system to synchronize. The device features a self-calibrating forecasting algorithm that requires 14 to 33 days to fully tune to your location.
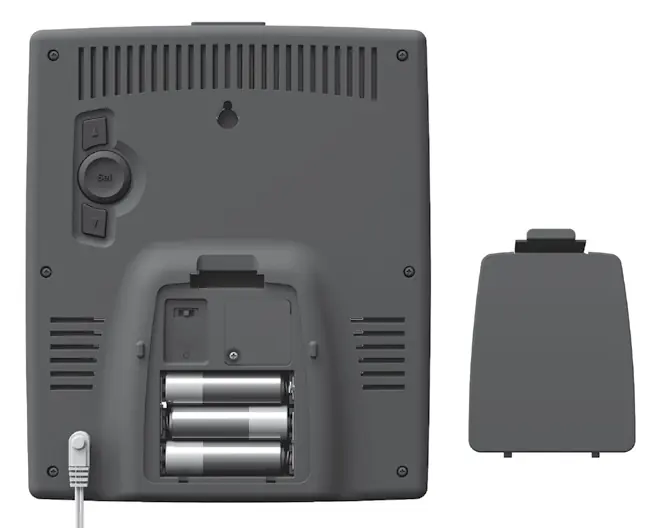
Sensor Setup
The outdoor sensor requires 2 AA batteries. For temperatures below -20°C (-4°F), use lithium batteries. Ensure the A-B-C switch inside the battery compartment matches the setting on the display unit.

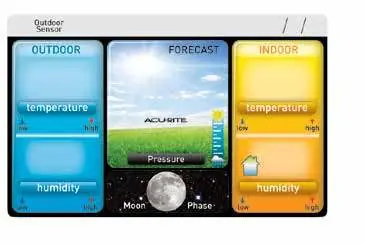
Display Unit Setup
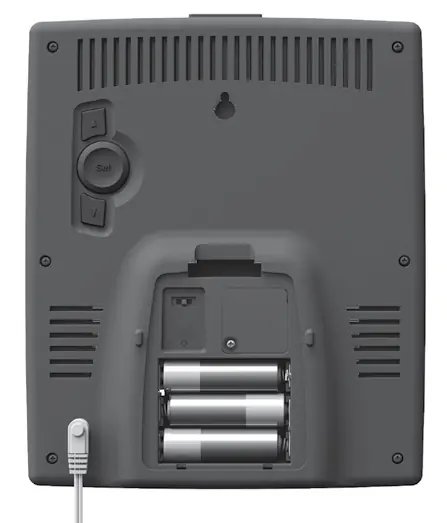
The display unit is powered by a 5V power adapter (recommended) with optional 3 AA batteries for backup. Set the A-B-C switch to match the sensor. The Intelli-Time clock is pre-programmed; you only need to select your time zone and daylight saving time preferences.
Calibration
You can manually calibrate indoor/outdoor temperature, humidity, and barometric pressure. To enter calibration mode, press and hold the appropriate buttons on the back of the display unit for 5-10 seconds. Adjust values using the arrow buttons and confirm with the SET button.
Display Backlight Settings
When using the power adapter, the backlight stays on at 100% brightness. You can manually dim it to 60% or 30%, or select AUTO DIM mode, which adjusts brightness based on the time of day (100% from 6:00 a.m. to 9:00 p.m., 30% from 9:01 p.m. to 5:59 a.m.).
Troubleshooting
If you experience no sensor reception, ensure units are within 100m (330ft) and away from electronics. If the outdoor temperature flashes, it indicates wireless interference; remove batteries from both units, ensure A-B-C switches match, and re-sync.
Care and Maintenance
Clean both the display and sensor with a soft, damp cloth. Avoid caustic cleaners or abrasives. Keep ventilation ports on the display unit clear of dust.
Manufacturer information
AcuRite
Practical help
Common problems
No outdoor sensor reception (no bars)
Relocate units within 100m (330ft), ensure they are at least 0.9m (3ft) away from electronics, and check battery type.
Outdoor temperature is flashing or showing dashes
Indicates wireless interference. Remove batteries from both units, verify A-B-C switch match, and re-sync for 20 minutes.
Inaccurate forecast
The unit requires up to 33 days of continuous operation to complete the Learning Mode calibration.
Before use
- Remove protective film from the LCD screen.
- Set the A-B-C switch to the same letter on both the sensor and display.
- Install 2 AA batteries in the sensor (lithium recommended for cold).
- Plug in the power adapter to the display unit.
- Install 3 AA backup batteries in the display (optional).
- Select time zone and DST preferences.
Specs in practice
- Wireless Range
- Up to 100m (330ft) depending on home construction materials.
- Operating Frequency
- 433 MHz.
- Data Reporting
- Outdoor updates every 16 seconds; indoor updates every 60 seconds.
Images and diagrams
- The A-B-C switch is located inside the battery compartments of both units and must be set to the same position for synchronization.
- The display unit back features buttons for setup (SET, up, down) and a reset button for factory defaults.
- The outdoor sensor includes an integrated hanger for easy placement.
Model compatibility
- Use lithium batteries in the sensor for temperatures below -20°C (-4°F).
- Do not use heavy-duty or rechargeable batteries.

Manual page author
Michael Turner
Technical manual editor
Reviews PDF manuals for structure, safety notes, and practical product details so readers can find the right information quickly.