Electronics / Monitors
AcuRite 13131A3 Atomic Alarm Clock Instruction Manual
Quick guide for the AcuRite 13131A3 Atomic Alarm Clock. Learn how to set up the clock, configure time and alarm settings, optimize atomic signal reception, and troubleshoot common issues.
Table of contents
Manual images
Jump to the sectionQuick guide from the manual
This document provides essential instructions for setting up and operating your AcuRite Atomic Alarm Clock. Key tasks include installing batteries, configuring time and alarm settings, and ensuring optimal placement for atomic signal reception. Please note that the atomic signal may take a few hours to synchronize; manual time setting is recommended immediately after powering on the device.
Clock Setup
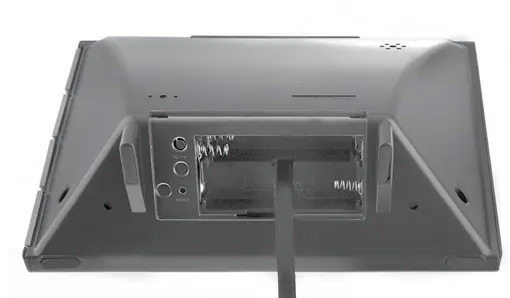
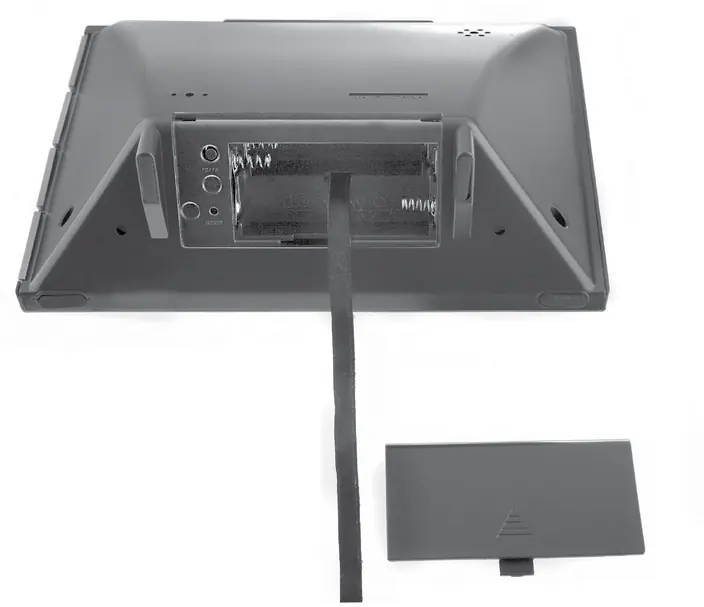
To set up the clock, remove the protective film from the LCD screen. Install 3 x AA alkaline batteries into the compartment on the back, ensuring correct polarity as indicated by the diagram. Replace the battery cover.
Atomic Clock
The clock uses a radio-controlled signal (RCC) from the NIST Radio Station WWVB to synchronize time and automatically update for Daylight Saving Time. For best signal reception, place the clock away from large metallic objects, thick walls, and electronic devices like TVs or microwaves. Reception is typically better at night and during clear weather.
Set the Time & Date
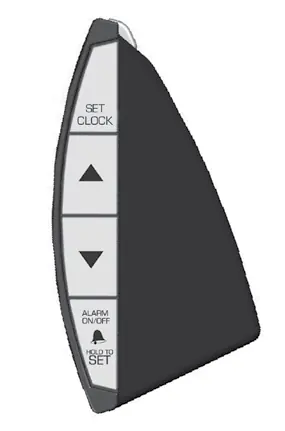
Press and hold the SET CLOCK button to enter SET MODE. Use the up and down arrow buttons to adjust flashing values. Press SET CLOCK to save and move to the next preference in this order: Time Zone, Auto DST (ON/OFF), Calendar Year, Month, Date, Hour, and Minute. The device will exit SET MODE automatically after 45 seconds of inactivity.
Using the Alarm Clock
To set the alarm time, press and hold the ALARM ON/OFF button for 5 seconds. Use the arrow buttons to adjust the hour and minute, pressing ALARM ON/OFF to confirm. To turn the alarm on or off, press and release the ALARM ON/OFF button until the alarm icon and status appear on the display. When the alarm sounds, press the SNOOZE/LIGHT button to activate the 8-minute snooze function.
Care & Maintenance
Clean the device with a soft, damp cloth. Avoid caustic cleaners or abrasives. Keep the unit free from dust, dirt, and moisture. Regularly clean ventilation ports with a gentle puff of air.
Troubleshooting
If the display is dark or hard to read, verify battery installation or replace them. For inaccurate temperature readings, ensure the clock is away from direct sunlight, heat sources, or vents. If the atomic signal fails to sync, check the placement guidelines or visit the NIST website for further information. A full factory reset can be performed using the RESET button in the battery compartment.
Manufacturer information
AcuRite
Practical help
Common problems
Clock display is dark or unresponsive
Verify batteries are installed correctly, replace with fresh alkaline batteries, or press the RESET button.
Inaccurate temperature reading
Ensure the clock is placed away from direct sunlight, heat sources, or air vents.
Atomic signal not syncing
Move the unit away from large metallic items, thick walls, and electronic devices (TVs, computers, microwaves).
Before use
- Remove protective film from the LCD screen.
- Install 3 x AA alkaline batteries following the polarity diagram.
- Place the unit away from heat sources and direct sunlight.
- Ensure the unit is at least 3 feet away from other electronic devices.
- Manually set the time and date after initial power-up.
Specs in practice
- Temperature Range
- 32°F to 99°F (0°C to 37°C).
Images and diagrams
- The front panel displays time, date, day of the week, indoor temperature, and atomic signal strength.
- Side buttons control clock settings, alarm toggling, and temperature units (C/F).
- The battery compartment contains the RESET button for factory defaults.
Model compatibility
- Compatible with standard 3 x AA alkaline batteries.
- Do not use rechargeable batteries.
- Designed for indoor use only.

Manual page author
Emily Carter
User documentation editor
Prepares concise manual descriptions and highlights the most useful setup, operation, and maintenance information for readers.