Home / Weather Stations & Thermometers
User Manual for Acurite 01194L Wireless Charging Forecaster
Quick setup guide and user manual for the Acurite 01194L Wireless Charging Forecaster. Learn how to install the outdoor sensor, configure display settings, use the weather forecast learning mode, and troubleshoot common issues.
Table of contents
Manual images
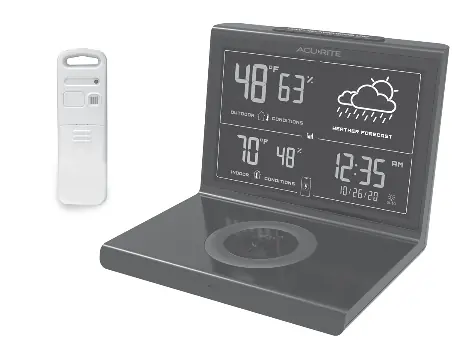
Click an image to enlargeQuick Start Guide
Follow these steps to set up your weather station:
- Install Sensor Batteries: Insert batteries into the outdoor sensor.
- Power the Display: Plug the display into a power outlet using the provided power adapter. Installing backup batteries is optional but recommended.
- Configure Settings: Use the arrow buttons to adjust settings and press SET to save and proceed. You can configure the clock (hour/minute), date (month/day/year), and units (F/C).
- Place Sensor Outside: Hang the sensor in a suitable location, such as a tree branch, using the integrated hanger. Ensure it is at least 5 feet (1.5 meters) off the ground, away from direct sunlight, and away from humidity sources. The sensor must be within 165 feet (50 meters) of the display.
Weather Forecast Learning Mode
The device features a self-calibrating forecast algorithm that analyzes pressure changes over time to determine your altitude. After 14 days, the self-calibrated pressure is tuned to your specific location, providing superior weather prediction.
Alarm Clock
To set the alarm:
- Press and hold the ALARM button until the alarm time flashes.
- Adjust the hour and minute using the up/down arrows, then press SET to save.
To turn the alarm on or off, press the ALARM button once. When the alarm is active, the screen will flash the currently set alarm time for 3 seconds.
Display Brightness
Press the SNOOZE / LIGHT button to adjust the brightness of the screen or to set it to auto-dimming at night.
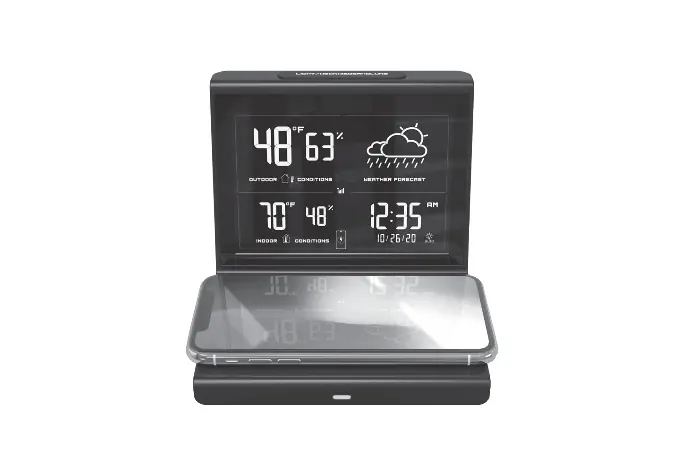
Wireless Charging
This device includes a Qi-certified wireless charging pad. To charge your phone or smartwatch, place the device on the charging pad with the charging area aligned. A charging icon will appear on the weather display. Note: The weather display must be powered by the power adapter to enable wireless charging.
Troubleshooting
If you encounter issues, check the following:
- No outdoor data on display: Ensure the sensor is powered on and within 165 feet (50 meters) of the display. Check for interference from building materials.
- Time, date, or units need adjustment: Press the SET button at any time and use the up/down arrows to adjust. Press SET to toggle to the next setting. If no buttons are pressed for 8 seconds, the display will save and exit the setting mode.
- Phone or smartwatch not charging: Ensure the display is powered by the power adapter (not just backup batteries). Verify the charging area of your device is aligned with the wireless charging pad.
Manufacturer information
AcuRite
Practical help
Common problems
No outdoor data on display
Ensure the sensor is powered on and within 165 feet (50 meters) of the display. Check for interference from building materials.
Phone or smartwatch not charging
Ensure the display is connected to the power adapter. Verify the device is properly aligned on the wireless charging pad.
Incorrect time, date, or units
Press the SET button to enter configuration mode and use the arrow buttons to adjust settings.
Before use
- Install batteries in the outdoor sensor.
- Plug the display into a power outlet using the power adapter.
- Install backup batteries in the display (optional).
- Place the sensor outside, at least 5 feet (1.5 meters) off the ground.
- Ensure the sensor is within 165 feet (50 meters) of the display.
Specs in practice
- Wireless Range
- 165 feet (50 meters) maximum distance between sensor and display.
- Sensor Height
- Must be at least 5 feet (1.5 meters) off the ground.
- Learning Mode
- 14-day period required for the device to calibrate pressure and altitude.
Images and diagrams
- The diagram illustrates the sensor placement, showing it should be at least 5 feet (1.5 meters) off the ground and within 165 feet (50 meters) of the display unit.
Model compatibility
- Wireless charging requires the display to be powered by the AC power adapter.
- The device is Qi-certified for wireless charging.

Manual page author
Michael Turner
Technical manual editor
Reviews PDF manuals for structure, safety notes, and practical product details so readers can find the right information quickly.