Home / Weather Stations & Thermometers
Acurite 00986M Digital Refrigerator/Freezer Thermometer
Quick guide for the Acurite 00986M Digital Refrigerator/Freezer Thermometer. Learn how to install batteries, set up sensors, configure programmable alarms, and troubleshoot common connectivity or temperature issues.
Table of contents
Manual images
Click an image to enlargeQuick guide from the manual
This guide provides essential instructions for setting up and operating your Acurite 00986M Digital Refrigerator/Freezer Thermometer. The system includes a display unit and two wireless sensors designed to monitor temperatures in your refrigerator and freezer. Ensure you remove the protective film from the LCD screen before use.
Package Contents
- 1 Display unit
- 2 Wireless sensors
- Instruction manual
Setup and Battery Installation
AcuRite recommends high-quality alkaline batteries for optimal performance. Do not use heavy-duty or rechargeable batteries.
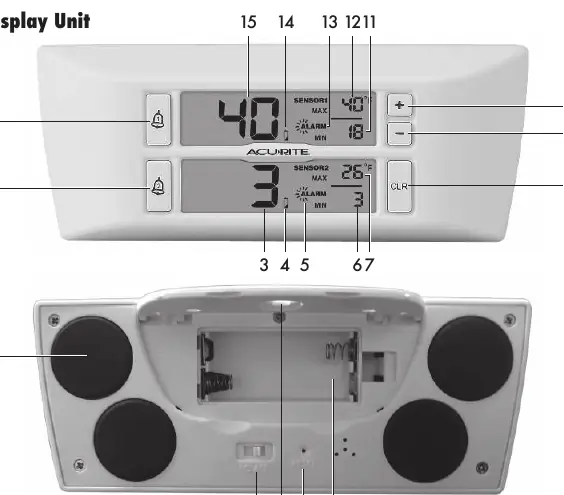
Display Unit
- Lift the battery door and slide off the cover.
- Insert 2 x AAA batteries, following the polarity (+/-) diagram.
- Replace the cover.
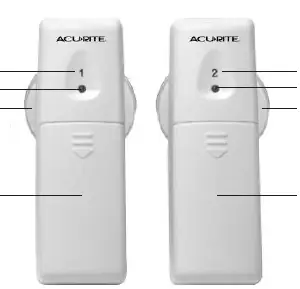
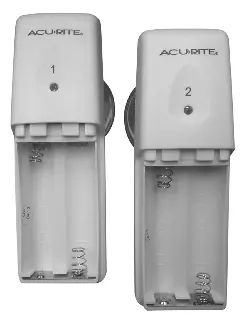
Sensors
- Slide off the battery compartment covers on the front of the units.
- Insert 2 x AA batteries, following the polarity (+/-) diagram.
- Replace the covers.
Note: For freezer temperatures below -4°F (-20°C), use lithium batteries in the freezer sensor to ensure proper function.
Temperature Units
To switch between Fahrenheit (°F) and Celsius (°C), slide the switch located on the back of the thermometer display.
Placement Guidelines
The display unit and sensors must be located within 75 ft (23 m) of each other. The display unit is magnet-mountable or can be hung using the keyhole on the back.
Sensor Placement:
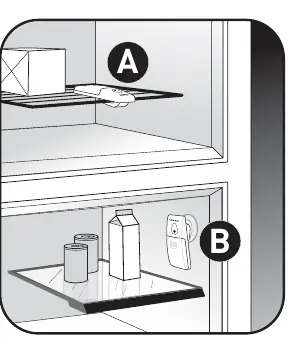
- Sensor #1: Recommended for the refrigerator.
- Sensor #2: Recommended for the freezer.
- Each sensor features a spring-action clip for attaching to wire or glass shelves.
- Each sensor includes a detachable suction cup for interior surfaces. Note that suction cups do not adhere well to freezing surfaces.
Using the Thermometer
High & Low Records
The device records the highest and lowest temperatures since the last reset. To clear these records, press the CLR button once.
Programmable Alarms
You can set audible and visual alarms for when temperatures exceed your preset range. An alert triggers if the temperature is out of range for longer than 15 minutes.
- Press and HOLD the alarm button (bell icon) until the current temperature disappears and the maximum alarm setting appears.
- Use the + or - buttons to adjust the maximum temperature.
- Press the alarm button to confirm. The unit will beep, and the minimum temperature setting will appear.
- Use the + or - buttons to adjust the minimum temperature.
- Press the alarm button to confirm.
- Press the alarm button again to turn the alarm ON/OFF. The alarm icon on the display indicates the alarm is active.
Repeat these steps for the second sensor using the corresponding alarm button.
Troubleshooting
- Temperature showing E or dashes: This indicates wireless interference. Bring all units together, remove all batteries, and reinstall them in order: display unit first, then sensor #1, then sensor #2.
- Inaccurate temperature: Ensure you are using standard alkaline batteries (or lithium for extreme cold). Do not use heavy-duty or rechargeable batteries.
- Display screen not working: Check battery installation or press the RESET button on the back of the display.
- Current Temperature reads -H- or -L-: Verify the temperature is within the measurable range of -40°F to 100°F (-40°C to 37°C).
Specifications
- Temperature Range: -40°F to 100°F (-40°C to 37°C)
- Wireless Range: 75 ft (23 m)
- Wireless Frequency: 433 MHz
- Data Reporting: Updates every 120 seconds
Care & Maintenance
Clean the device with a soft, damp cloth. Do not use caustic cleaners or abrasives.
Manufacturer information
AcuRite
Practical help
Common problems
Temperature showing E or dashes
Relocate units within 75ft. Perform a hard reset: bring all units together, remove all batteries, and reinstall in order (display, sensor 1, sensor 2).
Inaccurate temperature readings
Use standard alkaline batteries. Use lithium batteries for freezer sensors if temperatures drop below -4°F (-20°C). Avoid heavy-duty or rechargeable batteries.
Display screen not working
Check battery installation or press the RESET button on the back of the display unit.
Current Temperature reads -H- or -L-
Verify the temperature is within the measurable range of -40°F to 100°F (-40°C to 37°C).
Before use
- Remove protective film from the LCD screen.
- Install 2x AAA batteries in the display unit.
- Install 2x AA batteries in each sensor.
- Select temperature units (Celsius/Fahrenheit) using the switch on the back.
- Place sensors in the refrigerator and freezer.
- Ensure units are within 75 ft (23 m) of each other.
Specs in practice
- Temperature Range
- -40°F to 100°F (-40°C to 37°C).
- Wireless Range
- 75 ft (23 m), though signal may be impacted by location.
- Data Reporting
- The system updates temperature data every 120 seconds.
Images and diagrams
- Sensor #1 is typically for the refrigerator, Sensor #2 for the freezer.
- Sensors feature a spring-action clip for shelves and a detachable suction cup for interior surfaces.
Model compatibility
- Suction cups do not adhere well to freezing surfaces.
- Use lithium batteries for freezer sensors if temperatures drop below -4°F (-20°C).

Manual page author
Michael Turner
Technical manual editor
Reviews PDF manuals for structure, safety notes, and practical product details so readers can find the right information quickly.