Home / Weather Stations & Thermometers
User Manual for Acurite 01193M Wireless Charging Forecaster
Quick setup and operation guide for the Acurite 01193M Wireless Charging Forecaster. Learn how to install the sensor, configure display settings, use the alarm clock, and troubleshoot wireless charging issues.
Table of contents
Manual images
Click an image to enlargeQuick Setup Guide
To get your Acurite 01193M Wireless Charging Forecaster up and running, follow these steps:

- Install Sensor Batteries: Insert batteries into the outdoor sensor.
- Power the Display: Plug the display into a wall outlet using the included power adapter. Installing backup batteries (optional) is recommended.
- Configure Settings: Use the arrow buttons to adjust settings and the SET button to save and advance.
- Place Sensor: Mount the sensor outdoors in a suitable location.
Sensor Installation
The outdoor sensor should be placed in a location that ensures accurate readings:
- Mount at least 5 feet (1.5 meters) off the ground.
- Keep out of direct sunlight.
- Avoid proximity to heat and humidity sources.
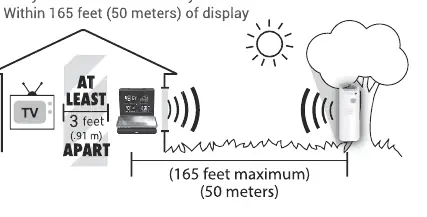
- Ensure the location is within 165 feet (50 meters) of the display unit.
Display Settings
You can configure the display settings at any time by pressing the SET button. Use the arrow buttons to change values and press SET to save and continue to the next setting. Configurable options include:
- Clock Hour/Minute
- Month/Day/Year
- Units Preference (F/C)
Weather Forecast Learning Mode
The device features a self-calibrating forecast algorithm. It analyzes changes in pressure over time to determine your altitude. After 14 days, the self-calibrated pressure is tuned to your location, providing superior weather prediction.
Alarm Clock
- Set Alarm: Press and hold the ALARM button until the alarm time flashes. Adjust the hour and minute using the up/down arrows, then press SET to save.
- Turn Alarm On/Off: Press the ALARM button once to toggle the alarm. When turned on, the screen will flash the currently set alarm time for 3 seconds.
Display Brightness
Press the SNOOZE / LIGHT button to adjust the brightness of the screen. This button also allows you to set the display to auto-dimming mode at night.
Wireless Charging
This weather station includes a Qi-certified wireless charging pad for compatible phones and smartwatches. To use this feature, the display must be powered by the included power adapter. Place your device on the charging pad, aligning it properly. A charging icon will appear on the weather display when charging is active.
Troubleshooting
- No outdoor data on display: Verify the sensor is powered on and within the 165 feet (50 meters) range. Check for environmental interference.
- Time/Date/Units need adjustment: Press the SET button at any time to enter the settings menu.
- Phone/Smartwatch not charging: Ensure the display is powered by the power adapter (wireless charging does not work on battery power alone). Verify the device is properly aligned on the charging pad and is compatible with Qi wireless charging.
Manufacturer information
AcuRite
Practical help
Common problems
No outdoor data on display
Ensure the sensor is powered on and within 165 feet (50 meters) of the display. Check for environmental obstructions.
Phone or smartwatch not charging
Ensure the display is connected to the power adapter. Wireless charging does not function on battery power alone. Verify the device is aligned correctly on the pad.
Before use
- 2x AA batteries for the outdoor sensor
- Power adapter (included) for the display
- 2x AA batteries for display backup (optional)
- Suitable outdoor location (out of direct sunlight and heat sources)
Specs in practice
- Wireless Charging
- Qi-certified pad for compatible devices; requires AC power adapter.
- Learning Mode
- 14-day calibration period for pressure and altitude to improve forecast accuracy.
- Transmission Range
- Maximum 165 feet (50 meters) between sensor and display.
Images and diagrams
- The sensor placement diagram indicates the sensor should be at least 5 feet (1.5 meters) off the ground.
- The diagram illustrates the maximum transmission range of 165 feet (50 meters) between the sensor and the display.
Model compatibility
- Wireless charging is only compatible with Qi-certified devices.
- Display must be plugged into a wall outlet for wireless charging to function.

Manual page author
Emily Carter
User documentation editor
Prepares concise manual descriptions and highlights the most useful setup, operation, and maintenance information for readers.