Home Appliances / Cookers & Ranges
User Manual for AGA R3 100-4h Twin Dome Cooker
Comprehensive user guide for the AGA R3 100-4h Twin Dome electric cooker. Includes operating instructions, cooking guidance, cleaning, maintenance, and installation requirements.
Table of contents
Manual images
Click an image to enlargeQuick Guide from the Manual
The AGA R3 100-4h is a fully electric heat storage appliance. It requires two 13 amp electrical connections. The cooker is designed to be left at cooking temperature 24 hours a day for optimal performance, though individual zones can be turned off or set to 'e' mode to save energy.
- Warm-up times: Roast oven (2h 10m), Bake/Simmer oven (2h), Boiling plate (40m), Simmer plate (20m).
- Safety: Keep children away from hot surfaces. Do not use steam cleaners. Always supervise cooking with fat or oil.
- First use: Odours and condensation are normal during the first few hours as insulation dries out; open windows to ventilate.
Overview
The cooker features multiple cooking zones:
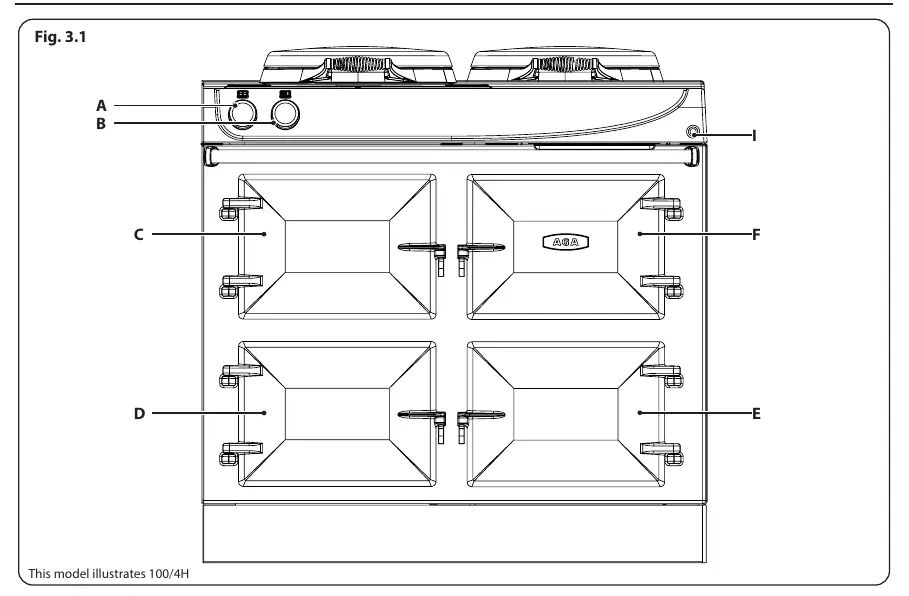
- Top Oven: Roast oven (cast iron).
- Lower Oven: Bake/Simmer oven.
- Warming Oven: For keeping food warm.
- Grill: High-speed infrared grill.
- Hotplates: Boiling plate (hottest) and Simmering plate.
Operation
The R3 offers flexibility by allowing individual control of ovens and hotplates. The 'e' setting reduces the Roast oven to a low bake temperature and the lower oven to a simmer, reducing energy consumption. The heating up time from 'e' setting to full temperature is approximately 1 hour.
Ovens
The upper Roast oven is cast iron and requires seasoning. The lower Bake/Simmer and Warming ovens are enamelled. Food should not be placed in ovens until they reach operating temperature. Use the cold plain shelf in the Roast oven to deflect heat if food is browning too quickly.
Hotplates
The hotplates are operated manually. The boiling plate is used for high-heat tasks like boiling and stir-frying. The simmering plate is used for lower-heat tasks like sauces, scrambling eggs, or slow frying. Do not place items directly on the insulated covers.
Cleaning & Maintenance
Cast iron surfaces (Roast oven and hotplates) must be kept dry and seasoned regularly with vegetable oil to prevent oxidation. Use the supplied wire brush to remove burnt-on debris. Enamelled surfaces should be cleaned with a damp, soapy cloth. Do not use abrasive pads, caustic cleaners, or steam cleaners.
Installation
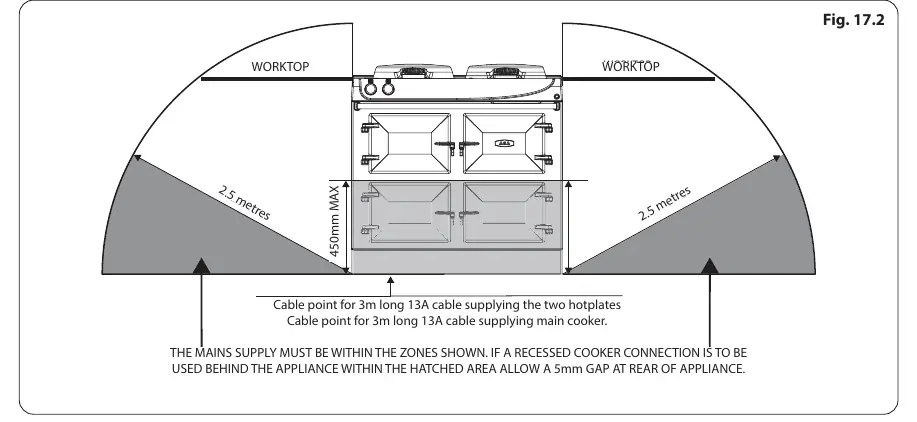
Installation must be performed by a qualified engineer. The appliance requires two 13 amp 230V ~ 50Hz fused electrical supplies. Ensure adequate ventilation and maintain required clearances from walls and cabinets. The appliance must be earthed.

Practical help
Common problems
Odour during first use
Normal, caused by protective oil burning off. Open kitchen windows to ventilate.
Condensation on top/front plate
Normal during heat-up as insulation dries. Wipe away immediately to prevent enamel staining.
Oven rusting
Cast iron oxidizes if moisture is left. Ensure surfaces are dried and seasoned regularly with vegetable oil.
Grill not working
Ensure the grill door is kept open when the grill is on. Power is cut to the ovens when the grill is in use.
Before use
- Ensure the kitchen is well ventilated
- Verify electrical installation is performed by a qualified engineer
- Season all cast iron surfaces (ovens and hotplates)
- Remove all packaging
- Check that the base/hearth is level and can support the weight (310 kg)
Specs in practice
- Electrical Supply
- Requires two separate 13 amp 230V ~ 50Hz fused supplies.
- Roast Oven Warm-up
- Approximately 2 hours 10 minutes from cold.
- Boiling Plate Warm-up
- Approximately 40 minutes from cold.
- Simmer Plate Warm-up
- Approximately 20 minutes from cold.
Images and diagrams
- Fig 3.1: Overview of controls, ovens, and hotplates.
- Fig 17.2: Electrical connection zones and cable routing requirements.
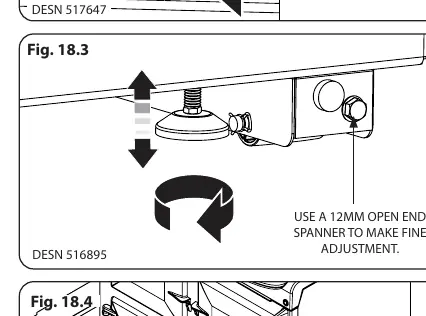
- Fig 18.3: Levelling and wheel adjustment procedure using a 12mm socket.
- Fig 19.2: Handrail installation and locking with grub screws.
Model compatibility
- Requires two 13 amp connections.
- Not compatible with external timers not approved by AGA.
- Do not install behind a decorative door.

Manual page author
Emily Carter
User documentation editor
Prepares concise manual descriptions and highlights the most useful setup, operation, and maintenance information for readers.