Garden / Garden Structures
Aivituvin 105-ZJ Garden Shed Assembly Manual
Comprehensive assembly guide for the Aivituvin 105-ZJ garden shed. Includes hardware lists, step-by-step installation instructions, and safety guidelines for proper setup.
Table of contents
Manual images
Click an image to enlargeQuick guide from the manual
This manual provides instructions for the assembly of the Aivituvin 105-ZJ garden shed. Assembly is estimated to take 45 minutes and is recommended to be performed by two people. Ensure you have a Phillips screwdriver and a drill (recommended) before starting.
Safety and maintenance
- Firmly tighten all bolts, screws, and knobs before use.
- Check all bolts, screws, and knobs every 90 days to ensure they remain secure.
- During assembly, fasten screws loosely at first. Do not fully tighten until the entire unit is assembled.
- Do not use or store this product near open flames or flammable materials.
- Some parts may be heavy or have sharp edges; use caution.
- If any parts are missing, broken, or damaged, discontinue use until repairs or replacements are made.
Parts and hardware
The kit includes various panels (A-L) and hardware (P1-P7). Ensure all parts are present before beginning assembly. Hardware includes various sizes of screws (M3.5 x 50mm, M3.5 x 35mm, M3.5 x 25mm, M3.0 x 10mm, M3.5 x 40mm), mushroom caps, and magnetic catches.
Product assembly

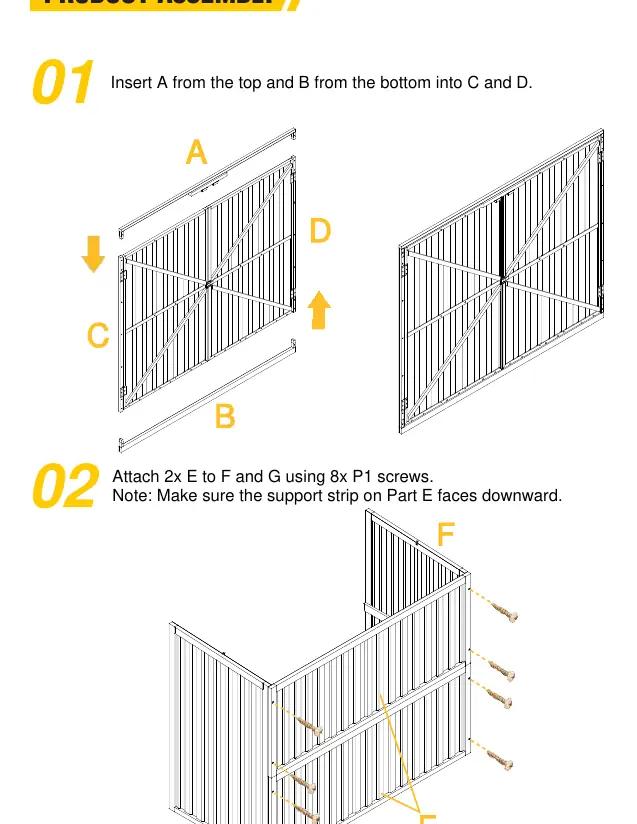
- Step 1-2: Insert top connection strip (A) and bottom connection strip (B) into the left and right door panels (C and D). Attach the two back panels (E) to the left (F) and right (G) panels using 8x P1 screws. Ensure the support strip on Part E faces downward.
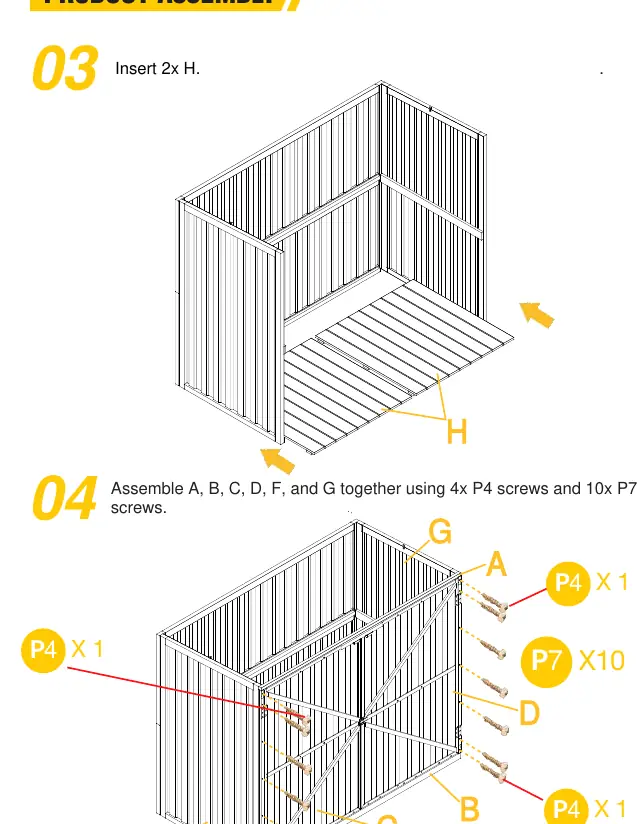
- Step 3-4: Insert the two bottom panels (H). Assemble the main frame (A, B, C, D, F, G) together using 4x P4 screws and 10x P7 screws.
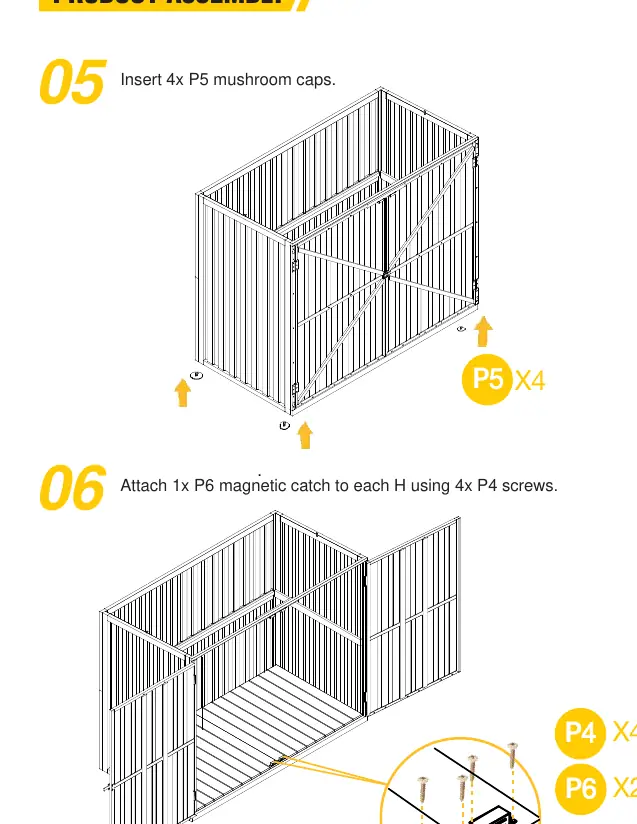
- Step 5-6: Insert 4x P5 mushroom caps. Attach the magnetic catches (P6) to each bottom panel (H) using 4x P4 screws.
- Step 7-8: Place the shelf (I). Install the left (J) and right (K) roof panels using 4x P2 screws each. Ensure the side with gaps on panels J and K faces backward to allow for water drainage.
- Step 9: Attach the roof joint cover (L) to the roof panels (J and K) using 6x P3 screws.
Practical help
Common problems
Missing or damaged parts
Discontinue assembly or use immediately and contact support for repairs or replacements.
Unstable structure
Check and tighten all bolts, screws, and knobs every 90 days.
Before use
- Ensure two people are available for assembly.
- Prepare a Phillips screwdriver and a drill.
- Verify all parts (A-L) and hardware (P1-P7) are present.
- Ensure the assembly area is clean and flat.
- Do not fully tighten screws until the entire unit is assembled.
Specs in practice
- Estimated assembly time
- Approximately 45 minutes with two people.
Images and diagrams
- Ensure the support strip on Part E faces downward during installation.
- Ensure the side with gaps on roof panels J and K faces backward to facilitate water drainage.
Model compatibility
- This manual applies to models AIR 105-ZJ, AIR 105-G, and AIR 105.

Manual page author
David Miller
Documentation analyst
Organizes user manual content into clear summaries, with attention to model details, product context, and everyday usability.