Garden / Gazebos & Canopies
Assembly Guide for Sunjoy 10x12 Pergola
Comprehensive assembly and maintenance guide for the Sunjoy 10x12 Pergola (Model A106008430). Includes step-by-step installation instructions, parts list, wood care guidelines, and safety warnings.
Table of contents
Manual images
Click an image to enlargeQuick Guide from the Manual
This pergola requires at least 4 adults for safe assembly. Before starting, ensure you have a cleared, level area. Do not assemble on sandy, muddy, or loose soil as stakes will not provide adequate anchorage. Always check local regulations regarding permits before installation. If securing to a concrete surface or wood deck, use appropriate anchors (not included). Periodically check and tighten all nuts and bolts to ensure structural integrity.
Safety Warnings
- Do not light fires under or near the product.
- Clear snow from the roof regularly if it exceeds 2 inches in thickness; use a plastic snow rake to avoid damage.
- The structure is intended for decorative and sunshade purposes only; it is not designed to withstand harsh weather, high winds, or heavy snow.
- Remove the canopy during winter or high wind conditions.
- Wear protective gloves during assembly as some parts may have sharp edges.
Tools Required for Assembly
The following tools are required but not included:
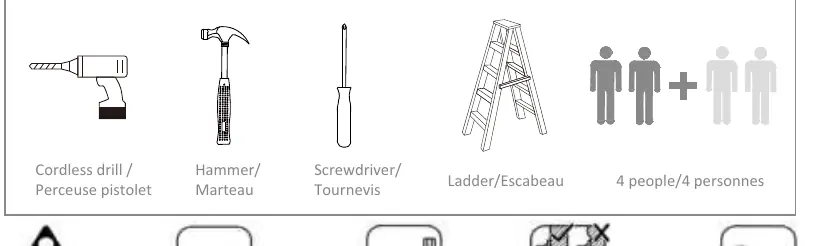
- Cordless drill
- Hammer
- Screwdriver
- Ladder
Assembly Instructions
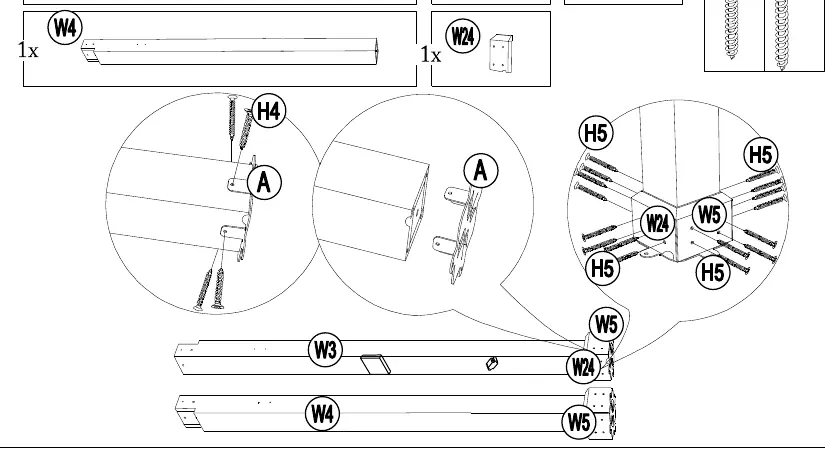
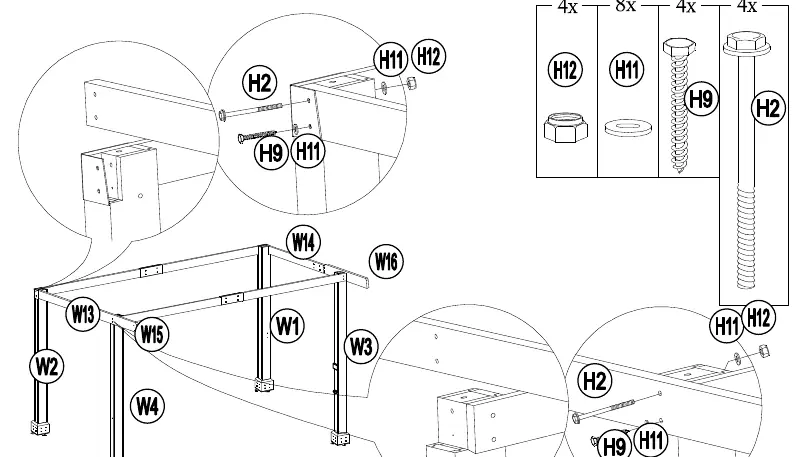
The assembly process involves 28 steps. Ensure all parts are present by comparing them with the parts list before beginning. When assembling wooden parts, do not overtorque bolts to prevent splitting the wood. Use a level to ensure the assembly is plumb and square before final tightening.
Key Assembly Steps
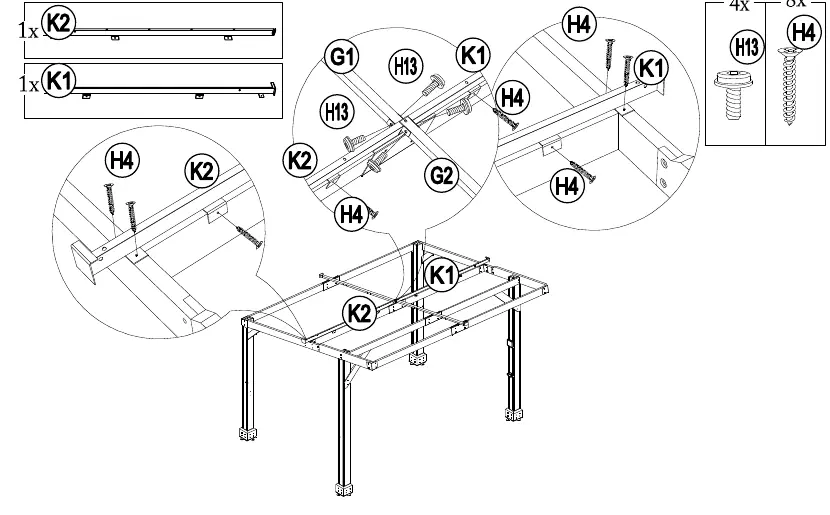
- Base Assembly: Attach post bases (A) to posts (W3, W4) using screws (H4, H5).
- Frame Construction: Assemble cross beams and middle beams using bolts (H14) and nuts (H12).
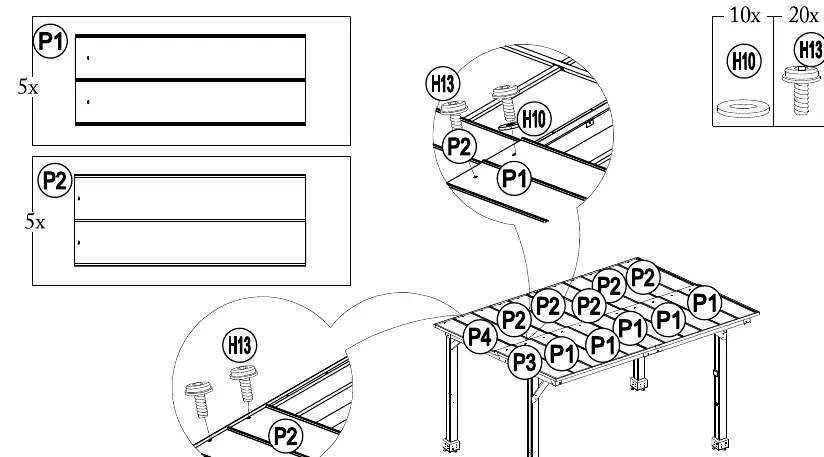
- Roof Structure: Install roof panels (P1-P4) and flashing (F1-F4) using screws (H13).
- Final Anchoring: Secure the pergola to the ground using stakes (HS) on level ground.
Wood Care and Maintenance
The pergola is made of China-Fir (Cunninghamia/Cedar) wood. To maintain its finish:
- Cleaning: Dust regularly with a damp cloth. For deeper cleaning, use a mild soap solution (1/4 cup dish soap per gallon of warm water). Rinse and dry immediately.
- Sealing: Apply a water-based sealant, linseed, teak, or tung oil annually to protect the wood.
- Rust Prevention: Steel components are treated with rust-inhibiting paint. If scratched, touch up immediately. Surface rust can be removed with cooking oil or WD-40.
Warranty Information
Sunjoy Group provides a 1-year limited warranty from the date of purchase for defects in workmanship and materials, provided the item was factory-sealed and used for personal, residential purposes. The warranty does not cover commercial use, acts of nature, vandalism, misuse, or improper assembly.
For missing parts or service inquiries, contact [email protected].
Practical help
Common problems
Surface rust on steel components
Remove with a light application of cooking oil or WD-40. Touch up scratches with rust-inhibiting paint.
Wood cracking or splitting
Avoid overtorquing bolts during assembly. Perform annual maintenance with sealant or oil.
Missing parts
Contact customer support at [email protected].
Before use
- Ensure 4 adults are available for assembly.
- Verify all parts are present against the parts list.
- Prepare a cleared, level area for installation.
- Gather required tools: cordless drill, hammer, screwdriver, and ladder.
- Check local regulations for installation permits.
Images and diagrams
- Exploded drawing shows the connection of posts, beams, and roof panels.
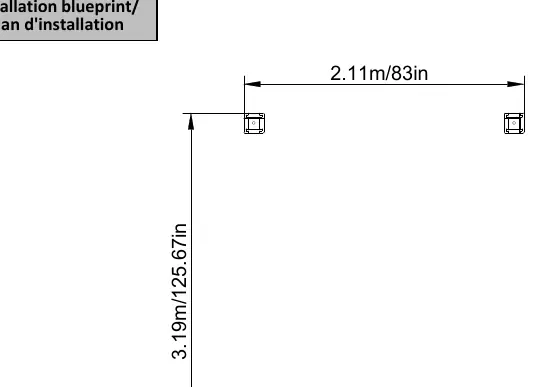
- Installation blueprint provides footprint dimensions (3.19m x 2.11m).
Model compatibility
- Not designed for harsh weather (high winds, heavy snow).
- Not for use on sandy, muddy, or loose soil.
- Requires specific anchors (not included) for concrete or wood deck installation.

Manual page author
Emily Carter
User documentation editor
Prepares concise manual descriptions and highlights the most useful setup, operation, and maintenance information for readers.