Lighting / Fixtures
User Manual for Hampton Bay 10x12 Longford Pergola
Get started with your Hampton Bay 10x12 Longford Pergola. This guide covers assembly instructions, safety warnings, maintenance tips, and warranty information.
Table of contents
Manual images
Click an image to enlargeQuick Guide
The Hampton Bay 10x12 Longford Pergola requires at least 2 people for assembly. The estimated installation time is 2 to 3 hours. Ensure you have all parts and tools ready before beginning. Do not place parts directly on the ground to avoid damaging the finish.
Safety Information
- Outdoor Use Only: This product is designed for outdoor use.
- Wind and Weather: While the pergola includes ground stakes, it is recommended to secure it to a deck, concrete patio, or footings in areas with frequent severe weather.
- Snow Removal: Clear snow regularly. Remove snow from the roof if it exceeds 4 inches in thickness using a plastic snow rake.
- Fire Safety: Keep all flame and heat sources away from the fabric. The fabric meets CPAI-84 specifications for flame resistance but is not fireproof.
- Handling: The unit is heavy; do not attempt to assemble it alone. Wear protective gloves as some parts may have sharp edges.
- Prohibitions: Do not climb on top of the pergola.
Pre-Assembly
Before starting, verify all parts are present against the hardware and package contents lists. If any parts are missing or damaged, contact Hampton Bay Customer Service.
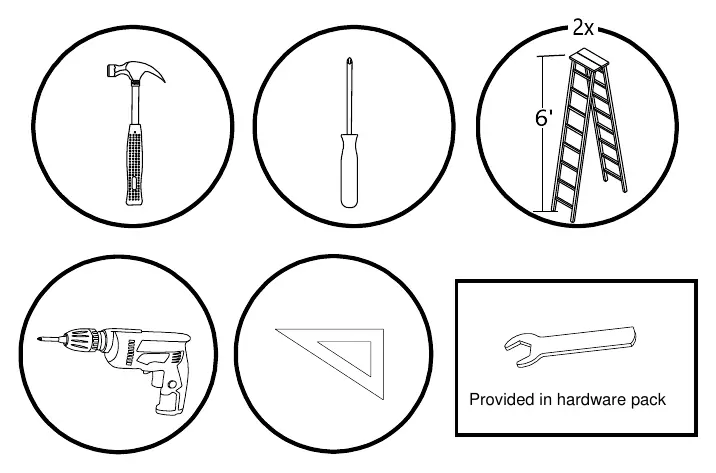
Tools Needed
- Hammer
- Screwdriver
- 6' Ladder
- Drill
- Triangular rule
- M6 Wrench and M6 Allen key (provided in hardware pack)
Assembly Instructions
The assembly process consists of 17 steps:

- Attaching the Base: Attach the base (C) to the posts (01) using screws (HH).
- Attaching the Covers: Insert the cover (D) into the top of the posts (01).
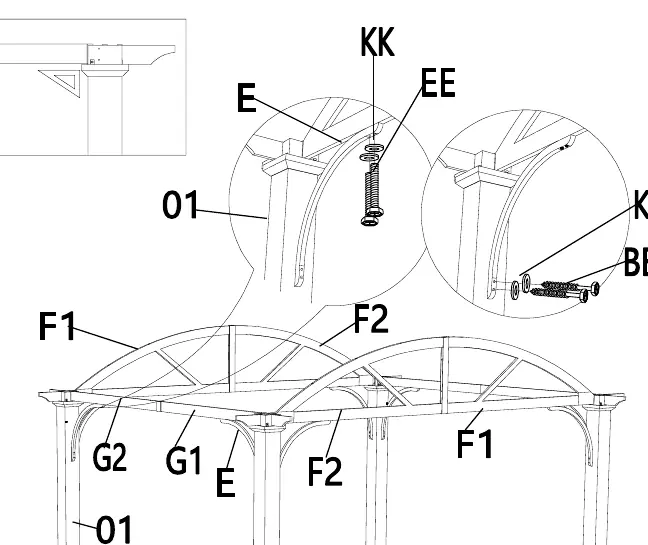
- Connecting Beams: Connect the beams (G1 & G2) with the connector (N) using bolts (MM) and flat washers (KK).
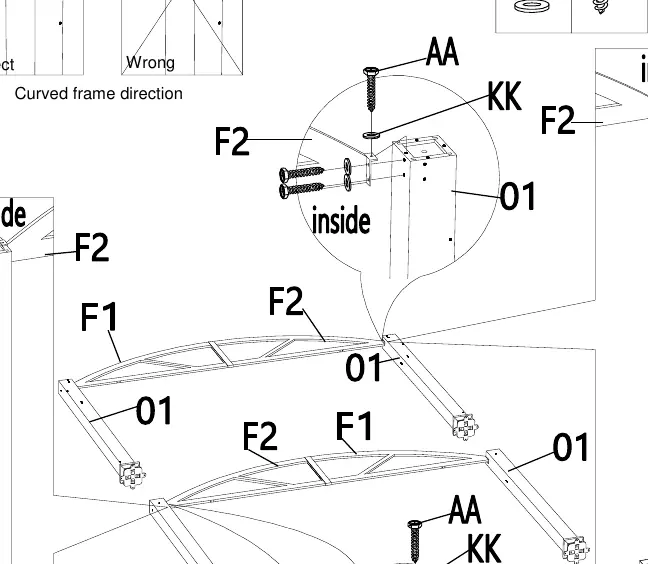
- Connecting Curved Frames: Connect the curved frames (F1 & F2) with the connector (N) using bolts (FF & GG) and flat washers (KK).
- Connecting Frames and Posts: Attach the curved frames to the posts (01) using screws (AA) and flat washers (KK).
- Attaching Beams to Posts: Attach the beams (G1 & G2) to the posts (01) using screws (AA) and flat washers (KK).
- Decorative Profile: Attach the decorative profiles (H) to the posts (01) using screws (AA) and washers (KK). Attach the cover (D) using screws (HH).
- Arc Support: Attach the arc support (E) to the curved frames, beams, and posts using bolts (EE), screws (BB), and flat washers (KK).
- Cross Beam Assembly: Connect the cross beams (I1 & I2) with the connector (I3) using bolts (MM) and flat washers (KK).
- Attaching Cross Beams: Attach the cross beams to the curved frames using bolts (II) and flat washers (KK).
- Canopy Tube Assembly: Connect canopy tube 1 (L1) with canopy tube 2 (L2) using bolt (JJ) and flat washer (KK).
- Covering the Canopy: Place the canopy (M) over the pergola.
- Inserting Canopy Tubes: Insert the assembled canopy tubes (L1 & L2) into the canopy (M).
- Inserting Guide Tube: Insert the guide tube (J) into the canopy tubes. Connect the guide tube and connector (K) to the posts (01) using screws (CC) and (HH).
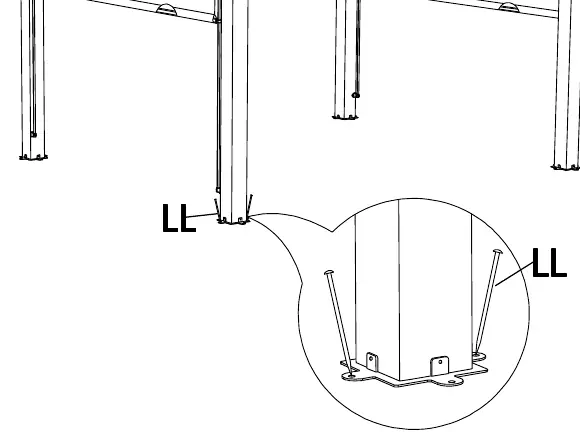
- Securing the Pergola: Secure the pergola to the ground using stakes (LL).
- Base Cover: Attach the base cover (02) to the posts (01) using screws (DD).
- Finishing: Apply stickers (NN) to cover pre-drilled holes if desired.
Care and Cleaning
- Rust Prevention: Steel components are treated with rust-inhibiting paint. If scratched, cover the scratch immediately with rust-inhibiting paint (not included). Surface rust can be removed with a light application of regular cooking oil.
- Cleaning: Do not use bleach, acid, or abrasive cleaners on the roof or frame.
- Storage: Remove the canopy during bad weather and windy conditions. When not in use, store the pergola in a cool, dry area. Keep the original packaging for storage.
Manufacturer information
Hampton Bay
Practical help
Common problems
Missing or damaged parts
Do not attempt to assemble the product. Contact Hampton Bay Customer Service at 1-855-HD-HAMPTON.
Surface rust
Apply rust-inhibiting paint to scratches immediately. Use a light application of cooking oil to remove surface oxidation.
Wind instability
Secure the pergola to a deck, concrete patio, or footings using appropriate hardware (purchased separately) if in an area with frequent severe weather.
Snow buildup
Remove snow thicker than 4 inches using a plastic snow rake to avoid damage.
Before use
- Ensure at least 2 people are available for assembly.
- Verify all parts are present against the hardware and package contents list.
- Wear protective gloves to handle parts with sharp edges.
- Have a hammer, screwdriver, 6' ladder, drill, and triangular rule ready.
- Clear a space for assembly and do not place parts directly on the ground to avoid finish damage.
Specs in practice
- Assembly Time
- Approximately 2-3 hours.
Images and diagrams
- Assembly steps show the connection of posts, beams, curved frames, and canopy.
- Hardware list identifies screws and bolts by letter codes (AA-NN).
Model compatibility
- Fabric meets CPAI-84 specifications for flame resistance but is not fireproof.

Manual page author
Michael Turner
Technical manual editor
Reviews PDF manuals for structure, safety notes, and practical product details so readers can find the right information quickly.