Power / Power Supplies
User Manual for AJAX 6V PSU Hub 2/Hub 2 Plus
Installation guide for the AJAX 6V PSU for Hub 2 and Hub 2 Plus. Includes step-by-step instructions for replacing the power supply unit, technical specifications, and safety requirements.
Quick answers from the manual
Quick answer
- The 6V PSU is a power supply unit that allows Hub 2 and Hub 2 Plus control panels to be powered by 6V or 12V DC sources instead of standard mains power. p. 1
Key actions
- Installation must be performed by a qualified electrician. p. 1
- Wait 5 minutes after disconnecting power before opening the device. p. 2
First start
- Switch on the 6V power source, then hold the device power button for 2 seconds. p. 5
Show 4 more answers Show less
Problems and fixes
No power in Ajax app
Check polarity of connected wires if using a terminal adapter.
p. 6Maintenance and reset
- The device does not require technical maintenance. p. 6
Technical specifications
| Parameter | Value | Meaning | Pages |
|---|---|---|---|
| Input voltage | 4.2-10 V DC | Operating voltage range | p. 6 |
| Output voltage | 4.8 V DC ± 5% | Output voltage | p. 6 |
Where to find it in the PDF
- Installation p. 1, 2, 3, 4
- Technical Specifications p. 6
Table of contents
Manual images
Click an image to enlargeQuick guide from the manual
The 6V PSU Hub 2/Hub 2 Plus is a power supply unit designed to connect Ajax Hub 2 and Hub 2 Plus control panels to 6V and 12V DC sources, replacing the standard 110/230V power supply. Important: This device must be installed by a qualified electrician only. Never disassemble the device while it is under voltage.
Installation process
Before starting, ensure the device is disconnected from the mains. Wait 5 minutes after disconnecting for the capacitors to discharge.
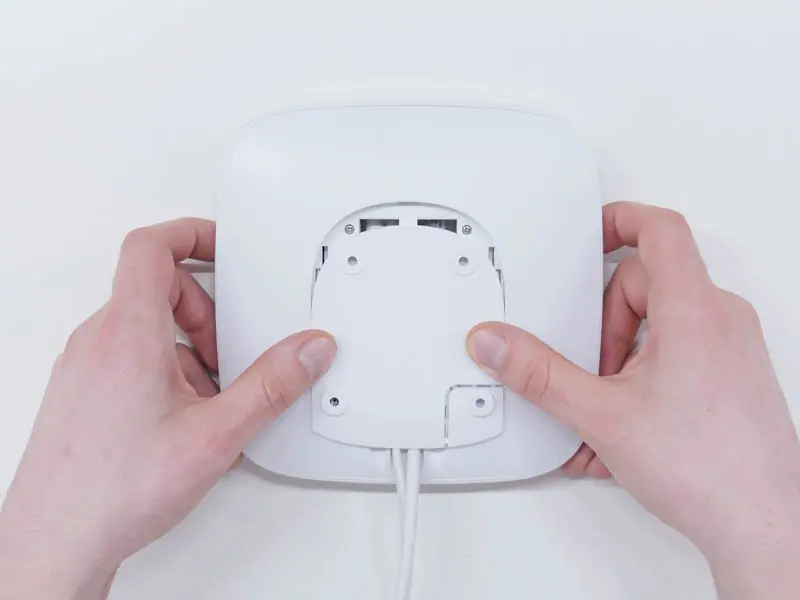
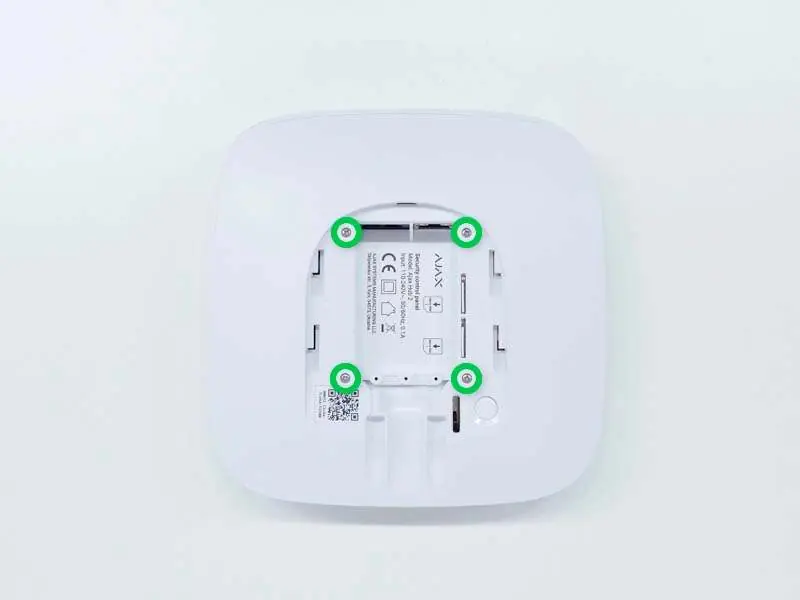
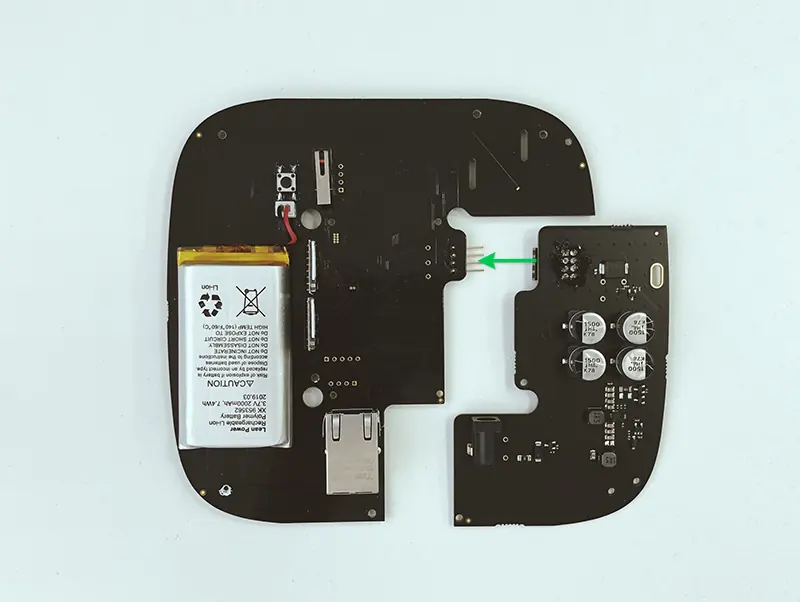
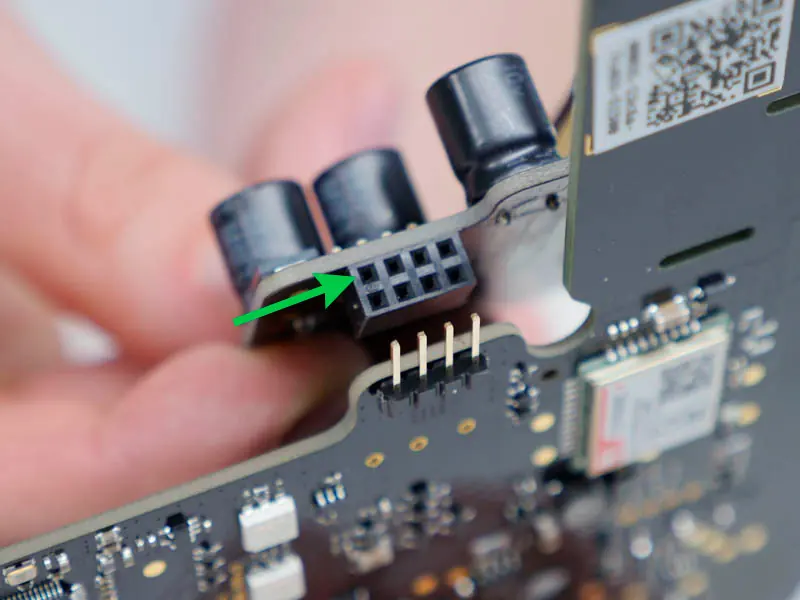
- Remove the screws and detach the device from the SmartBracket mounting panel by shifting it down.
- Switch off the device by holding the power button for 2 seconds.
- Disconnect the power and Ethernet cables.
- Remove the four screws on the back lid and take it off.
- Remove the screws attaching the boards to the device body.
- Carefully remove both boards, keeping them in the same plane. Do not disconnect them; there is a connector between the boards that must not be broken.
- Disconnect the power supply unit (the smaller board) from the mainboard.
- Connect the 6V PSU Hub 2/Hub 2 Plus to the mainboard using the eight-pin connector. Ensure the board contacts are plugged into the bottom row of the connector (closest to the board). Do not warp or bend the antennas.
- Reassemble the boards and the device body, then tighten the screws. Ensure the battery and cables are not clamped.
- Connect the power and Ethernet cables to the appropriate sockets.
- Switch on the 6V power source.
- Switch on the device by holding the power button for 2 seconds.
- Close and fix the SmartBracket mounting panel.
Testing and verification
After switching on the device, wait for it to load and check the external power status in the Ajax app. If there is no power, check the polarity of the connected wires if using a terminal adapter. If the issue persists, contact Support Service.
Technical specifications
The device operates within an input voltage range of 4.2-10V DC and provides an output voltage of 4.8V DC ± 5%. It is compatible with Hub 2 and Hub 2 Plus.
Practical help
Common problems
No power after installation
Check the polarity of the connected wires if using a terminal adapter. Verify the power status in the Ajax app.
Device does not fit together after reassembly
Ensure the battery and its cables are not clamped. The boards should stand firmly on all guides and not stagger.
Before use
- Ensure the device is disconnected from the mains.
- Wait 5 minutes for capacitors to discharge before opening.
- Ensure installation is performed by a qualified electrician.
- Check that the battery and cables are not clamped during reassembly.
- Verify input voltage on the device body.
Show more Show less
Specs in practice
- Input voltage
- 4.2-10V DC range supported.
- Output voltage
- 4.8V DC ± 5%.
- Max input current
- 2.2A on 4.2V; 0.8A on 10V.
Images and diagrams
- The 8-pin connector must be aligned so the board contacts are in the bottom row (closest to the board).
- When connected correctly, the boards should be on the same level.
Model compatibility
- Compatible with Hub 2 and Hub 2 Plus control panels only.

Manual page author
Emily Carter
User documentation editor