Tools / Power Tools
User Manual for Ferrex 20V Cordless 3-in-1 Multi Sander FASS 20-I
Quick guide for the Ferrex 20V Cordless 3-in-1 Multi Sander FASS 20-I. Learn how to change sanding plates, attach the dust container, operate the tool, and troubleshoot common issues.
Quick answers from the manual
Quick answer
- The Ferrex FASS 20-I is a 20V cordless 3-in-1 multi-sander designed for sanding wood, metal, plaster, and filler surfaces. It features interchangeable sanding plates and a dust extraction system. p. 1, 16
Key actions
- Changing the sanding plate p. 17, 18
- Inserting the battery p. 20
- Sanding technique p. 24
First start
- Unpack the product, check for damage, and ensure all parts are included. p. 17
Problems and fixes
Product will not start
Insert a charged battery, ensure it is correctly inserted, or reduce pressure on the product.
p. 25Maintenance and reset
- Empty the dust container after every use and clean the housing with a soft cloth. p. 27
Technical specifications
| Parameter | Value | Meaning | Pages |
|---|---|---|---|
| Supply voltage | 20 V | Operating voltage | p. 28 |
| Idle speed | 12,000 min-1 | Rotational speed without load | p. 28 |
Where to find it in the PDF
- Product overview p. 2, 16
- Safety instructions p. 7, 15
- Operation p. 17, 24
- Technical data p. 28
Table of contents
Manual images
Click an image to enlargeQuick guide from the manual
The Ferrex 20V Cordless 3-in-1 Multi Sander is designed for private use in sanding wood, metal, plaster, and filler surfaces. It features interchangeable sanding plates (square, rectangular, triangular) and a dust extraction system. Always wear protective gear, including goggles, a dust mask, and ear protection, when operating the tool.

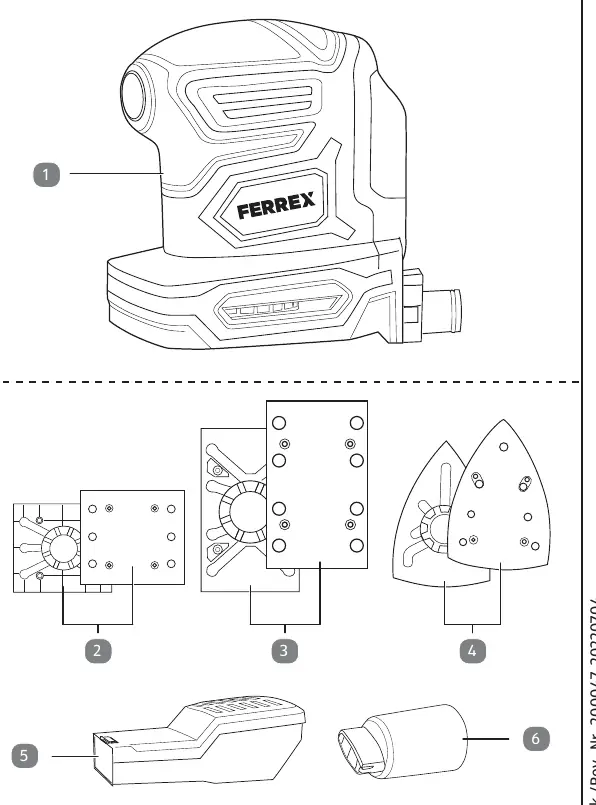
Product description
The unit consists of a basic unit with a battery holder, an on/off switch, and a connecting nozzle for the dust container or vacuum adapter. The package includes three sanding plates, each with a base plate and a hook-and-loop fastener plate.
First use
Before using the product, check that all parts are included and that the product is not damaged. Ensure the battery is charged and compatible with the tool.
Operation
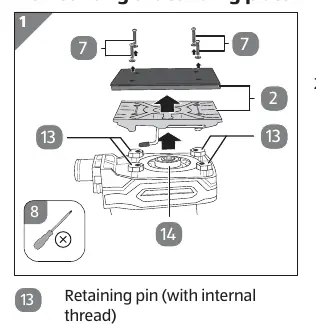
Changing the sanding plate
The square sanding plate comes pre-assembled. To change it: release the 4 fastening screws using a cross-head screwdriver, pull the plate off the central base and retaining pins, and attach the new plate by reversing the process.
Attaching the dust container
Attach the dust container to the connecting nozzle. For external extraction, use the vacuum adapter to connect a vacuum cleaner hose.
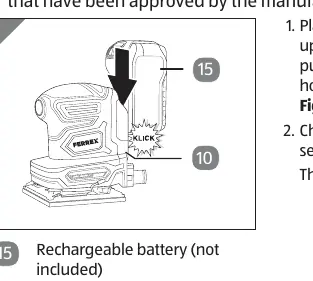
Inserting the battery
Place the battery on the upper edge of the battery holder and push it along the guide until it audibly clicks into place.
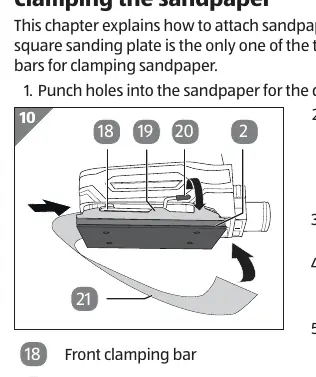
Sanding
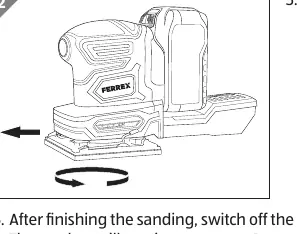
Attach the appropriate sanding sheet or sandpaper. Switch the product on, place the sanding plate flat on the workpiece, and move the tool in circular motions. Apply even contact pressure. Always start with rough sanding and move to finer grits for finishing.
Cleaning and maintenance
Empty the dust container after every use. Clean the housing with a soft cloth or brush. Regularly check that the on/off switch, sanding plates, and battery holder are in good condition. Remove the battery before performing any maintenance.
Troubleshooting
If the product does not start, check the battery charge and insertion. If sanding performance is poor, replace the sanding sheet. If dust is not extracted, ensure the extraction openings are not blocked.
Technical data
The tool operates at 20V with an idle speed of 12,000 min-1. It is compatible with Activ Energy batteries and chargers.
Practical help
Common problems
Product will not start
Check if the battery is charged and correctly inserted; reduce pressure on the tool if it is blocking the oscillating movement.
Poor sanding performance
Replace worn sanding sheet or sandpaper; ensure the sheet is suitable for the material being sanded.
Dust not extracted
Ensure extraction openings are not covered by the sanding sheet; punch holes in the sandpaper if necessary.
Sanding sheet does not adhere
Clean the hook-and-loop fastener surfaces on the sanding plate.
Before use
- Check the product and parts for damage
- Ensure the battery is fully charged
- Select the correct sanding plate for the task
- Attach the sanding sheet or sandpaper securely
- Wear protective goggles, dust mask, and ear protection
- Ensure the work area is clean and well-lit
Specs in practice
- Supply voltage
- 20 V DC
- Rectangular sanding plate
- 128 x 78 mm
- Square sanding plate
- 110 x 100 mm
- Triangular sanding plate
- 149 x 149 x 99 mm
Images and diagrams
- 1: Finishing sander
- 2: Square sanding plate
- 3: Rectangular sanding plate
- 4: Triangular sanding plate
- 5: Dust container
Model compatibility
- Use only with Activ Energy batteries and chargers.
- Compatible battery models: AEB 20-2.0/2, AEB 2040-2.5/2, XYZ561a, XYZ562a.
- Compatible charger models: AEC 20-4.0/2a, XYZ563a.

Manual page author
Michael Turner
Technical manual editor
Reviews PDF manuals for structure, safety notes, and practical product details so readers can find the right information quickly.