Plumbing / Sinks Faucets
User Manual for Alpha Smart 18i Instant Shower Heater
Comprehensive user manual for the Alpha Smart 18i Instant Shower Heater. Includes installation instructions, safety guidelines, operating procedures, maintenance tips, and technical specifications.
Table of contents
Manual images
Click an image to enlargeQuick Guide from the Manual
This document provides essential instructions for the installation and operation of the Alpha Smart series instant shower heaters. Key safety requirements include:
- Earthing: The appliance must be permanently earthed in accordance with local regulations.
- RCD: An approved Residual Current Device (RCD) with 10mA sensitivity must be installed.
- Water Supply: Not for use with potable water supply. Do not connect to water obtained from other water heating systems.
- Safety Test: Always test the water temperature with your hand before stepping into the shower.
- Maintenance: Do not use thinner, alcohol, or petrol to clean the unit.
Product Overview
The Alpha Smart series features an external control panel with an Auto Test indicator, Heater indicator, Line Fault indicator, Pump Control knob (on applicable models), and Temperature Control knob. Internally, the unit contains a built-in ELSD, heating element, and flow switch assembly.

Installation Procedures
Installation must be performed by a competent person recommended by the manufacturer. Follow these steps:
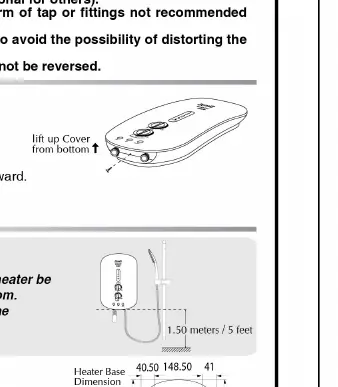
- Mounting: Decide the mounting position (recommended 1.5 meters above the floor). Remove the heater cover, mark 4 mounting points, drill holes, and secure the unit to the wall.
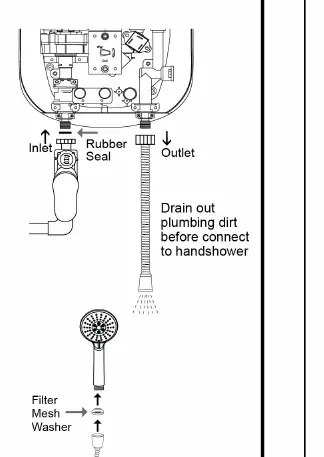
- Plumbing: Connect the Stop Valve to the heater inlet using the provided rubber seal. Connect the incoming water supply to the Stop Valve. Connect the flexible hose to the heater outlet.
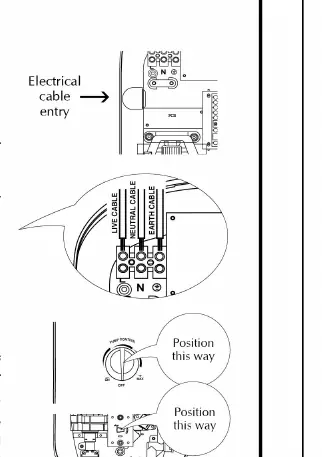
- Electrical: Ensure the electrical mains are off. Insert the electrical cable through the rubber grommet. Connect the Live (L), Neutral (N), and Earth (E) wires to the terminal block.
- Test Run: Turn on the Stop Valve and switch on the heater. The 'AUTO TEST' and 'LINE FAULT' indicators should light up. Turn the Temperature Control knob to verify heating.
Operating Procedures
To operate the shower:
- Switch on the heater switch outside the bathroom.
- Turn on the Stop Valve and adjust the water regulator for suitable water volume.
- Turn the Temperature Control knob to adjust the water temperature.
- The 'HEATER' indicator will light up when the unit is heating.
- Switch off the heater switch when not in use.
Maintenance
Regular maintenance ensures the longevity of your shower heater:
- Cleaning: Use a damp cloth and mild detergent. Do not use corrosive solutions.
- Filter Cleaning: Regularly clean the Filter Mesh inside the Stop Valve to prevent blockages.
- Handshower: Descale the handshower regularly to maintain water flow.
Troubleshooting
If you encounter issues:
- Auto Test/Line Fault light is RED: Switch off the mains supply immediately and contact a qualified electrician.
- Water not hot enough: Reduce water flow using the Water Regulator or turn the Temperature Control knob clockwise.
- ELSD Trips: If the ELSD trips during normal operation, switch off the mains supply and contact the service center.
Specifications
The unit operates at 230V-240V, 50/60Hz. It requires a minimum flow rate of 1.5L/min (with pump) or 2L/min (without pump). The protection rating is IP25.
Manufacturer information
Alpha Home Appliances
Practical help
Common problems
Auto Test or Line Fault indicator shows RED light
Switch off the mains supply immediately and contact a qualified electrician to check the electrical installation.
Water is not hot enough even at 'MAX' setting
Reduce the water inflow using the Water Regulator or turn the Temperature Control knob clockwise to increase heating power.
ELSD trips during operation
Switch off the mains supply and contact the service center for repair.
Before use
- Ensure the unit is properly earthed.
- Verify that an RCD with 10mA sensitivity is installed.
- Check that the water supply is turned on.
- Ensure the heater is not installed on a direct path of water spray.
- Perform a test run of the heater before first use.
Specs in practice
- Heater Power Rating
- 4.1-4.5kW or 3.5-3.8kW depending on the specific model and voltage.
- Minimum Flow Rate
- 1.5L/min for models with a pump; 2L/min for models without a pump.
- Degree of Protection
- IP25, indicating protection against water jets.
Images and diagrams
- External Parts: Identifies the location of indicators, control knobs, and water connections.
- Internal Parts: Shows the terminal block, heating element, and ELSD location.
- Wiring Diagram: Illustrates the required electrical connections for safe operation.
Model compatibility
- Not for use with potable water supply.
- Requires a dedicated RCD (10mA sensitivity).
- Must be installed on a solid wall.

Manual page author
Michael Turner
Technical manual editor
Reviews PDF manuals for structure, safety notes, and practical product details so readers can find the right information quickly.