Plumbing / Sinks Faucets
User Manual for AXOR Starck Electronic Basin Mixer
Quick guide for the AXOR Starck electronic basin mixer. Includes installation, electrical connection, sensor range adjustment, battery replacement, and technical specifications.
Table of contents
Manual images
Click an image to enlargeQuick guide from the manual
This electronic basin mixer is designed for hygienic use. It features automatic sensor calibration to local conditions (washbasin size, ambient light, reflections). The faucet is not compatible with continuous flow water heaters and should not be installed on washstands with raised edges.
Safety and Installation
Safety Notes: Wear gloves during installation to prevent injuries. Ensure hot and cold water supplies have equal pressure. The transformer and mains plug must be installed in dry interior rooms and not in protection zones 0, 1, or 2.
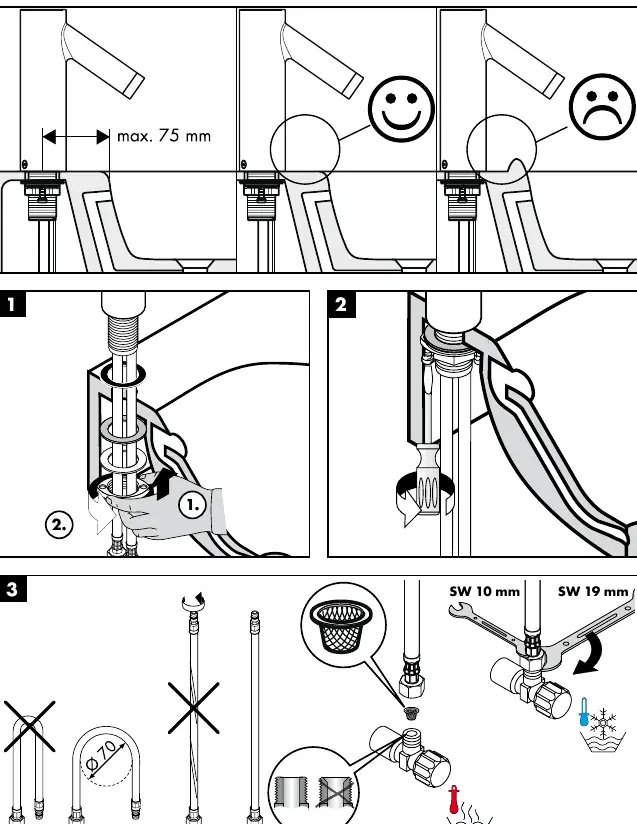
Installation: Install mesh washers to protect against dirt from pipework. After installation or maintenance, the faucet may require 10-15 minutes for automatic self-calibration. If the jet pattern is irregular due to air, activate the faucet approximately 15 times to stabilize it.
Electrical Installation
Installation and testing must be performed by an authorized electrician in accordance with DIN VDE 0100 part 701 / IEC 60364-7-701. The circuit must be protected via a ground fault protector (RCD/FI) with a measured differential current of ≤ 30 mA. Ensure the system is de-energized before performing any work.
Operation and Adjustment
Normal Operation: The sensor range depends on ambient optical conditions and the object being detected. Dark objects are detected less effectively than light or reflective objects. Strong light sources should not be directed at the sensor window.
Range Setting: If the faucet is installed on very small or highly reflective washstands, you can manually switch between "Maximum range" (factory setting) and "Reduced range" (reduced by approx. 50 mm). To change the mode, interrupt the power supply for 10 seconds, reconnect, and follow the calibration steps indicated by the LED.
Maintenance
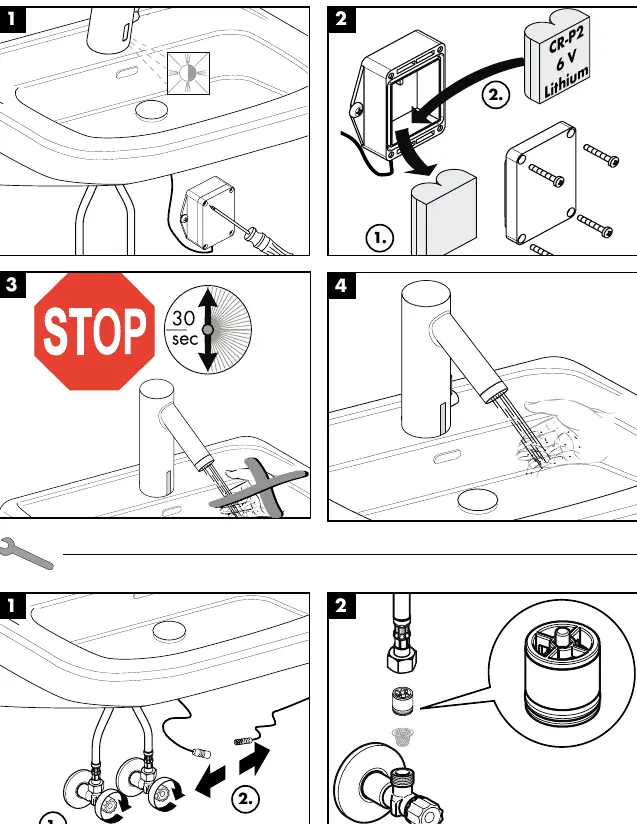
Battery Replacement: When the battery voltage is ≤ approx. 5.5 V, the LED blinks during operation. When voltage is ≤ approx. 5.3 V, the LED lights continuously and the faucet stops working; the battery must be replaced. After inserting a new battery, do not activate the faucet for 30 seconds to allow for self-adjustment.
Cleaning: Clean the faucet regularly. Do not use silicone containing acetic acid.
Technical Data
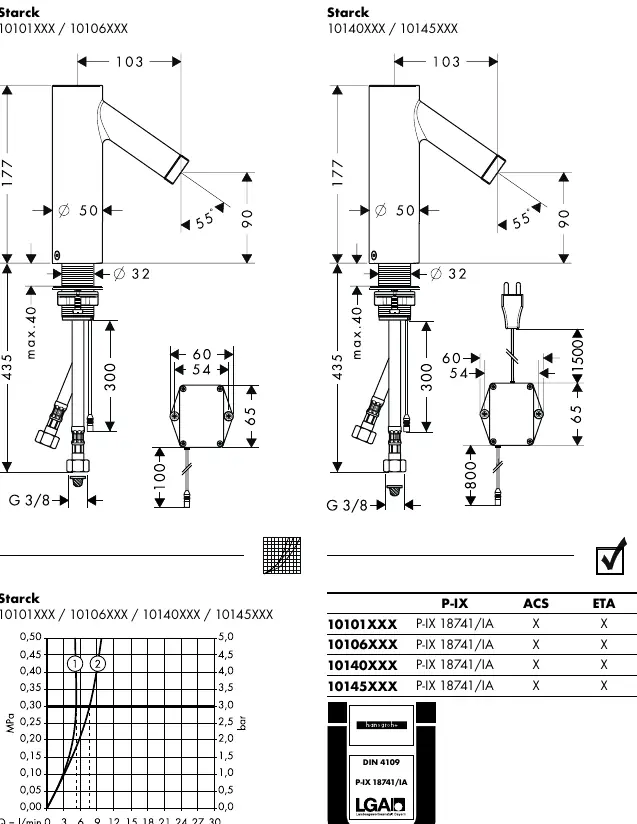
- Operating pressure: max. 0.8 MPa
- Recommended operating pressure: 0.1 - 0.5 MPa
- Hot water temperature: max. 80°C (recommended 65°C)
- Automatic shut-off: after 1 minute
- Protection class: IP X5
- Battery: CR-P2 / 6V Lithium
- Transformer: 230V AC ± 10% / 50-60 Hz / 2 mA
Manufacturer information
AXOR
Practical help
Common problems
Water flow is delayed or irregular after installation/maintenance
Wait 10-15 minutes for automatic self-calibration or activate the faucet about 15 times to clear air from the system.
LED blinks when faucet is operated
Battery voltage is low (≤ 5.5V). Replace the battery soon.
LED lights continuously
Battery is empty (≤ 5.3V). Replace the battery immediately.
Faucet activates unintentionally
Check for water drops or condensation on the sensor window and wipe clean.
Before use
- Ensure hot and cold water supplies have equal pressure.
- Install mesh washers to prevent dirt from entering the system.
- Ensure the transformer is installed in a dry location (not in zones 0, 1, or 2).
- Do not install on washstands with raised edges.
- Wait 30 seconds after battery insertion before activating the faucet.
Specs in practice
- Operating pressure
- Maximum 0.8 MPa (8 bar).
- Protection class
- IP X5, indicating protection against water jets.
- Automatic shut-off
- The faucet will stop water flow after 1 minute of continuous operation.
- Battery type
- CR-P2 / 6V Lithium battery.
Images and diagrams
- Installation steps are detailed on page 73.
- Adjustment and battery replacement procedures are shown on page 75.
- Battery replacement details are on page 78.
- Dimensions and flow diagrams are on page 79.
Model compatibility
- Not compatible with continuous flow water heaters.

Manual page author
Michael Turner
Technical manual editor
Reviews PDF manuals for structure, safety notes, and practical product details so readers can find the right information quickly.