Plumbing / Sinks Faucets
Lavabo Kubus 780 Soft Slim Sink Installation Guide
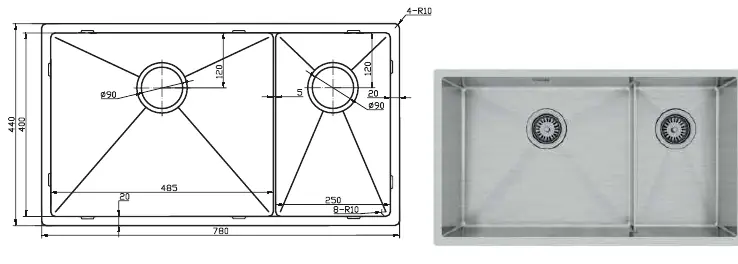
Comprehensive installation and cutout dimensions guide for the Lavabo Kubus 780 Soft Slim stainless steel kitchen sink, including flush mount and top mount specifications.
Table of contents
Product Overview
The Lavabo Kubus 780 Soft Slim is a high-quality stainless steel kitchen sink designed for modern kitchens. With a material thickness of 1.2 mm, this sink offers durability and a sleek aesthetic. It is engineered to fit into a minimum cabinet width of 800 mm, ensuring a stable and secure installation. The sink comes with included fixing clips specifically designed for top-mount (drop-in) installation, providing a straightforward setup process for professional installers and DIY enthusiasts alike.
Installation Methods
This sink supports two primary installation methods: standard top-mount (drop-in) and flush-mount. Each method requires specific cutout dimensions to ensure a perfect fit. For a standard top-mount installation, the required cutout size is 760 mm by 420 mm with a corner radius of 10 mm. This method allows the rim of the sink to rest on the countertop surface.
For a more seamless, integrated look, the flush-mount installation is recommended. This method requires a slightly larger cutout of 784 mm by 444 mm, also with a corner radius of 10 mm. Flush mounting ensures that the sink rim sits level with the countertop, creating a smooth transition that is easy to clean and visually appealing. It is essential to verify these measurements before cutting the countertop material to avoid errors.
Technical Specifications and Maintenance
The sink features a robust construction with a material thickness of 1.2 mm, which provides excellent resistance to daily wear and tear. The overall design includes two bowls, providing ample space for washing and food preparation. The drain holes are standard size, compatible with most modern plumbing fixtures. To maintain the appearance of the stainless steel surface, it is recommended to clean the sink regularly with mild soap and water. Avoid using abrasive cleaners or steel wool, as these can scratch the finish. Always rinse the sink thoroughly after use to prevent mineral deposits and staining. Proper installation using the provided fixing clips is crucial for the long-term stability of the sink, especially for top-mount configurations where the clips secure the unit firmly against the countertop.
Practical help
Common problems
Sink movement after installation
Ensure the provided fixing clips are correctly tightened and that the countertop cutout is accurate to the specified dimensions.
Difficulty with flush mount alignment
Verify that the cutout is exactly 784 mm by 444 mm and that the countertop edge is prepared for a flush finish.
Before use
- Verify minimum cabinet width of 800 mm
- Confirm chosen installation method (top-mount vs flush-mount)
- Measure and mark the countertop according to the specific cutout dimensions
- Ensure the corner radius of 10 mm is maintained during cutting
- Check that all fixing clips are present
Specs in practice
- Material thickness
- 1.2 mm stainless steel for structural integrity
- Min. cabinet width
- The minimum internal space required in the cabinet to house the sink
- Cutout (Top-mount)
- Required hole size for standard drop-in installation: 760 x 420 mm
- Cutout (Flush-mount)
- Required hole size for level-surface installation: 784 x 444 mm
Images and diagrams
- The diagram illustrates the top-down view of the sink with precise measurements for the bowls and drain locations.
- Separate cutout templates are provided for top-mount and flush-mount installations.
- Corner radius specifications (r=10 mm) are highlighted for both installation types.
Model compatibility
- Requires a minimum cabinet width of 800 mm.
- Compatible with standard plumbing drain fixtures.

Manual page author
David Miller
Documentation analyst
Organizes user manual content into clear summaries, with attention to model details, product context, and everyday usability.