Electronics / Educational Devices
Assembly Instructions for Amazon 204391Q Panel Bed Frame
A comprehensive assembly guide for the Amazon 204391Q Panel Bed Frame. This manual includes essential preparation tips, parts and hardware lists, step-by-step assembly instructions, and care advice to ensure safe and proper setup.
Quick answers from the manual
Quick answer
- The Amazon 204391Q Panel Bed Frame requires assembly by at least two people. The process involves attaching the headboard components, connecting the side rails to the headboard and footboard, and installing the slats with support legs. p. 1, 3, 7, 8
Key actions
- Assemble with at least two people. p. 3
- Tighten hardware after two weeks and every six months. p. 4
Problems and fixes
Wobbly furniture
Ensure the furniture rests on an even and flat surface. Double-check all bolts and/or screws are properly tightened and secured.
p. 8Maintenance and reset
- Check and tighten hardware every six months. p. 4
Where to find it in the PDF
- Assembly Instructions p. 1, 7, 8
- Parts List p. 5
Table of contents
Manual images
Click an image to enlargeQuick guide from the manual
This document provides assembly instructions for the Amazon 204391Q Panel Bed Frame. It is essential to review the pre-assembly tips, identify all parts and hardware before starting, and follow the step-by-step assembly process to ensure the furniture is stable and safe.
Assembly Preparation
Before beginning the assembly, ensure you have the following:


- Teamwork: Always have at least two people to help with transporting and assembling the product to avoid injury or damage.
- Suitable Location: Assemble near the area of the intended location.
- Sufficient Space: Ensure you have enough space to move around during assembly.
- Avoid Scratches: Use cardboard, blankets, or a carpeted area to protect the furniture.
- Flat Surface: Ensure the furniture rests on a flat and level surface with each leg evenly touching the floor.
Assembly and Care Advice
Failure to follow these guidelines may result in injury or property damage:
- Position each part correctly and insert screws or bolts into their respective holes.
- Turn clockwise to tighten and only tighten when the step is completed or when instructed.
- Use appropriate hand tools.
- Save the instructions and store any supplied tools for later maintenance.
- After two weeks, check and tighten any loose hardware and repeat every six months.
Parts and Hardware
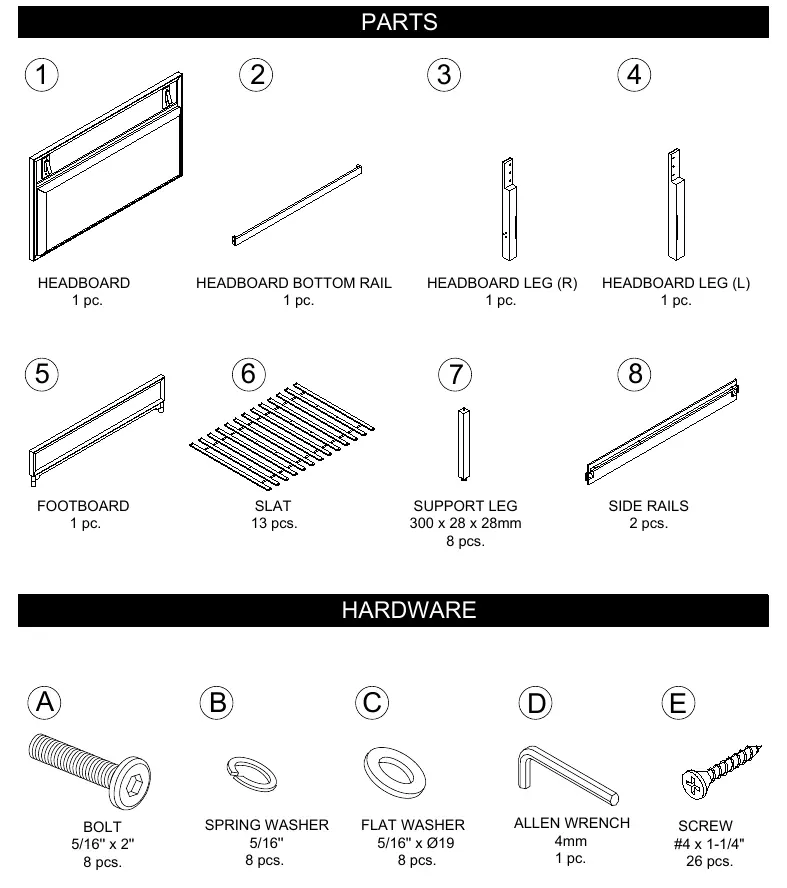
The manual includes a detailed list of parts (Headboard, Footboard, Side Rails, Slats, Support Legs) and hardware (Bolts, Washers, Screws, Allen Wrench). Verify all quantities against the list on page 5 before starting.
Assembly Steps
The assembly process is divided into four main steps:
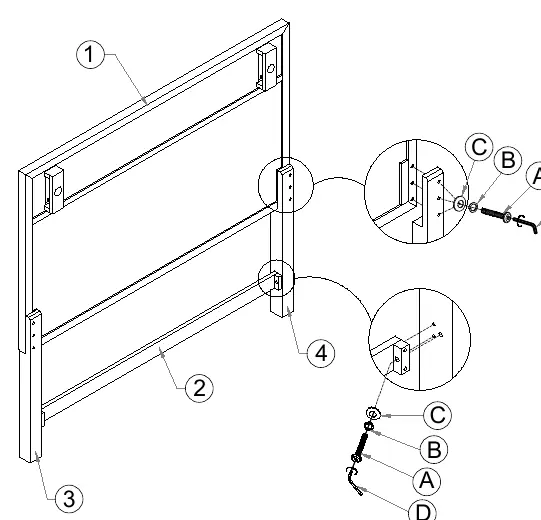
- Headboard Assembly: Attach the Headboard Bottom Rail and Legs to the Headboard using the provided bolts and washers.
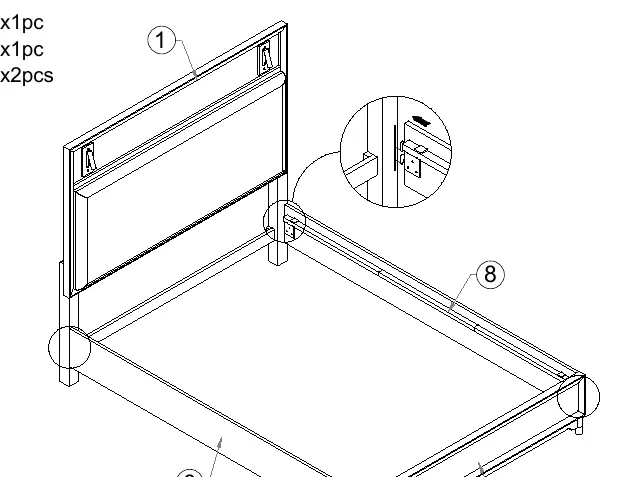
- Frame Assembly: Connect the Side Rails to the Headboard and Footboard.
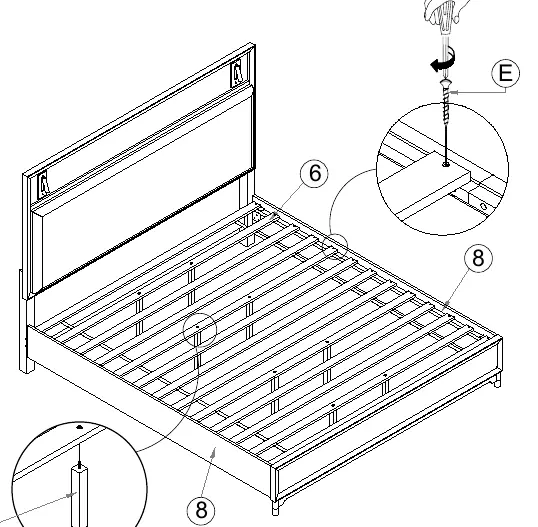
- Slat Installation: Install the slats and support legs onto the frame.
- Final Check: Ensure the bed is in its final position and check that all bolts and screws are properly tightened.
Safety and Maintenance
This product is intended for residential use only and not for commercial use. Always lift the product when adjusting its placement to avoid damage. If the product wobbles or feels loose, double-check that all bolts and screws are properly tightened and secured.
Practical help
Common problems
Furniture wobbles or feels loose
Ensure the furniture rests on an even, flat surface. Double-check that all bolts and screws are properly tightened and secured.
Hardware loosening over time
Check and tighten any loose hardware after two weeks, and repeat this maintenance every six months.
Before use
- Verify all parts and hardware against the list provided in the manual.
- Ensure you have at least two people available for assembly.
- Clear sufficient space for assembly.
- Prepare a flat, level surface for the assembly area.
- Use protective material like blankets or cardboard to prevent scratches.
Images and diagrams
- Hardware is identified by letters (A, B, C, D, E).
- Parts are identified by numbers (1-8).
- Diagrams illustrate the correct orientation and connection points for each step.
Model compatibility
- Intended for residential use only.
- Not for commercial use.

Manual page author
Michael Turner
Technical manual editor
Reviews PDF manuals for structure, safety notes, and practical product details so readers can find the right information quickly.