Lighting / Fixtures
Installation Manual for American Lighting Association 71265-66 Harbor View 1-Light Outdoor Wall Light
Quick installation guide for the American Lighting Association 71265-66 Harbor View 1-Light Outdoor Wall Light. Includes step-by-step wiring diagrams, mounting instructions, bulb specifications, and moisture protection tips.
Quick answers from the manual
Quick answer
- This manual provides installation instructions for the American Lighting Association 71265-66 1-Light Outdoor Wall Light, covering wiring, mounting, and bulb installation. p. 1
Key actions
- Shut off power at the fuse box or circuit breaker. p. 1
- Attach mounting plate to the outlet box. p. 1
- Connect electrical wires using connectors. p. 1
- Apply silicone sealant to the back plate. p. 1
- Install bulb. p. 1
First start
- Follow the installation steps: attach mounting plate, connect wires, secure back plate, apply sealant, and install bulb. p. 1
Show 2 more answers Show less
Technical specifications
| Parameter | Value | Meaning | Pages |
|---|---|---|---|
| Bulb Type | Medium base | Compatible bulb base type | p. 1 |
| Maximum Wattage | 60 Watts | Maximum power rating for the bulb | p. 1 |
| Location Rating | Wet location | Suitable environment for installation | p. 1 |
Where to find it in the PDF
- Installation Instructions p. 1
Table of contents
Manual images
Click an image to enlargeImportant Installation Information
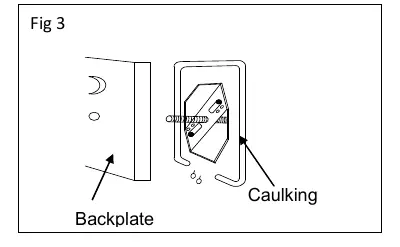
Before beginning installation, ensure the power is shut off at the fuse box or circuit breaker. This fixture is ETL listed for wet location applications. To prevent moisture from entering the outlet box and causing a short, you must apply clear silicone sealant around the outside of the fixture back plate where it meets the wall, leaving a small space at the bottom to allow moisture to escape.
Installation Steps
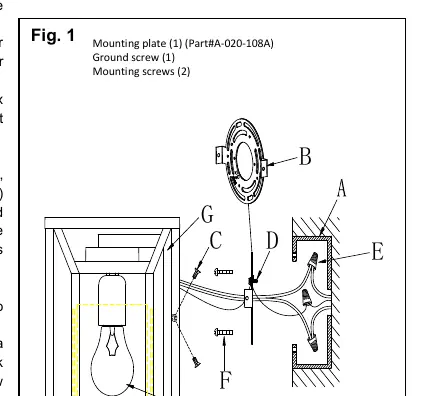
- Prepare: Shut off power and remove the old fixture. Unpack all parts and ensure you have the mounting plate (B), mounting screws, and wire connectors.
- Mounting Plate: Attach the mounting plate (B) to the outlet box (A) using the outlet box screws (F). Ensure the side marked "GND" faces outward.
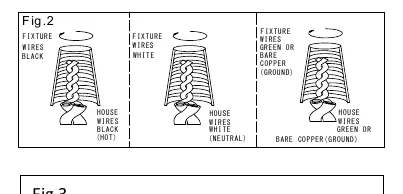
- Wiring: Connect the fixture wires to the house wires using the provided connectors (E). Connect the fixture ground wire to the house ground wire (green or bare copper). If no house ground wire is available, connect the fixture ground wire directly to the mounting plate using the provided green screw (D). Carefully tuck all wires into the outlet box.
- Final Assembly: Place the back plate (G) over the mounting plate (B) and secure it with the two screws (C). Tighten until snug.
- Seal: Apply clear silicone sealant around the back plate as described in the important information section.
Bulb Replacement and Maintenance
To replace the glass or install a bulb:
- Remove the gaskets (M) and loosen the screws (L) to remove the cover (K).
- Insert the new glass (J) into the fixture frame from the bottom.
- Secure the lower cover (K) by tightening the screws (L) and reinstalling the gaskets (M).
- Install one medium base bulb (I) up to 60 Watts, or a CFL/LED equivalent. Do not exceed the maximum wattage rating.
Practical help
Common problems
Moisture entering the outlet box
Apply clear silicone sealant around the outside of the fixture back plate where it meets the wall, leaving a gap at the bottom for drainage.
No ground wire in the outlet box
Connect the fixture's ground wire directly to the mounting plate using the provided green screw (D).
Before use
- Shut off power at the fuse box or circuit breaker.
- Verify the outlet box is compatible with the mounting plate.
- Ensure you have clear silicone sealant for weatherproofing.
- Check that the bulb wattage does not exceed 60 Watts.
- Confirm all wire connections are secure.
Show more Show less
Specs in practice
- Max 60 Watts
- The maximum power rating for the bulb. Exceeding this may cause fire or damage.
- Wet Location Rated
- The fixture is designed to withstand exposure to rain and moisture.
Images and diagrams
- Fig 1: Shows the mounting plate installation and component assembly.
- Fig 2: Illustrates the correct wiring connections between the fixture and house wires.
- Fig 3: Demonstrates where to apply caulking/sealant to the backplate for moisture protection.
Model compatibility
- Compatible with medium base bulbs (Incandescent, CFL, or LED).
- Requires an existing outlet box for installation.

Manual page author
David Miller
Documentation analyst