Lighting / Fixtures
Installation Manual for TRIO 2411101XX LED Ceiling Lamp
Quick guide for installing the TRIO 2411101XX LED ceiling lamp. Includes safety instructions, wiring diagrams, and technical specifications.
PDF source: Deutsch · summary: English
Quick answers from the manual
Quick answer
- The TRIO 2411101XX is an LED ceiling lamp requiring a 230V~50Hz power supply. Installation involves mounting the bracket to the ceiling and connecting the L, N, and Ground wires to the terminal block. p. 2
Key actions
- Turn off the power supply before starting installation. p. 1
- Connect the electrical wires to the terminal block (L, N, Ground). p. 2
First start
- Ensure the lamp is securely mounted and wiring is correct before switching on the power. p. 2
Show 3 more answers Show less
Maintenance and reset
- Clean the surface with a dry cloth. The light source is integrated and not user-replaceable. p. 2
Technical specifications
| Parameter | Value | Meaning | Pages |
|---|---|---|---|
| Voltage | 230V | Operating voltage | p. 2 |
| Frequency | 50Hz | Operating frequency | p. 2 |
| Power | 16W | LED power consumption | p. 2 |
| IP Rating | IP20 | Protection against solid objects | p. 2 |
Where to find it in the PDF
- Safety Warnings p. 1
- Installation and Specs p. 2
- Energy Efficiency p. 3
Table of contents
Important Safety Information
Before beginning the installation, ensure that the power supply is switched off. Read all safety instructions carefully to prevent accidents or damage to the product. This product is intended for indoor use only.
Installation Guide
The installation process involves mounting the fixture to the ceiling and connecting the electrical wiring. Please follow these steps based on the provided diagram:
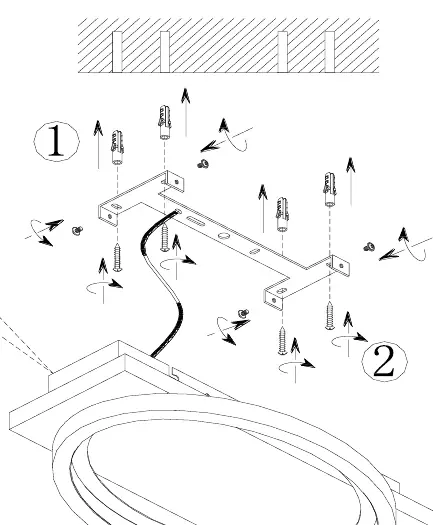
- Preparation: Ensure the mounting surface is stable and capable of supporting the weight of the lamp.
- Step 1: Mark and drill holes in the ceiling according to the mounting bracket dimensions. Insert the wall plugs.
- Step 2: Secure the mounting bracket to the ceiling using the provided screws.
- Step 3: Connect the electrical wires to the terminal block. Ensure the Live (L), Neutral (N), and Ground (Earth) wires are connected to the corresponding terminals.
- Step 4: Attach the lamp housing to the mounting bracket and secure it in place.
Technical Specifications
- Voltage: 230V~50Hz
- Power: 16W LED
- IP Rating: IP20
- Energy Efficiency: Class F
Maintenance and Disposal
The light source contained in this product is not user-replaceable. For maintenance, clean the surface with a dry cloth. Do not dispose of this product with household waste; follow local regulations for the disposal of electronic equipment.
Practical help
Common problems
Light does not turn on
Check if the power supply is on and verify that the wiring connections (L, N, Ground) are secure in the terminal block.
Unstable mounting
Ensure the mounting bracket is screwed tightly into a solid ceiling surface using appropriate wall plugs.
Before use
- Ensure the main power supply is disconnected.
- Verify that the ceiling can support the weight of the lamp.
- Check that all necessary mounting hardware is included.
- Confirm the voltage matches your local power supply (230V~50Hz).
Show more Show less
Images and diagrams
- The diagram illustrates the 4-step installation process: drilling, mounting the bracket, wiring the terminal block, and securing the lamp.
- The wiring diagram shows the connection points for Live (L), Neutral (N), and Ground (Earth) wires.
Model compatibility
- This product is designed for indoor use only (IP20).

Manual page author
Emily Carter
User documentation editor