Lighting / LED Strips
User Manual for American Lighting 120-H3-RGBW Hybrid 3 RGBW Bulk Reels
Quick guide for the American Lighting 120-H3-RGBW Hybrid 3 RGBW Bulk Reels. Learn how to install, cut, wire, and maintain your LED strip lighting safely.
Table of contents
Manual images
Click an image to enlargeQuick guide from the manual
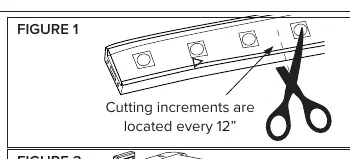
The American Lighting 120-H3-RGBW Hybrid 3 RGBW Bulk Reels are decorative LED lighting strips. Key operational requirements include a maximum run distance of 164 feet and the use of a 120V DC 4-channel controller (such as the 120-CTRL-4CH). Cutting the strip is only permitted at 12-inch increments; cutting elsewhere will damage the internal wiring and LEDs.
Safety Information
- Do not operate while coiled: Operating the light while tightly coiled can cause overheating. Maintain at least 12mm spacing between cables.
- Outdoor use: Use dielectric grease and shrink tube at all power connections and end caps. Use GFCI protection on circuits or outlets.
- Installation restrictions: Do not submerge in liquids, do not route through walls or ceilings, and do not install within 15 feet of a swimming pool.
- Electrical safety: Disconnect power at the source before installation or servicing. Do not use if the PVC housing or power cord insulation is damaged.
Installation: Cutting and Wiring
Follow these steps to connect the power kit or link jumpers:
- Determine the required length.
- Cut the strip squarely at the nearest 12-inch cut mark using a sharp tool.
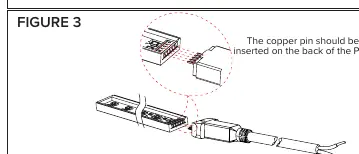
- Insert the rubber ring from the conkit into the pin block side.
- Insert the pin block into the Hybrid 3 RGBW strip.
- Press the pin block and strip into the connector's pedestal and place the cover over it.
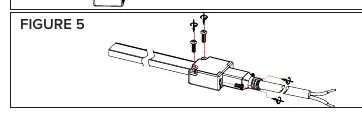
- Secure the conkit using the lock screws.
- Wire the 5-pin leads to the 120V DC 4-channel controller, matching polarity: Black to +, Red to Red, Green to Green, Blue to Blue, and White to White.
Mounting
Mounting Clips: Attach clips using nails or screws. Ensure the surface is mechanically sound. Clips should be spaced evenly, with a maximum of 12 inches between them. Maintain at least 1/2 inch distance between separate lines of the light strip to ensure proper heat distribution.
Mounting Channel: Attach the mounting track/channel to a sound surface using appropriate fasteners. Gently press the light strip into the channel until it snaps into place.
Care and Maintenance
For cleaning, use a soft, dry, or damp cloth. Do not use harsh chemicals or abrasives.
Manufacturer information
American Lighting Inc.
Practical help
Common problems
LEDs not working after cutting
Ensure the cut was made exactly at the 12-inch increment mark. Cutting elsewhere damages the internal wiring.
Overheating
Do not operate the light while tightly coiled. Ensure at least 12mm spacing between cables.
Outdoor connection failure
Ensure dielectric grease and shrink tube are applied to all power connections and end caps to prevent water ingress.
Before use
- Verify you have a 120V DC 4-channel controller.
- Ensure electrical power is disconnected at the source.
- Check the PVC housing and power cord for any damage.
- Confirm you have dielectric grease and shrink tube for outdoor installations.
- Ensure the mounting surface is mechanically sound.
Specs in practice
- Cutting Increment
- 12 inches; cutting anywhere else will damage the product.
- Power Consumption
- 3W per foot.
Images and diagrams
- Figure 1: Illustrates cutting the strip at the 12-inch increment mark.
- Figure 3: Shows the correct insertion of the copper pin block into the back of the PCB.
- Figure 5: Shows the final step of securing the connector with lock screws.
Model compatibility
- Requires a 120V DC 4-channel controller (e.g., 120-CTRL-4CH).
- Use only American Lighting recommended controllers, power connectors, jumpers, and extensions.
- Use only UL approved outdoor extension cords (type SW, SOW, STW, STOW, SJW, SJOW, SJTW, or SJTOW) for outdoor use.

Manual page author
Emily Carter
User documentation editor
Prepares concise manual descriptions and highlights the most useful setup, operation, and maintenance information for readers.