Lighting / Controllers & Dimmers
User Manual for American Lighting 120-CTRL-4CH 120V 4 Channel DMX Decoder
Quick guide for the American Lighting 120-CTRL-4CH 120V 4 Channel DMX Decoder. Includes installation instructions, wiring diagrams, DMX addressing, and operation modes.
Table of contents
Manual images
Click an image to enlargeQuick Start and Safety
The American Lighting 120-CTRL-4CH is a 120V 4-channel DMX decoder designed for indoor use. Before beginning, ensure the power is disconnected at the source. The device is rated IP20 and must be installed in a dry location with proper ventilation to prevent overheating. Operating temperature range is -20°C to 50°C. Never connect cables while the power is on.
Installation
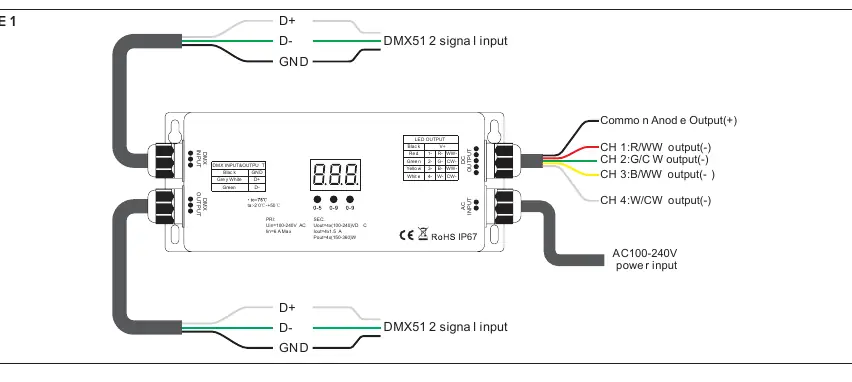
The decoder features mounting tabs on either end for secure installation via screws. Wiring must be performed according to the fixture's instruction manual, ensuring correct polarity. The device requires a 100-240V AC power source.
Operation Modes
Mode A: External DMX Master ControllerThis mode requires an external DMX master controller (sold separately). Connect the 120-CTRL-4CH to the controller via the included bare wire kit or an optional XLR3 connection. Ensure all wiring polarity is matched (Black to Black, White to White, Red to Red, Green to Green, Blue to Yellow).
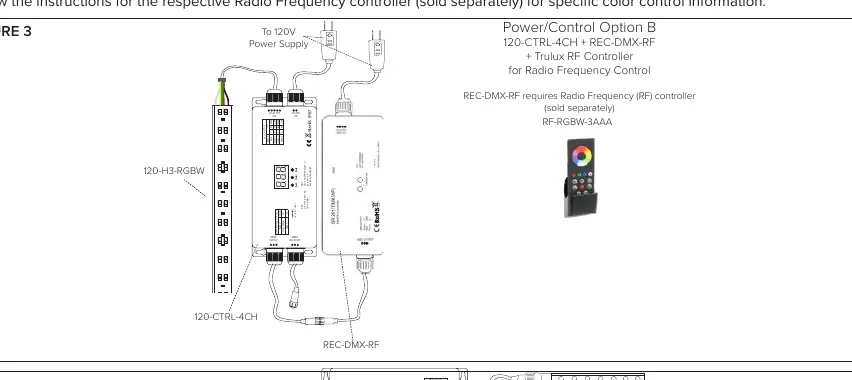
Mode B: Radio Frequency Receiver + ControllerThis mode requires the REC-DMX-RF receiver and an RF-RGBW-3Z controller (sold separately). Connect the DMX input of the decoder to the DMX output of the REC-DMX-RF receiver. Sync the RF controller by pressing the learning key on the receiver and following the controller's specific instructions.
Device Settings
Settings are configured using the three buttons (A, B, C) on the controller and the digital display:
- DMX Address: Press and hold any button for >3 seconds to enter setting mode. Use buttons A (hundreds), B (tens), and C (units) to set the address. Hold any button for >3 seconds to confirm.
- DMX Channel: Press and hold buttons B+C for >3 seconds to select 1, 2, 3, or 4 channels.
- PWM Frequency: Press and hold buttons A+B for >3 seconds. Use button C to select frequency (0-9, A-J). Note: Do not exceed 3KHz to avoid damage.
- Dimming Curve: Press and hold A+B+C for >3 seconds to adjust the gamma value (0.1-9.9).
- Factory Reset: Press and hold buttons A+C for >3 seconds until the display cycles.
Technical Specifications
- Input Voltage: 100-240V AC
- Output: 4 channels, 1.5A each
- Compatibility: Single color, Tunable CCT, RGB, RGBW fixtures
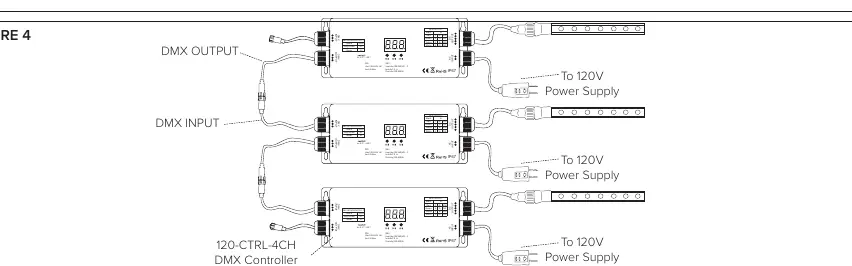
- DMX Signal: Limited to 700ft max run for interconnected units
Manufacturer information
American Lighting Inc.
Practical help
Common problems
Device overheating
Ensure the controller is mounted in an area with proper ventilation.
DMX signal not detected
Check connections between the DMX master controller and the decoder. Ensure the indicator dot next to the 'hundreds' digit is red.
PWM frequency too high
Do not set the PWM frequency higher than 3KHz to avoid overheating and damage to the device.
Before use
- Verify 100-240V AC power source is available.
- Ensure the installation location is indoors and dry.
- Check that all wiring polarity matches (Black to Black, White to White, etc.).
- Confirm DMX master controller or RF receiver is compatible.
- Ensure all wires are secured tightly in the connectors.
Specs in practice
- Operating Temp
- Device functions between -20°C and 50°C.
Images and diagrams
- Figure 1: Wiring diagram showing DMX input, AC power input, and LED output connections.
- Figure 2: Setup diagram for connecting an external DMX master controller.
- Figure 3: Setup diagram for using the Radio Frequency Receiver (REC-DMX-RF) with the decoder.
- Figure 4: Diagram for interconnecting multiple DMX controllers.
Model compatibility
- Requires 100-240V DC products.
- Mode B requires REC-DMX-RF and RF-RGBW-3Z (sold separately).
- DMX 512 signal is limited to a 700ft maximum run.

Manual page author
Emily Carter
User documentation editor
Prepares concise manual descriptions and highlights the most useful setup, operation, and maintenance information for readers.