Home Appliances / Ovens
User Manual for Amica 2022CC2.30eEX / EHC 933 041 /1 E Built-in Oven
Quick guide for the Amica 2022CC2.30eEX / EHC 933 041 /1 E built-in oven. Includes installation instructions, operation modes, cleaning procedures, and troubleshooting tips.
Quick answers from the manual
Quick answer
- This manual provides installation, operation, and maintenance instructions for the Amica 2022CC2.30eEX / EHC 933 041 /1 E built-in oven. p. 1, 69
Key actions
- Install the oven p. 78, 81
- Clean the oven p. 96, 97
First start
- Heat the oven at 250°C for 30 minutes p. 85
Show 3 more answers Show less
Problems and fixes
Appliance not working
Check fuse box
p. 100Technical specifications
| Parameter | Value | Meaning | Pages |
|---|---|---|---|
| Max Power | 10.2 kW | Maximum power consumption | p. 101 |
Where to find it in the PDF
- Installation p. 78, 81
- Operation p. 85, 88
Table of contents
Manual images
Click an image to enlargeQuick guide from the manual
This document provides essential instructions for the safe installation, operation, and maintenance of the Amica 2022CC2.30eEX / EHC 933 041 /1 E built-in oven. Before first use, ensure the oven is cleaned and heated at 250°C for 30 minutes to remove manufacturing residues. Always supervise children near the appliance and never leave frying oil unattended.
Installation
The oven must be installed in a dry, well-ventilated area. Ensure the worktop cutout dimensions are 560 mm by 490 mm. The appliance must be connected to the power supply by a qualified electrician. The electrical connection supports 400V 3N~50Hz or 230V single-phase, depending on the configuration. Ensure the earth lead is correctly connected to the terminal marked with the earth symbol.

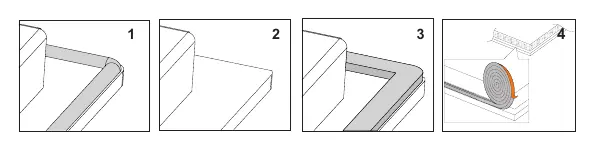

Mounting the hob
If the seal is not factory-fitted, attach it to the underside of the hob before installation. Use the provided brackets to secure the hob to the worktop. For 38 mm thick worktops, use four brackets. For 28 mm thick worktops, use additional wooden blocks (15x15x50 mm).
Operation
The oven is controlled by two main knobs: the function selector and the temperature regulator. The hob zones are controlled by individual knobs. Always use pans with flat, thick bases that match the size of the heating zone to maximize efficiency. Avoid using pans with concave or convex bases.

Oven functions
- Rapid Preheating: Uses top and bottom heaters, roaster, and fan to heat the oven quickly.
- Defrosting: Only the fan is active.
- Grill/Supergrill: Used for grilling meat, fish, and toasts. Keep the oven door closed during grilling.
- ECO Heating: An optimized heating mode to save energy.
Cleaning and Maintenance
Regular cleaning ensures the longevity of the appliance. Always switch off the power before cleaning. Use warm water with a mild detergent for the interior. For the hob, use a special scraper to remove stubborn spills, being careful not to damage the frame.
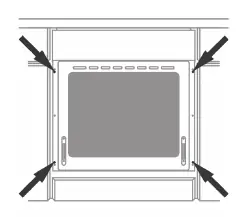
Steam Cleaning
Pour 250 ml of water into a bowl on the lowest level, set the temperature to 50°C, and the function to bottom heater. Heat for 30 minutes, then wipe the interior clean.
Door and glass removal
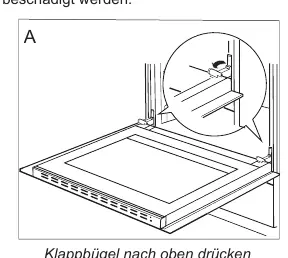
The oven door can be removed for easier access. Tilt the safety catches on the hinges upwards, close the door slightly, and lift it out. The inner glass panel can be removed by unhooking the upper door slat.
Troubleshooting
If the appliance does not work, check the household fuse box. If the oven light fails, tighten or replace the bulb (G9, 230V, 25W). For any other technical faults, contact an authorized service center.
Technical Data
The maximum power rating is 10.2 kW. The appliance operates on 230/400V ~ 50 Hz.
Manufacturer information
Amica S.A.
Practical help
Common problems
Appliance does not work
Check the household fuse box; replace any blown fuses.
Oven lighting does not work
Tighten or replace the bulb (G9, 230V, 25W).
Before use
- Remove all packaging materials
- Clean the oven interior and hob
- Heat the oven at 250°C for 30 minutes
- Heat hob zones for 4 minutes without pans
Show more Show less
Images and diagrams
- Cutout dimensions: 560x490 mm
- Electrical connection diagrams for 1/N~, 2/N~, 3/N~ configurations
Model compatibility
- Use pans with flat, thick bases
- Do not use pans with concave or convex bases
- Pan diameter should match the heating zone size

Manual page author
Emily Carter
User documentation editor