Garden / Watering Equipment
User Guide for AQUA JOE 2-Zone Electronic Water Timer AJ-ET2Z
Quick start guide and user manual for the AQUA JOE 2-Zone Electronic Water Timer (AJ-ET2Z). Learn how to install batteries, program watering cycles, set the time, and perform maintenance.
Quick answers from the manual
Quick answer
- The AQUA JOE AJ-ET2Z is a 2-zone electronic water timer. It is programmed by setting the current time, selecting a watering frequency (1st to 7th), and choosing a cycle duration (15, 30, or 60 minutes) on the dials. p. 2, 3
Key actions
- Install 2 AA batteries in the lower back compartment. p. 3
- Set current time using + and - buttons. p. 3
- Select watering frequency using the 'S' button. p. 3
First start
- Install batteries, set the current time, attach to faucet, and program the desired watering schedule. p. 3
Show 4 more answers Show less
Problems and fixes
Timer stops working or poor water quality
Remove and clean the inlet filter; flush faucet and hose connections.
p. 4Maintenance and reset
- Clean the inlet filter and flush connections if the timer stops working. p. 4
Technical specifications
| Parameter | Value | Meaning | Pages |
|---|---|---|---|
| Power | 2 AA Alkaline batteries | Required power source | p. 2 |
| Operating Pressure | 10 - 100 PSI | Required water pressure range | p. 2 |
Where to find it in the PDF
- Controls and Technical Data p. 2
- Setup and Programming p. 3
- Maintenance p. 4
Table of contents
Manual images
Click an image to enlargeQuick guide from the manual
The AQUA JOE 2-Zone Electronic Water Timer (AJ-ET2Z) allows you to automate your outdoor watering. Key steps include installing two AA batteries, setting the current time, and programming the watering frequency and cycle duration for each zone. Always detach the timer from the faucet during freezing weather to prevent damage.
Product Overview
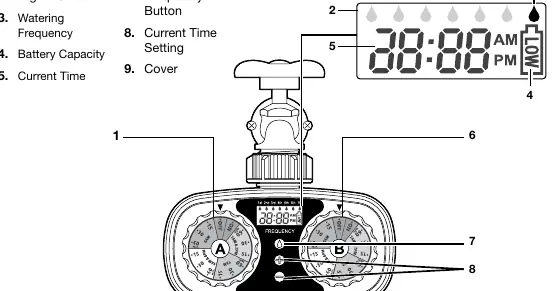
The timer features two independent zones (A and B) controlled by dials. The control panel includes a digital screen, a frequency button, and plus/minus buttons for time adjustments. The battery compartment is located on the lower back of the unit.
Technical Data
- Power: 2 AA Alkaline batteries (not included)
- Operating Pressure: 10 - 100 PSI
- Max Pressure: 120 PSI
- Watering Frequency: 12 hours up to every 7 days
- Cycle Time Max: 60 minutes per cycle
- Valves/Zones: 2
Battery Installation
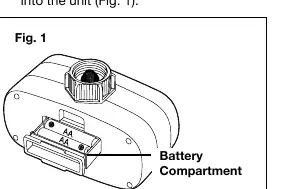
- Open the battery compartment on the lower back of the timer.
- Pull out the compartment and insert two AA batteries.
- Secure the battery compartment back into the unit.
Setting Current Time
- Use the “+” button to increase the time.
- Use the “-” button to decrease the time.
- Ensure the correct AM/PM setting is displayed.
- Tip: Hold the “+” or “-” button to scroll through time selections quickly.
Programming the Timer
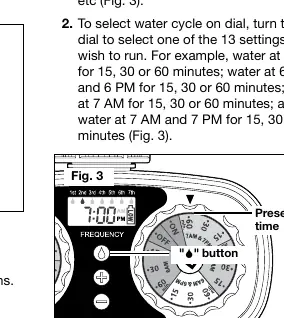
- Set Frequency: Press the “S” button to cycle through options (1st to 7th). 1st = once a day, 2nd = once every two days, etc.
- Set Cycle: Turn the dial to select one of the 13 available settings (e.g., 6 AM for 15, 30, or 60 minutes).
Installing the Timer
Attach the timer securely to the faucet and hose. Open the faucet and leave it open; the timer will automatically control the water flow based on your settings. Ensure the cover is closed securely.
Manual Operation
For non-timed watering, turn the dial to the ON position. Turn the dial to OFF to stop manual watering.
Maintenance and Care
If the timer stops working or water quality is poor due to debris:
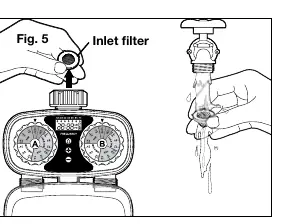
- Remove the inlet filter from the faucet connection and rinse under water.
- Flush the faucet connection and hose connections with a stream of water.
- Replace the inlet filter before reattaching.
Safety Warnings
- Detach from the faucet during freezing weather.
- Intended for outdoor watering use only.
- Do not use water exceeding 100°F (38°C).
- Do not use with water pressures exceeding 100 PSI.
Manufacturer information
Aqua Joe
Practical help
Common problems
Timer stops working or exhibits poor water quality
Remove the inlet filter and rinse under water to remove debris. Flush faucet and hose connections.
Freezing weather
Detach the timer from the faucet to prevent damage.
Before use
- Ensure you have 2 AA alkaline batteries (not included).
- Verify water pressure is between 10-100 PSI.
- Ensure the faucet thread size is 0.75 inches.
- Confirm the timer is for outdoor use only.
Show more Show less
Specs in practice
- Operating Pressure
- 10-100 PSI; do not exceed 100 PSI.
- Watering Frequency
- 12 hours up to every 7 days.
- Cycle Time Max
- 60 minutes per cycle.
Images and diagrams
- The control panel features two dials (Zone A and Zone B), a frequency button, and +/- buttons for time setting.
- The battery compartment is located on the lower back of the unit.
Model compatibility
- Intended for outdoor watering use only.
- Not for use with water exceeding 100°F (38°C).

Manual page author
Michael Turner
Technical manual editor