Garden / Lawn Mowers
User Manual for Vonhaus Retractable Garden Hose Reel 20M
Quick guide for the Vonhaus 20M Retractable Garden Hose Reel. Includes assembly instructions, mounting guide, spray settings, and troubleshooting for retraction issues.
Quick answers from the manual
Quick answer
- The Vonhaus 20M Retractable Garden Hose Reel is an outdoor watering device featuring a 9-function sprayer. It requires wall mounting at a recommended height of 0.9m and connects to standard 1/2-inch or 3/4-inch taps. p. 1, 2, 4
Key actions
- Mounting the reel p. 3
- Operating the hose p. 5
First start
- Ensure all parts are present, drill M8 holes for the bracket, mount at 0.9m, and attach the tap connector. p. 2, 3, 4
Problems and fixes
Hose does not retract
Hold the hose at the yellow warning mark and give it a quick tug, or place the unit on its right side and pull on the hose until it retracts.
p. 5Maintenance and reset
- Periodically check and re-tighten fittings. Re-tighten all fittings after the first week following assembly. p. 5
Technical specifications
| Parameter | Value | Meaning | Pages |
|---|---|---|---|
| Hose Length | 20M | Maximum extension length | p. 1 |
| Tap Compatibility | 1/2-inch and 3/4-inch | Supported tap sizes | p. 4 |
Where to find it in the PDF
- Product Diagram p. 2
- Assembly p. 3, 4
- Spray Settings p. 5
Table of contents
Manual images
Click an image to enlargeQuick guide from the manual
The Vonhaus 20M Retractable Garden Hose Reel is designed for outdoor use. It features a 9-function spray nozzle and a 2-in-1 tap connector compatible with 1/2-inch and 3/4-inch taps. For optimal use, the unit should be wall-mounted at a height of 0.9 metres from the floor. If the hose fails to retract, it is usually due to the stop-anywhere mechanism being locked; this can be resolved by pulling the hose at the yellow warning mark or placing the unit on its side.
Product components
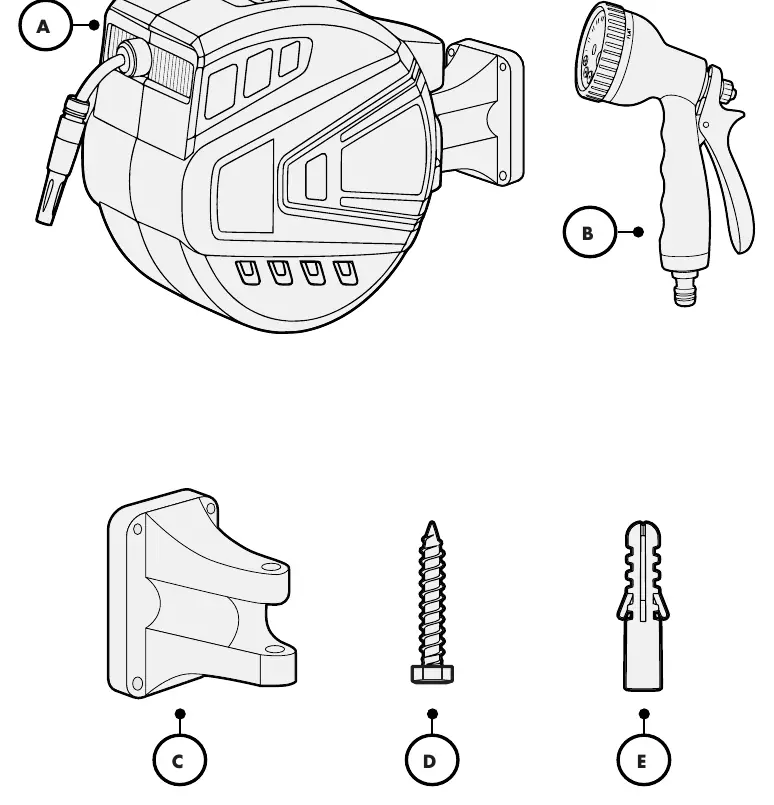
- A: Hose Reel Machine
- B: 9 Function Sprayer
- C: Wall Mounting Bracket
- D: M8*60 Screws (x4)
- E: Wall Plugs (x4)
Assembly and installation
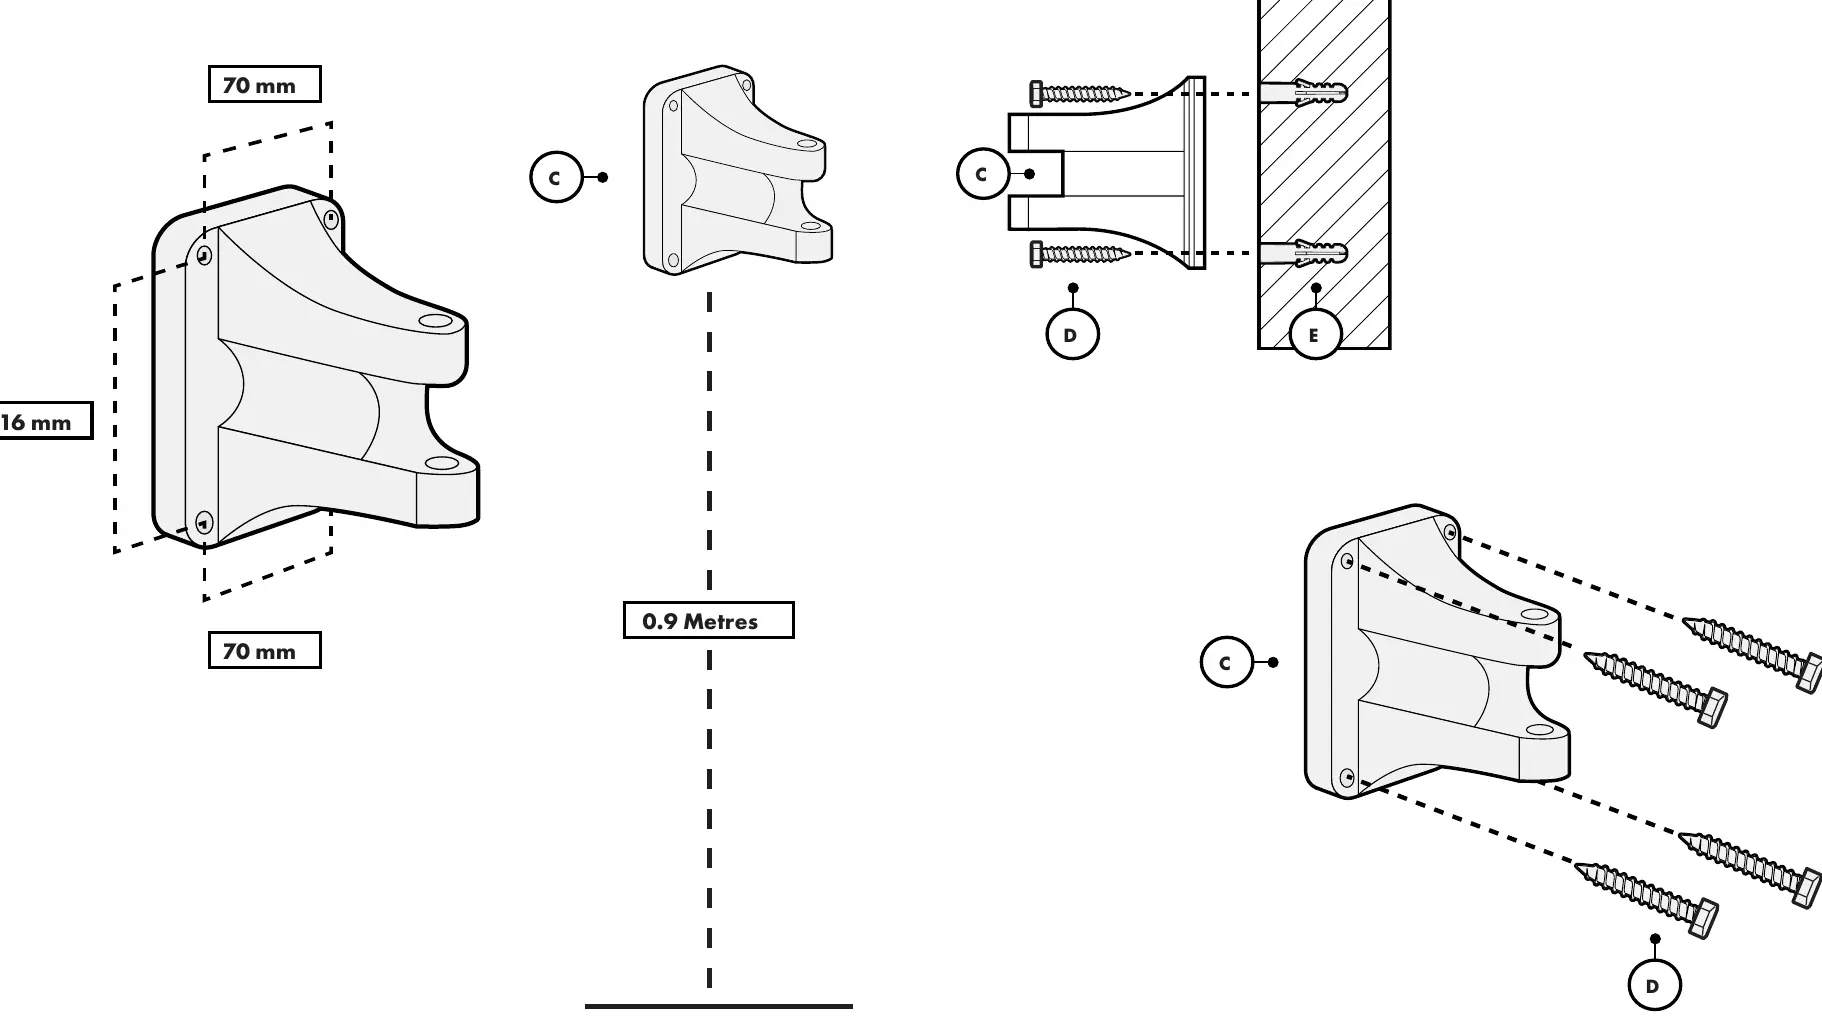
- Mounting: Drill four M8 holes to align with the mounting bracket. It is recommended to install the bracket at a height of 0.9 metres from the floor. Secure the bracket using the provided screws and wall plugs.
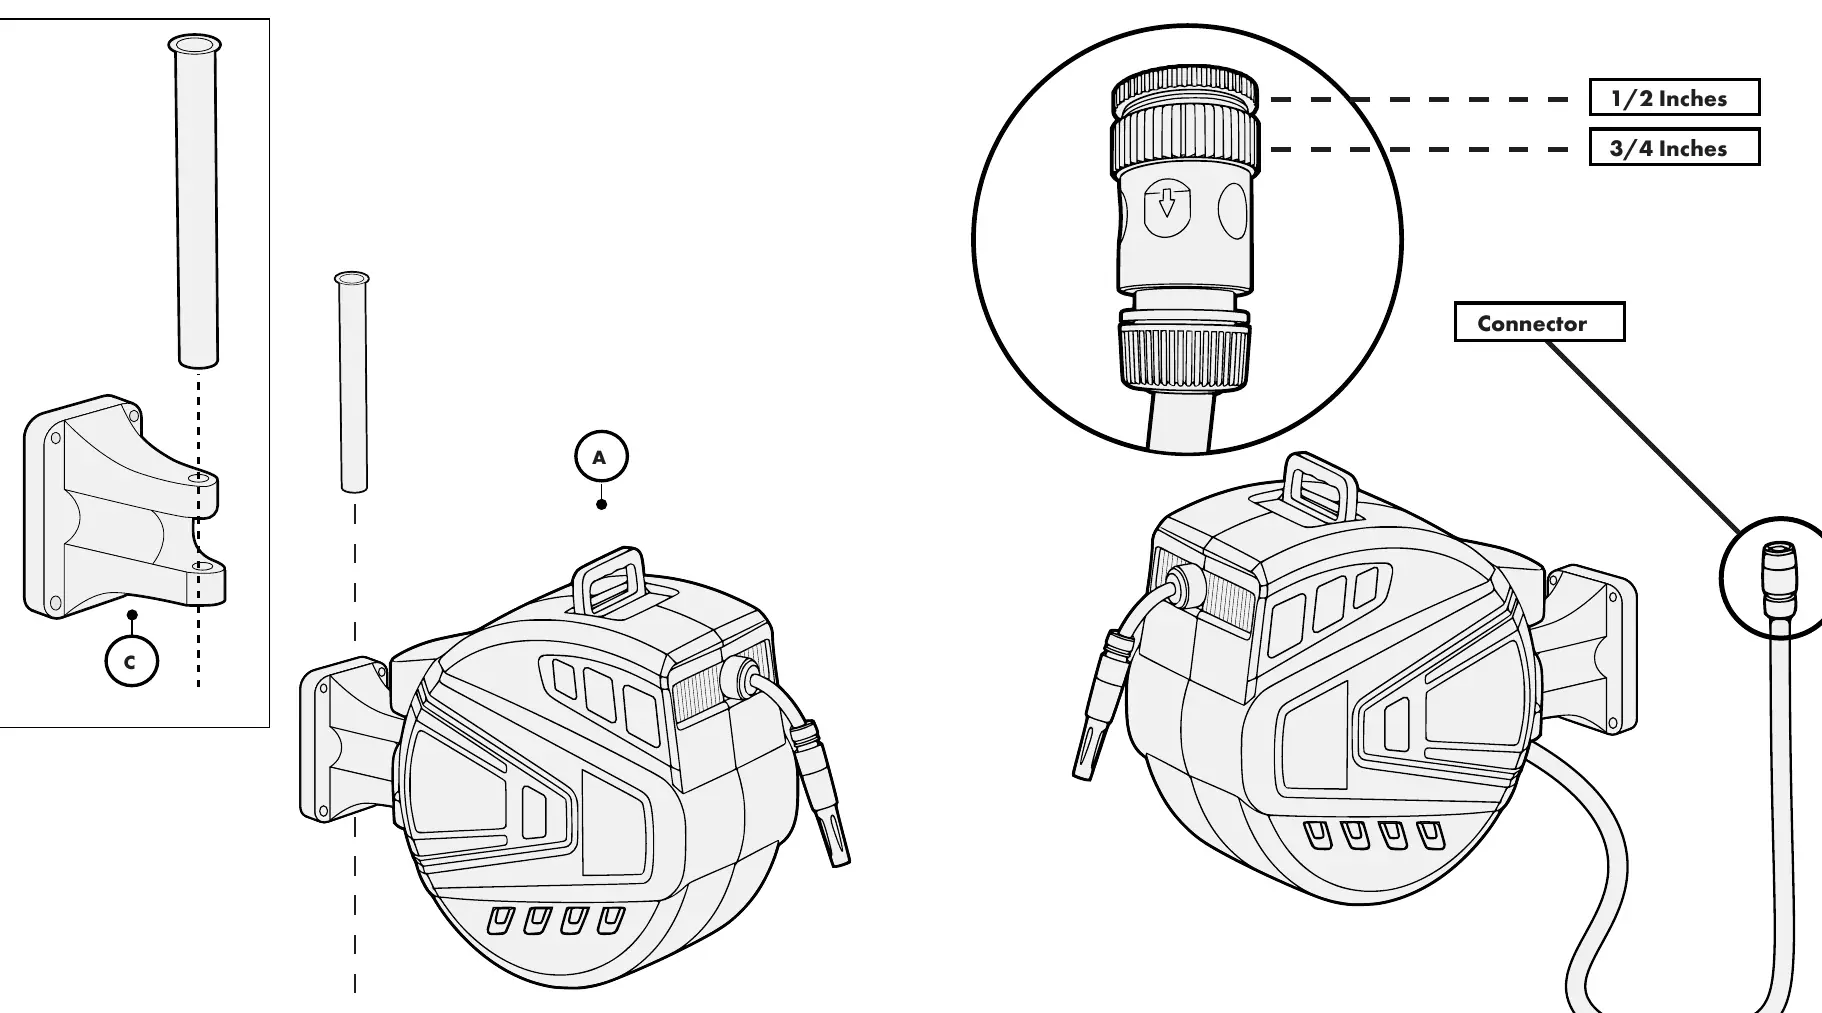
- Attaching the reel: Attach the hose reel to the mounting bracket using the pivot pin.
- Connecting to tap: Attach the connector to your tap. The 2-in-1 adaptor fits both 1/2-inch and 3/4-inch sizes.
Spray settings
Rotate the nozzle head to switch between the 9 available spray functions: Mist, Flat, Center, Rise, Shower, Cone, Angle, Jet, and Soaker.
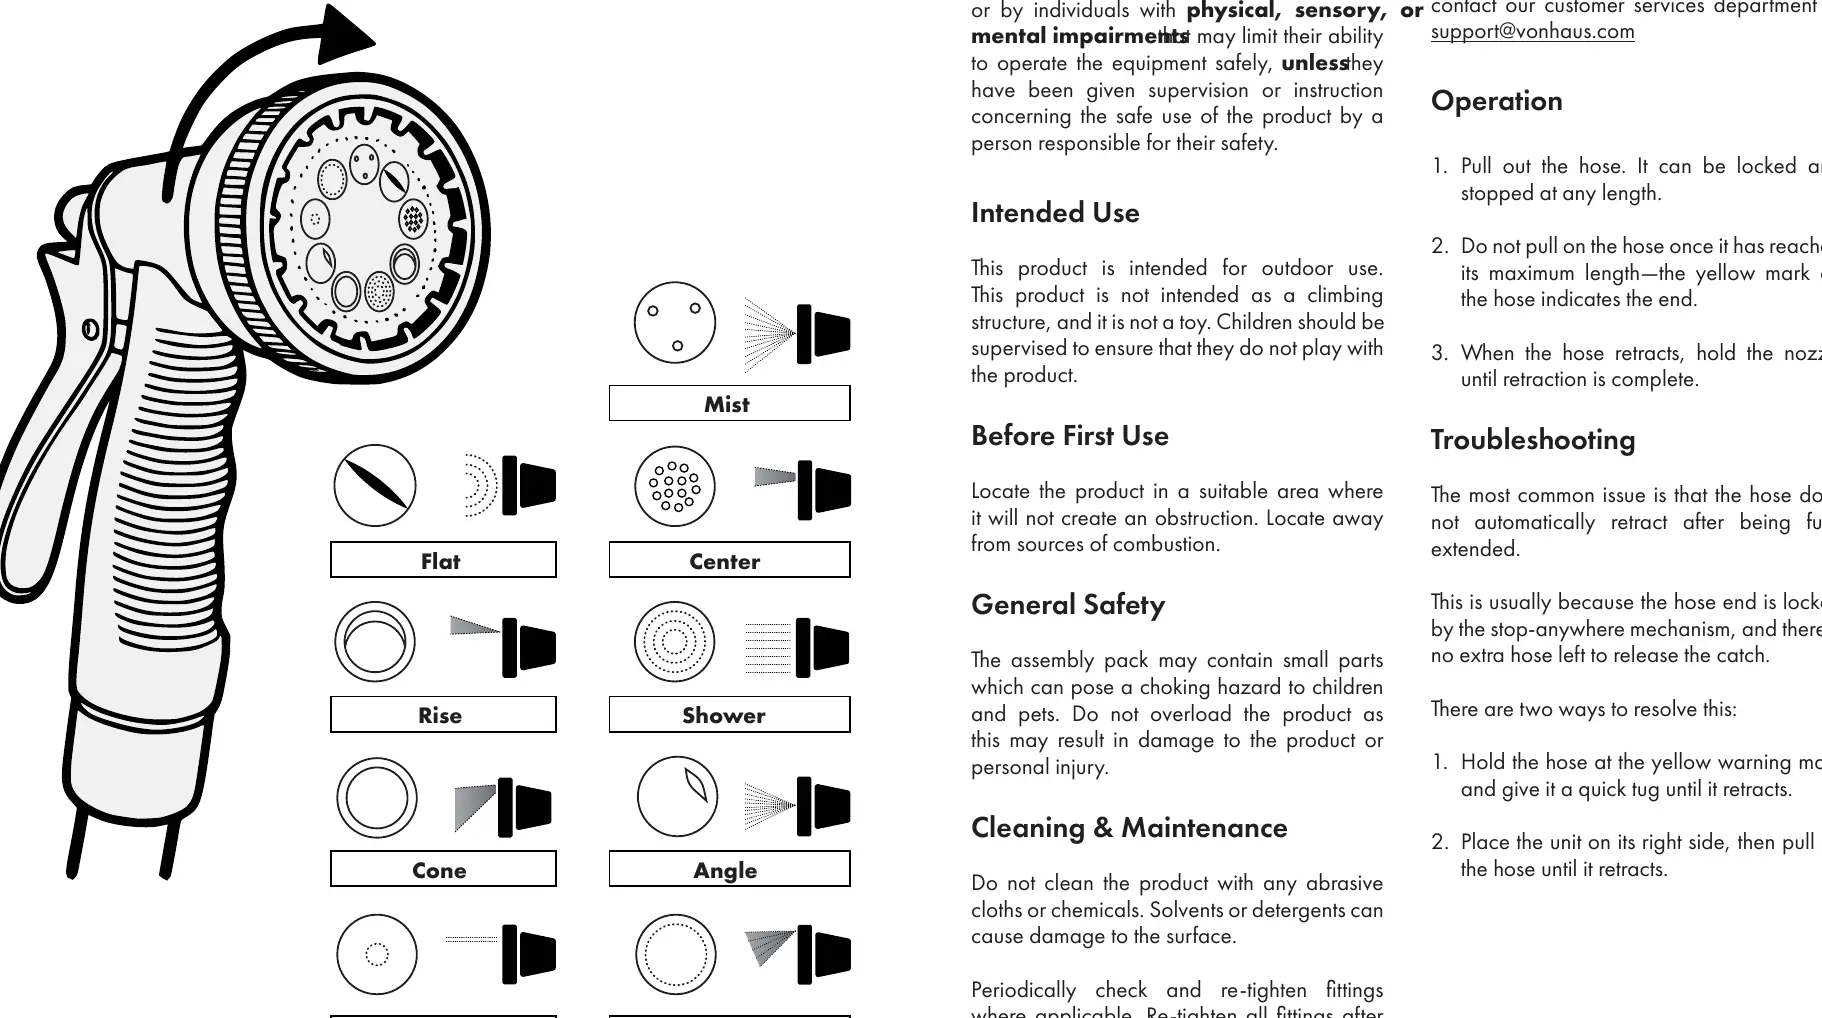
Operation
- Pull out the hose to the desired length; it can be locked and stopped at any length.
- Do not pull the hose once it has reached its maximum length (indicated by the yellow mark).
- When retracting, hold the nozzle until the retraction is complete.
Cleaning and maintenance
- Do not clean with abrasive cloths or chemicals; use a sponge with warm water and mild detergent.
- Periodically check and re-tighten fittings.
- Re-tighten all fittings after the first week following assembly.
Troubleshooting
If the hose does not automatically retract after being fully extended, it is likely locked by the stop-anywhere mechanism with no extra hose left to release the catch. To resolve this, hold the hose at the yellow warning mark and give it a quick tug, or place the unit on its right side and pull on the hose until it retracts.
Safety and intended use
This product is for outdoor use only. It is not a toy and not intended as a climbing structure. Children should be supervised. Do not overload the product. Locate the unit away from sources of combustion.
Practical help
Common problems
Hose does not automatically retract
Hold the hose at the yellow warning mark and give it a quick tug, or place the unit on its right side and pull on the hose until it retracts.
Before use
- Ensure you have all components (A-E) listed in the manual.
- Locate the product in a suitable area away from obstructions and sources of combustion.
- Drill four M8 holes for the mounting bracket.
- Mount the bracket at a recommended height of 0.9 metres.
- Check that the tap connector fits your tap size (1/2-inch or 3/4-inch).
Specs in practice
- Mounting Height
- Recommended 0.9 metres from the floor
- Tap Compatibility
- Fits 1/2-inch and 3/4-inch taps
- Spray Functions
- 9 different settings (Mist, Flat, Center, Rise, Shower, Cone, Angle, Jet, Soaker)
Images and diagrams
- A: Hose Reel Machine
- B: 9 Function Sprayer
- C: Wall Mounting Bracket
- D: M8*60 Screws
- E: Wall Plugs
Model compatibility
- The included 2-in-1 adaptor is compatible with both 1/2-inch and 3/4-inch tap sizes.

Manual page author
Michael Turner
Technical manual editor
Reviews PDF manuals for structure, safety notes, and practical product details so readers can find the right information quickly.