Garden / Watering Equipment
User Manual for Chapin 16200 Home and Garden Sprayer
Quick guide for the Chapin 16200 Home and Garden Sprayer. Includes assembly, filling, pressurizing, maintenance, and safety instructions for safe operation.
Quick answers from the manual
Quick answer
- The Chapin 16200 is a manual pump sprayer. To operate, fill the tank, pump the handle to build pressure, and use the shut-off handle to spray. Always release pressure after use. p. 1
Key actions
- Connect hose to tank and extension wand to shut-off. p. 1
- Pump handle until resistance is felt to pressurize. p. 1
- Turn handle counterclockwise to release pressure. p. 1
First start
- Perform a pre-use check with water only to ensure no leaks and that the nozzle is not clogged. p. 1
Show 3 more answers Show less
Problems and fixes
Leaking
Check hose nut and tank condition.
p. 1
Clogged nozzle
Clean nozzle and discharge assembly.
p. 1Maintenance and reset
- Oil pump rod with 10-12 drops of light oil. p. 1
Where to find it in the PDF
- Assembly and Operation p. 1
Table of contents
Manual images
Click an image to enlargeQuick guide from the manual
This manual provides instructions for the safe operation and maintenance of the Chapin 16200 Home and Garden Sprayer. Important: Always wear protective gear (goggles, gloves, long sleeves, pants, and full foot protection) when spraying. Never use the sprayer with flammable, caustic, acidic, chlorine, bleach, or other corrosive chemicals. Always release pressure after use and before storing.
Assembly
Hose to Tank
Insert the outlet tube portion of the discharge assembly into the tank adapter. Ensure there is no gap between the tank adapter and the outlet tube adapter. Firmly tighten the retaining nut to the tank adapter.
Extension Wand to Shut-off
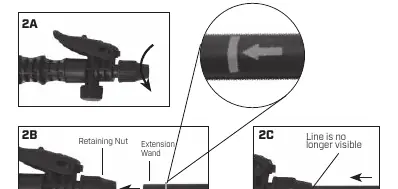
Loosen the retaining nut from the shut-off. Insert the extension wand into the end of the shut-off until the line marked on the end of the wand is no longer visible. Tighten the retaining nut securely.
Pre-Use Check
- Check the tightness of the hose nut to ensure the hose is securely attached to the tank outlet.
- Inspect the hose for deterioration, cracks, softness, or brittleness. Replace if necessary.
- Inspect the interior and exterior of the tank for signs of deterioration.
- Test the unit with water only to ensure there are no leaks and the discharge is not clogged.
- Inspect all metal parts (wand, nozzle, fittings) for rust, corrosion, or pitting.
Filling
- Turn the pump handle counterclockwise and remove the pump.
- Prepare the spray solution according to the chemical manufacturer's instructions.
- Fill the tank to the appropriate gallon marker. Do not overfill.
- Check the pump barrel for grass or dirt. Replace the pump in the tank and tighten securely.
Pressurizing and Spraying
To Pressurize: Turn the handle clockwise to tighten. Pump the handle until you feel resistance.
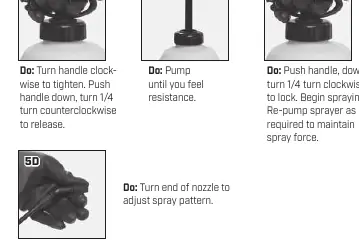
To Spray: Push the handle down and turn 1/4 turn clockwise to lock. Begin spraying. Re-pump as required to maintain spray force.
Adjusting Pattern: Turn the end of the nozzle to adjust the spray pattern.
Releasing Pressure
With the pump facing away from you, turn the locked handle counterclockwise until air begins to escape. Stop turning when you hear air escaping and keep the pump pointed away until all air has escaped.
Fatigue-Free Spraying
To Lock: For constant spraying, push down on the shut-off handle and slide it forward.
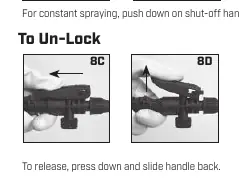
To Unlock: Press down and slide the handle back.
Care, Storage, and Maintenance
- Rinsing: Rinse the tank thoroughly with water only after each use. Run water through the discharge assembly.
- Storage: Store the tank upside down with the pump removed in a warm, dry location.
- Lubrication: Periodically oil the pump by dropping 10-12 drops of light oil down the pump rod through the opening in the cover.
Practical help
Common problems
Sprayer not spraying
Check for clogs in the nozzle or discharge assembly. Ensure the pump is properly pressurized.
Pressure loss
Check for leaks in the hose or tank. Ensure the pump is tightened securely and the hose nut is tight.
Pump resistance issues
Lubricate the pump rod with 10-12 drops of light oil through the cover opening.
Before use
- Check hose nut tightness.
- Inspect hose for cracks or brittleness.
- Inspect tank for signs of deterioration.
- Test with water only first.
- Check pump barrel for dirt or grass.
Show more Show less
Images and diagrams
- Hose to Tank: Ensure no gap between adapter and tube.
- Extension Wand: Insert until the line is no longer visible.
- Locking mechanism: Push down and slide handle forward to lock.
Model compatibility
- Do not use with flammable, caustic, acidic, chlorine, or bleach solutions.

Manual page author
David Miller
Documentation analyst