Home Appliances / Commercial Kitchen Equipment
User Manual for Avantco 177AG Series Cooking Equipment
Comprehensive user manual for Avantco 177AG series commercial cooking equipment, including manual griddles, radiant charbroilers, and hot plates. Covers installation, gas conversion, operation, maintenance, and technical specifications.
Quick answers from the manual
Quick answer
- This manual covers the installation, operation, and maintenance of Avantco 177AG series commercial cooking equipment, including griddles, charbroilers, and hot plates. p. 1
Key actions
- Install the pressure regulator before connecting to the gas line. p. 4
- Perform gas leak testing with soapy water before lighting. p. 4
First start
- Season the griddle surface before first use. p. 4
Problems and fixes
Pilot or burner outage
Check for air drafts from exhaust fans or AC; install baffles if necessary.
p. 3Technical specifications
| Parameter | Value | Meaning | Pages |
|---|---|---|---|
| Gas Inlet | 3/4 inch NPT | Standard gas connection size for Avantco appliances. | p. 3 |
Where to find it in the PDF
- Installation p. 2
- Operation p. 3, 4
- Cleaning p. 5
- Conversion p. 6
- Specifications p. 7
Table of contents
Manual images
Click an image to enlargeQuick guide from the manual
This manual provides essential instructions for the installation, operation, and maintenance of Avantco 177AG series commercial cooking equipment. Important: This equipment is for commercial use only and must be connected to the specific gas type identified on the rating plate. Always ensure the pressure regulator is installed to avoid voiding the warranty.
Installation Instructions
Installation must be performed by qualified, certified, and authorized personnel in accordance with local codes and the National Fuel Gas Code (ANSI Z223.1). Key installation steps include:
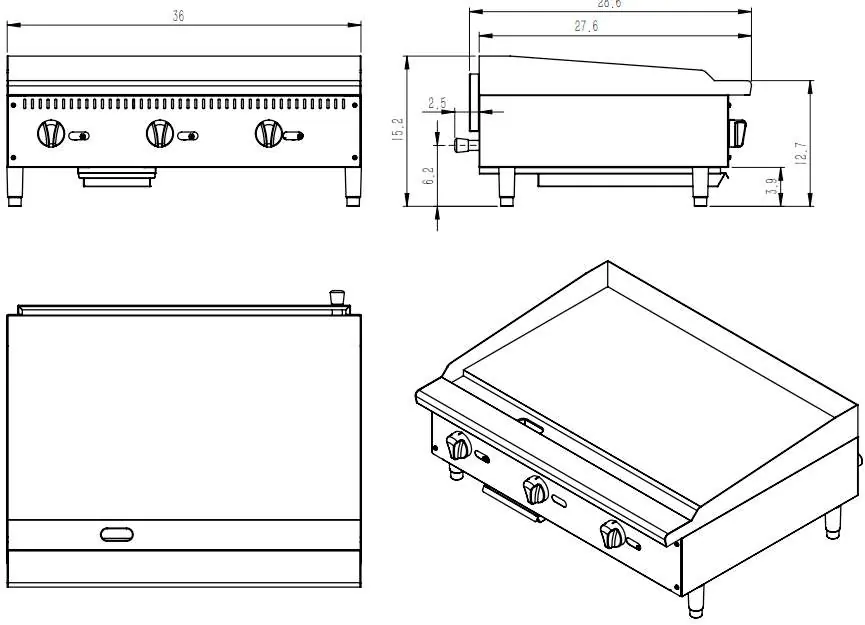
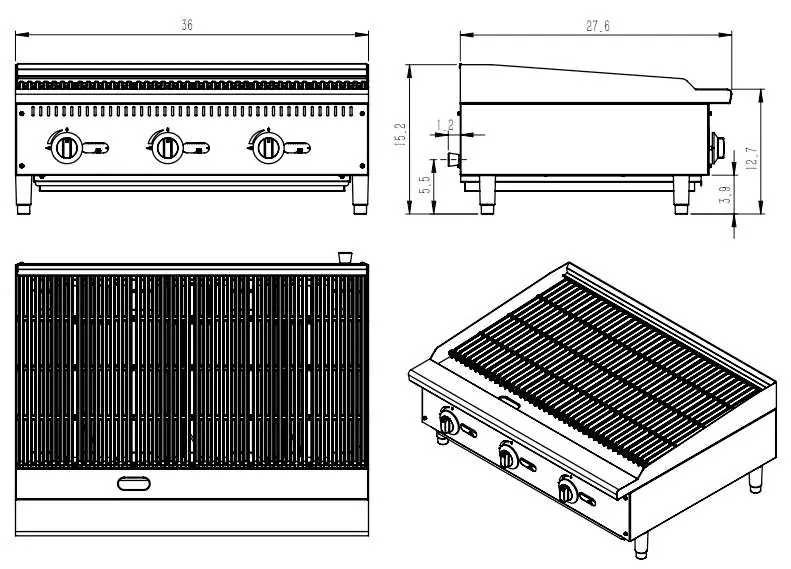
- Gas Connection: The supply line must be the same size or greater than the appliance inlet (3/4" NPT). Use sealant resistant to LP gas on all pipe joints.
- Pressure Regulator: A regulator is packed inside the appliance and must be installed on the incoming service line. Failure to install this regulator will void the warranty.
- Ventilation: Ensure the area around the appliance is clear. The unit should be placed under an exhaust hood constructed according to local codes.
- Leak Testing: All connections must be tested with a soapy water solution before lighting any pilots.
Operating Instructions
Before operating, ensure all gas connections are leak-free. Caution: Do not stand with your face close to the combustion chamber when lighting pilots.
Lighting and Shutdown
- Turn all valves to the OFF position and wait 5 minutes.
- Turn the pilot valve(s) by adjusting the screw counter-clockwise, then light the standing pilot and adjust the flame to 1/4" high.
- Turn ON the gas valve(s) to light the main burner.
- For complete shutdown, turn OFF the gas valve(s) and turn the pilot valve(s) clockwise to shut off gas to the pilot(s).
Before First Use (Griddles)
- Clean the griddle surface with hot, soapy water to remove factory-applied protective oil.
- Rinse with a mixture of 1/4 cup vinegar to 1 qt. water.
- Spread unsalted solid shortening or liquid frying compound over the surface.
- Turn burners to medium until the shortening smokes, then turn off.
- Rub the melted shortening into the surface with burlap, allow to cool, and wipe with a thin film of oil.
Cleaning & Maintenance
Regular maintenance ensures equipment longevity and efficient operation.
Daily Maintenance
- Open Burners: Remove top grates, lift off burner heads and venturi, wash in hot soapy water, and reinstall.
- Griddles: Scrape with a nylon griddle scraper. Use a fine-grained stone only if necessary. Wash with hot soapy water, rinse with vinegar/water, then clear water. Re-oil the surface. Warning: Do not flood a hot griddle with cold water as it may warp or crack.
- Stainless Steel: Wipe regularly with hot soapy water. Do not use steel wool, abrasive cloths, or metal tools.
Gas Conversion
Units are shipped configured for Natural Gas. To convert to Propane (L.P.):
- Perform conversion before connecting to the gas supply.
- Remove trivets and burners.
- Replace orifice fittings (check unit number on the side of fittings).
- Install front panel knobs.
- Adjust the regulator by unscrewing the cap, flipping the plastic insert to the "LP" position, and snapping it back in.
Manufacturer information
Avantco Equipment
Practical help
Common problems
Pilot or burner outage
Check for air drafts from exhaust fans or air conditioning; provide air openings or baffles in the room if the problem persists.
Gas leaks
Test all connections with a soapy water solution before lighting any pilots.
Griddle plate warping or cracking
Do not flood a hot griddle with cold water.
Before use
- Verify gas type matches the rating plate
- Install the pressure regulator
- Check for gas leaks with soapy water
- Clean griddle surface (if applicable)
- Ensure adequate ventilation and exhaust hood installation
Specs in practice
- Intake-Tube Pressure
- The required gas pressure in inches of water column (in.W.C.).
Images and diagrams
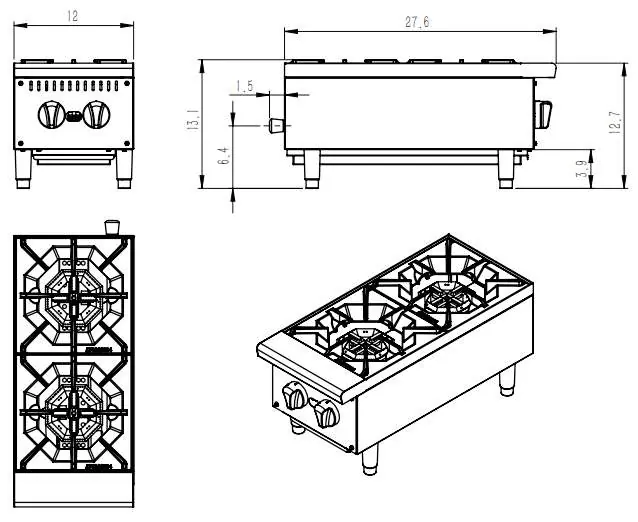
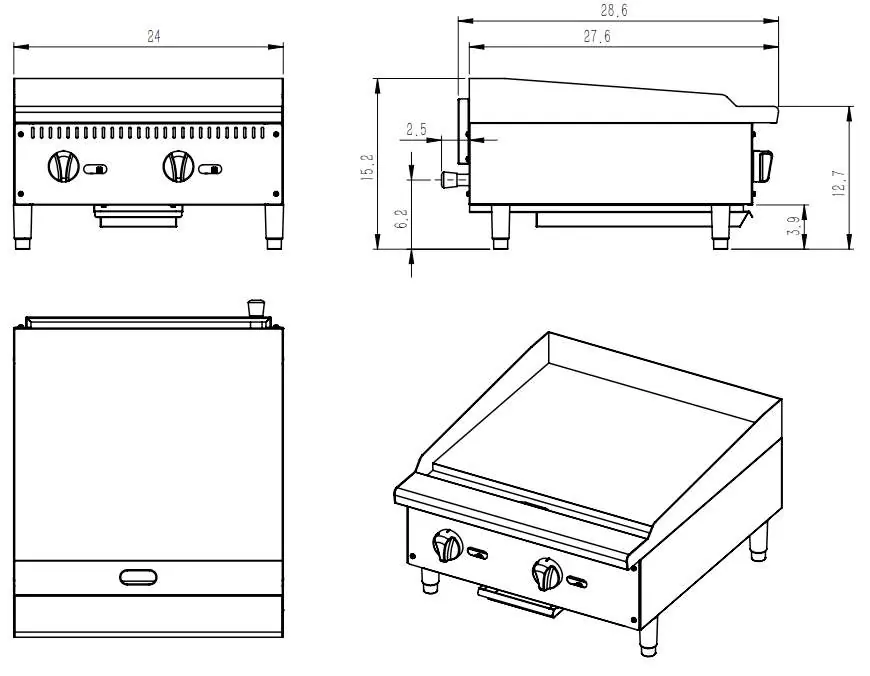
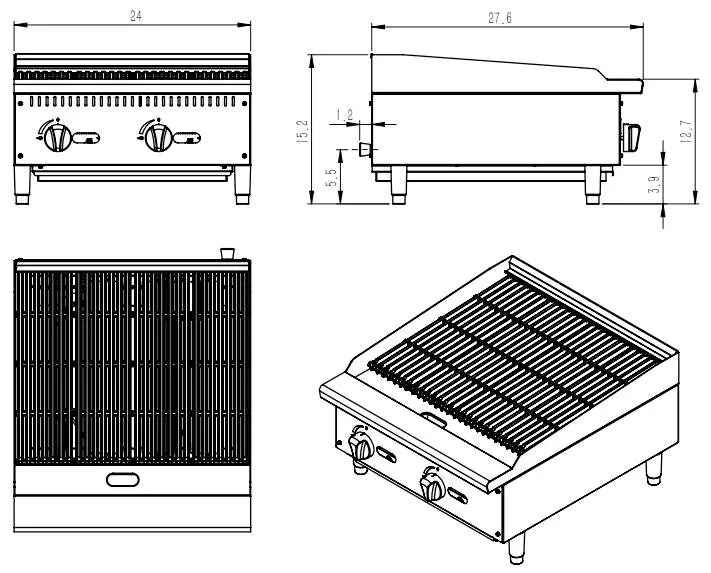
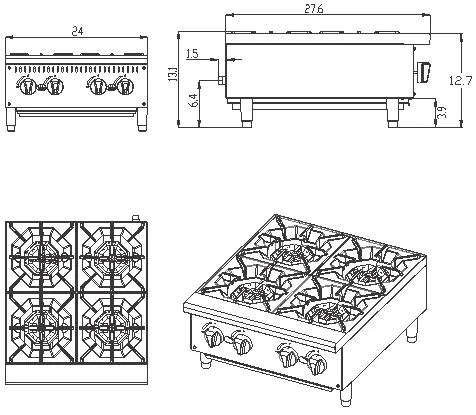
- Diagrams show dimensions and layout for each model in the 177AG series.
- Conversion diagrams illustrate orifice replacement and regulator adjustment.
Model compatibility
- For commercial use only.
- Must be connected to the gas type identified on the rating plate.
- Requires professional installation.

Manual page author
Michael Turner
Technical manual editor
Reviews PDF manuals for structure, safety notes, and practical product details so readers can find the right information quickly.