Home Appliances / Commercial Kitchen Equipment
User Manual for Avantco Glass Door Merchandisers
Quick guide for Avantco Glass Door Merchandisers. Includes installation, temperature control, defrosting, cleaning, and troubleshooting steps.
Quick answers from the manual
Quick answer
- Avantco Glass Door Merchandisers are designed for indoor, temperature-controlled environments. Key setup steps include allowing the unit to stand for 24 hours if transported on its side, ensuring a level surface, and maintaining 6 inches of rear clearance. Temperature settings are factory-calibrated but can be adjusted via the digital control panel. p. 3, 4
Key actions
- Adjusting Temperature p. 4
- Cleaning Condenser Coil p. 7
- Manual Defrost p. 5
First start
- Let stand upright for 24 hours if transported on its side. p. 3
- Ensure level surface and 6-inch clearance. p. 3
Problems and fixes
Compressor not running
Check fuse/breaker, power cord, thermostat setting, or wait for defrost cycle.
p. 8Maintenance and reset
- Clean condenser coil monthly. p. 7
Technical specifications
| Parameter | Value | Meaning | Pages |
|---|---|---|---|
| Refrigerator Temp Range | 33°F - 40°F | Operating cycle range | p. 4 |
| Freezer Temp Range | -5°F - 2°F | Operating cycle range | p. 4 |
Where to find it in the PDF
- Installation p. 3
- Temperature Controls p. 4
- Cleaning p. 7
- Troubleshooting p. 8
Table of contents
Manual images
Click an image to enlargeImportant Information
This manual covers the installation, operation, and maintenance of Avantco Glass Door Merchandisers. The unit is intended for indoor use in a temperature-controlled environment (below 75°F and 60% relative humidity). Failure to follow these conditions may void the warranty.
Installation
Before installing the unit, ensure the following:

- Acclimatization: If the unit was transported on its side, let it stand upright for at least 24 hours before plugging it in.
- Surface: Install on a strong, level surface to prevent noise and malfunction.
- Clearance: Maintain at least 6 inches of clearance on the back for proper ventilation.
- Environment: Do not install outdoors, in direct sunlight, or in high-humidity/dusty areas. Keep away from heat-generating equipment.
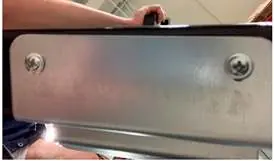
- Bracket Removal: For swing door units, remove the bracket from the bottom of the doors (Fig. 1) to prevent paint damage.
- Shelves: Ensure shelves are installed with the raised lip facing up towards the rear to promote airflow.
Electrical Requirements
- Use a dedicated, grounded, and properly-sized electrical outlet.
- Do not use extension cords.
- Do not plug or unplug with wet hands.
- After unplugging, wait at least 10 minutes before plugging back in to protect the compressor.
Temperature Controls
Units are factory-set to optimal temperatures. To adjust:
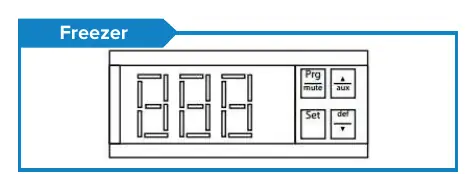
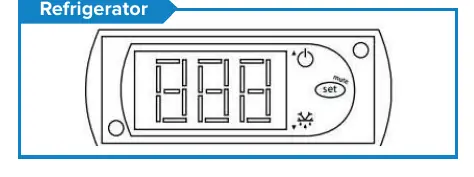
- Hold the "SET" button for 1 second until the display flashes.
- Use the arrow buttons to adjust the minimum temperature.
- Press "SET" again to save.
Note: Refrigerators cycle between 33°F and 40°F. Freezers cycle between -5°F and 2°F.
Operation
Defrosting: Units feature automatic defrost cycles. To run a manual defrost cycle (on digital control models only):
- Freezers: Press the defrost button ("DEF" and ▼) for 5 seconds.
- Refrigerators: Press the defrost button (Snowflake and ▼) for 3 seconds.
Loading: Ensure at least 4 inches of clearance from the evaporator. Do not store flammable or explosive materials inside.
Cleaning
Disconnect power before cleaning. Clean the condenser coil at least once per month to prevent malfunction and high energy consumption. Use a soft brush or vacuum to clean the finned condenser coil in a vertical direction. Clean the interior with warm water and mild soap; avoid abrasive cleaners.
Troubleshooting
If the unit is not performing correctly, check the following:
- Compressor not running: Check for a tripped circuit breaker, unplugged cord, or if the unit is in a defrost cycle.
- Cabinet too warm: Check if the thermostat is set too high, airflow is blocked, or the condenser coil is dirty.
- Condensation: Ensure the door gasket is sealing properly and the relative humidity is below 60%.
Manufacturer information
Avantco Equipment
Practical help
Common problems
Compressor not running
Check if the fuse is blown or circuit breaker tripped, ensure the power cord is plugged in, or wait for the defrost cycle to finish.
Cabinet temperature too warm
Check if the thermostat is set too high, ensure airflow is not blocked, clean the condenser coil, or check if the door is ajar.
Condensation collecting
Check if the door gasket is sealing properly or if the ambient relative humidity is above 60%.
Before use
- Let the unit stand upright for 24 hours if it was transported on its side.
- Ensure the unit is placed on a strong, level surface.
- Maintain 6 inches of clearance at the back of the unit.
- Ensure all accessories (shelves, clips, casters) are installed.
- Plug into a dedicated, grounded outlet.
Specs in practice
- Refrigerator Temperature
- Cycles between 33°F and 40°F.
- Freezer Temperature
- Cycles between -5°F and 2°F.
- Ambient Conditions
- Must be below 75°F and 60% relative humidity.
Images and diagrams
- Fig. 1: Shows the bracket at the bottom of the door that must be removed before operation to prevent paint damage.
Model compatibility
- For indoor use only.
- Not for chilling warm products; meant for keeping cold products cold.

Manual page author
Michael Turner
Technical manual editor
Reviews PDF manuals for structure, safety notes, and practical product details so readers can find the right information quickly.