Electronics / Security Cameras
Installation Guide for Avigilon H6A PTZ Camera
A comprehensive installation and setup guide for the Avigilon H6A PTZ camera series. This guide covers mounting procedures for in-ceiling and pendant configurations, wiring diagrams, power requirements, initial network setup, and...
Quick answers from the manual
Quick answer
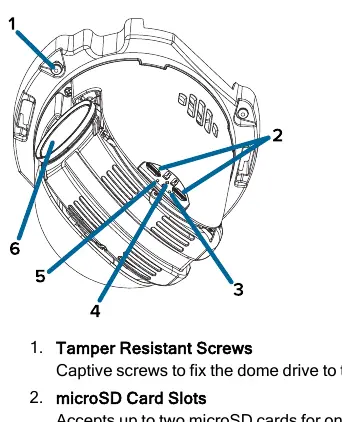
- The Avigilon H6A PTZ camera requires a UL Listed Class 2 or LPS power unit (24VAC/VDC or PoE+). Installation involves mounting the back box, connecting cables, and initializing the camera via the web interface to set an administrator password. p. 3, 33, 35
Key actions
- Initialize camera username and password p. 35
- Perform factory reset p. 41
First start
- Connect to network and power p. 33, 35
- Access web interface p. 35
Problems and fixes
LED blinking patterns
Perform a factory reset using the physical firmware revert button.
p. 39Maintenance and reset
- Factory reset procedure p. 41
Technical specifications
| Parameter | Value | Meaning | Pages |
|---|---|---|---|
| Power (In-Ceiling) | 24 VAC 55VA / 24 VDC 35W / PoE+ 25.5W | Power requirements for in-ceiling mount. | p. 3 |
Where to find it in the PDF
- Safety Information p. 3, 4
- In-Ceiling Installation p. 16, 22
- Pendant Installation p. 23, 31
- Cable Connections p. 33, 34
Table of contents
Manual images
Click an image to enlargeQuick guide from the manual
This document provides essential installation and operation information for the Avigilon H6A PTZ camera. Before installation, ensure you have a UL Listed Power Unit marked Class 2 or LPS. Installation must be performed by qualified personnel only. The camera supports both in-ceiling and pendant mounting configurations.
Installation
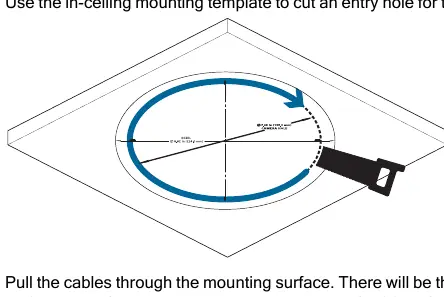
The camera can be installed in-ceiling or as a pendant mount. In-Ceiling Installation: Use the provided template to cut the hole, pull cables through, terminate them, and secure the back box using the spring clips. Pendant Installation: Requires a pendant wall mount or pipe adapter. Secure the back box to the mount, feed cables, and attach the dome drive.
Cable Connections
The camera supports Power over Ethernet (PoE) or auxiliary power (24 VAC or 24 VDC). Seamless Failover: The camera can transition between PoE and auxiliary power without interruption. Use the 16-pin connector for alarms, relays, and audio inputs/outputs. Ensure proper wire gauge (18AWG or heavier for power) to prevent voltage drop.
Configuration
Upon first connection, you must initialize the camera by creating an administrator username and password via the web interface or the Avigilon Camera Configuration Tool. The camera automatically obtains an IP address via DHCP; if unavailable, it defaults to the 169.254.0.0/16 subnet. You can configure microSD storage and home preset positions through the web interface or ACC Client software.
Troubleshooting and Maintenance
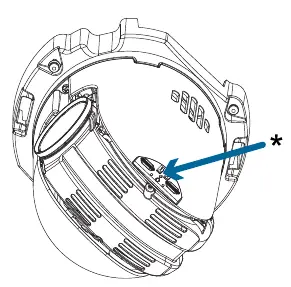
If the camera is not functioning as expected, check the LED indicators. A factory reset can be performed using the physical firmware revert button on the dome drive. To clean the dome bubble, use hand soap or a non-abrasive detergent and a microfiber cloth to avoid scratches.
Practical help
Common problems
Green LED is off and amber is on
Perform a factory reset using the physical firmware revert button.
Camera not connected or streaming video
Check the General setup page in the web interface to ensure LEDs are not disabled; if not, perform a factory reset.
Blurry or smudged video
Clean the dome bubble with hand soap or non-abrasive detergent and a microfiber cloth.
Before use
- Verify power source (24 VAC/VDC or PoE+ IEEE 802.3at/bt)
- Ensure installation is performed by qualified personnel
- Check ceiling thickness (max 38.1 mm for in-ceiling)
- Prepare RJ45 connector and required cabling
- Have a microSD card ready if onboard storage is required
Specs in practice
- 24 VAC / 24 VDC
- Auxiliary power input requirements.
- PoE+ IEEE 802.3at/bt
- Power over Ethernet standards supported for operation.
Images and diagrams
- Wiring diagram for the 16-pin I/O connector
- In-ceiling back box components and cable routing
- Pendant mount assembly order
Model compatibility
- Pendant mount models comply with EN 60529 IP66 and IP67 ratings.
- Using less than Type 4, Class 8 PSE for pendant mounts will reduce pan/tilt speed specifications.

Manual page author
David Miller
Documentation analyst
Organizes user manual content into clear summaries, with attention to model details, product context, and everyday usability.