Electronics / Networking
Installation Guide for Avigilon AI NVR Standard 10GbE Kit
Learn how to install the 10GbE network card in your Avigilon AI NVR Standard. This guide covers hardware installation, riser configuration, and software verification steps.
Table of contents
Manual images
Click an image to enlargeQuick guide from the manual
This guide provides instructions for installing the 10GbE Kit into an Avigilon AI NVR Standard. Before beginning, ensure your system is shut down and disconnected from power. You must use an antistatic mat and strap to prevent damage to components. Note that the installation procedure varies depending on whether you are also installing the AI NVR Performance Upgrade Kit.
Package Contents
- 1 x 4-port 10GbE Direct Attach SFP+ PCIe card
- 1 x low-profile PCIe bracket (for moving the BOSS card to slot 4 if required)
Required Tools
- Phillips #2 screwdriver
- Antistatic mat and antistatic strap
Installation Preparation
Before starting the installation:
- Shut down the AI NVR and wait for the power light to stop blinking.
- Disconnect all cables, including power, network, and peripherals.
- Remove the unit from the rack if applicable.
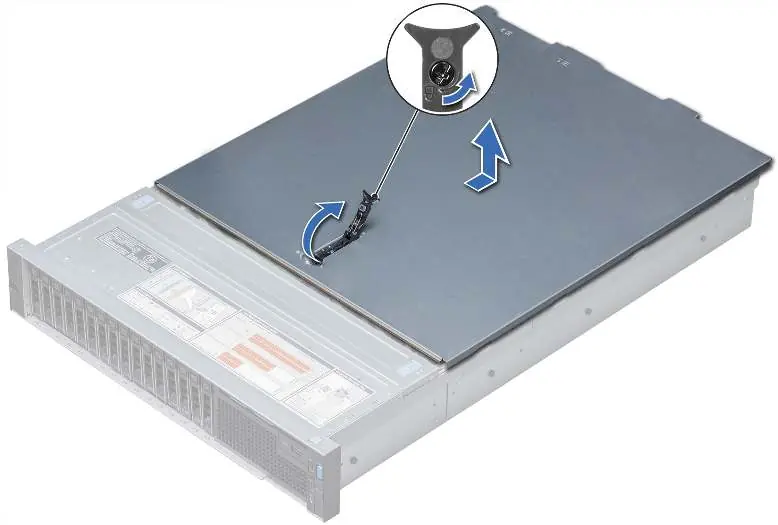
- Unlock the latch release on top of the unit, lift, and rotate the latch to remove the cover.
Installing the 10GbE Card in Slot 2 of Expansion Riser 1
Use this procedure if you are not installing the Performance Upgrade Kit:
- Unpack the 10GbE card.
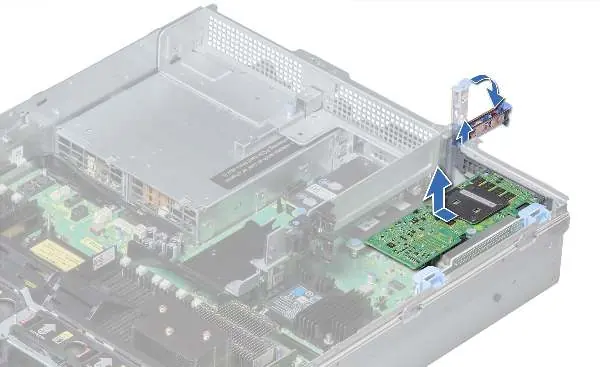
- Remove the pre-installed graphics card from slot 1 of expansion riser 1 by pulling the expansion card latch.
- Set the graphics card aside on an ESD mat.
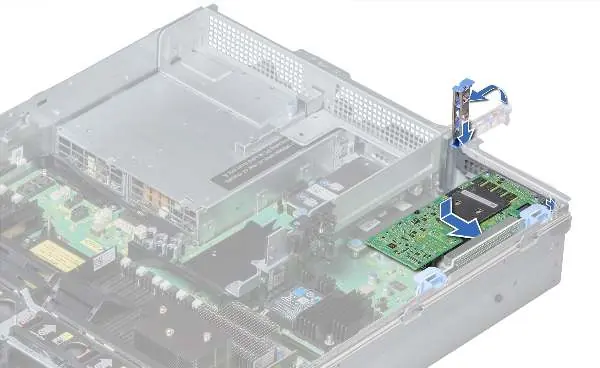
- Install the 10GbE card into slot 2.
- Reinstall the graphics card into slot 1.
- Push the expansion card latch closed.
Installing the 10GbE Card in Slot 3 of Expansion Riser 1
Use this procedure if the Performance Upgrade Kit is installed or planned:
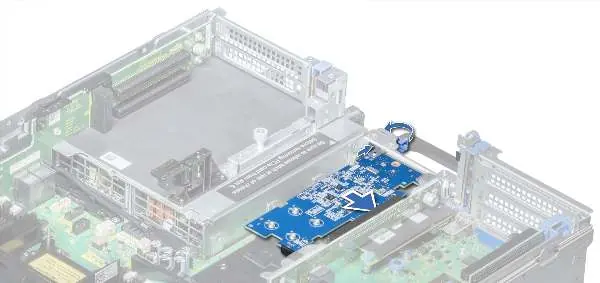
- Remove all cards from expansion riser 1.
- If the BOSS card is in slot 3, remove it, attach the low-profile bracket, and move it to the low-profile slot in riser 2 (slot 4).
- Install the 10GbE card in slot 3 of expansion riser 1.
- Reinstall the GPU cards into their original locations (slot 1 and slot 2).
- Push the expansion card latch closed and re-engage the PCIe lock.
Reattaching the AI NVR Cover
- Ensure all expansion card latches are closed and filler covers are in place for empty slots.
- Close and lock the AI NVR cover.
- Remount the unit in the rack if necessary.
- Reconnect all peripherals and cables.
- Ensure both 750W power supplies are connected to mains power.
- Power on the AI NVR.
Confirming the Installation
After hardware installation, verify the setup via the ACC Client:
- Log in to the ACC site and navigate to Site Setup.
- Select the AI NVR and click Server Management.
- Log in with administrator credentials.
- Go to the Network tab in the Server Management dashboard.
- Verify the 10GbE ports are listed.
- On the General tab, confirm the device is listed as Ethernet Controller X710 for 10GbE SFP+ under Controller Info.
Practical help
Common problems
System fails to function after upgrade
Ensure both 750W power supplies are connected to mains power; the upgraded system requires both.
10GbE ports not detected in ACC software
Verify that you are running ACC release 7.12.4 or later (or 7.14.2+ if using the Performance Upgrade Kit).
BOSS card obstruction
If the BOSS card is in slot 3, it must be moved to the low-profile slot in riser 2 (slot 4) using the provided low-profile bracket.
Before use
- Shut down the AI NVR and disconnect all cables.
- Prepare a Phillips #2 screwdriver.
- Use an antistatic mat and strap to protect components.
- Verify ACC software version compatibility (7.12.4+).
- Ensure you have assistance if lifting the system.
Specs in practice
- Power Requirement
- Requires both 750W power supplies to be connected to function properly.
Images and diagrams
- Cover removal: Shows the latch release mechanism on top of the unit.
- Riser installation: Illustrates the removal and insertion of PCIe cards into the expansion riser.
Model compatibility
- 10GbE Kit alone requires ACC 7.12.4 or later.
- 10GbE Kit + Performance Upgrade Kit requires ACC 7.14.2 or later.

Manual page author
Emily Carter
User documentation editor
Prepares concise manual descriptions and highlights the most useful setup, operation, and maintenance information for readers.