Electronics / Security Cameras
Installation Guide for Avigilon H6X Box Camera
A comprehensive installation and setup guide for the Avigilon H6X Box Camera. This manual covers mounting, cable connections, network configuration, initial setup, and troubleshooting for models 2.0C-H6X-B, 4.0C-H6X-B, 6.0C-H6X-B, and...
Quick answers from the manual
Quick answer
- The Avigilon H6X Box Camera requires a qualified installer to mount the device, connect power (PoE or 12-24V DC), and initialize the administrator account via the web interface or configuration tool. p. 9, 10
Key actions
- Mounting the camera p. 9
- Connecting power p. 10, 14
- Factory reset p. 17
First start
- Create an administrator user via the web interface or configuration tool. p. 10
Problems and fixes
LEDs off or blinking
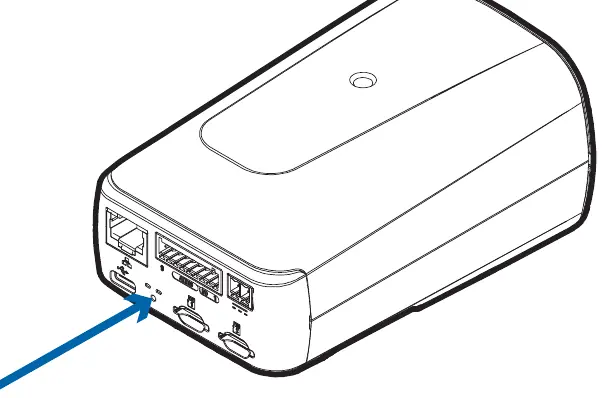
Perform a factory reset using the physical firmware revert button.
p. 16Maintenance and reset
- Factory reset using the firmware revert button. p. 17
Technical specifications
| Parameter | Value | Meaning | Pages |
|---|---|---|---|
| Power Input | 12-24 VDC or PoE | Required power source | p. 4, 10 |
Where to find it in the PDF
- Overview p. 7, 8
- Installation p. 9, 10
- Troubleshooting p. 16, 17
Table of contents
Manual images
Click an image to enlargeQuick guide from the manual
This document provides essential instructions for installing and configuring the Avigilon H6X Box Camera. Installation must be performed by qualified personnel only. Before starting, ensure you have a compatible mounting bracket (minimum 0.7 kg capacity) and a 5/64" or 2 mm slotted screwdriver for power connections.
Overview
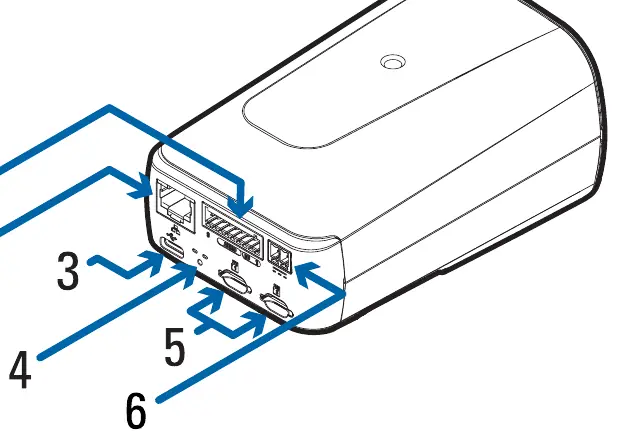
The camera features a front-facing lens port and mounting points, with a rear panel containing all necessary connectivity options:
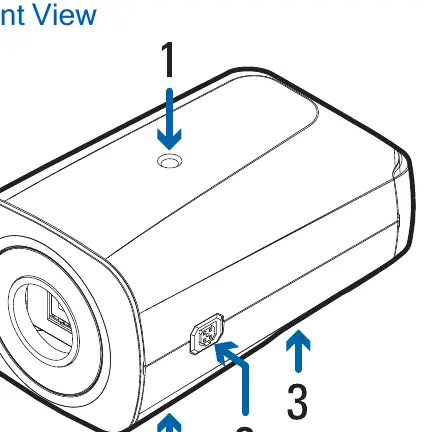
- Front: Camera mounts (1/4"-20 UNC), iCS/CS lens port, and serial number tag.
- Rear: I/O connector block, Ethernet port (supports PoE), USB-C port (for Wi-Fi adapter), LED indicators, microSD card slots, and power connector block.
Installation
Mount the camera using the top or bottom 1/4"-20 UNC threaded holes on a bracket, enclosure, or tripod. Ensure the mounting surface can support the camera weight.
Connecting Cables
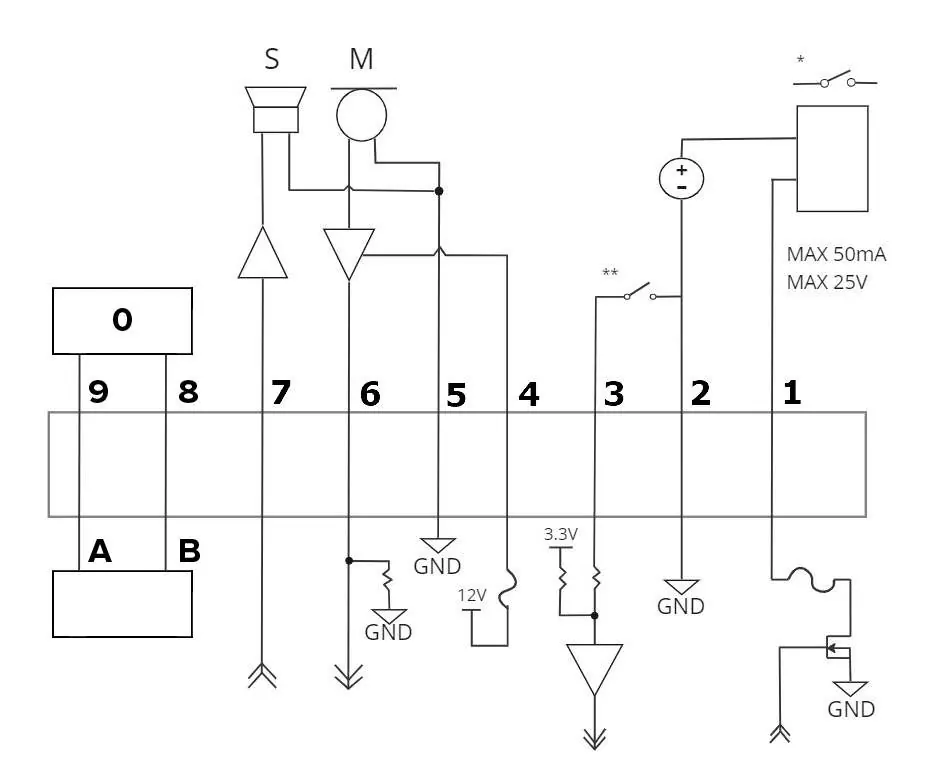
- Connect external I/O devices to the I/O connector block if required.
- If using a CS or iCS lens, ensure the cable is connected to the 5-pin connector on the side.
- Connect power via PoE (Class 3) or an external 12-24 V DC power source to the power connector block.
- Connect a network cable to the Ethernet port.
Configuration
Before the camera is operational, you must create an administrator user. This can be done via the camera's web interface (by entering the IP address in a browser), the Avigilon Camera Configuration Tool, or compatible Avigilon software (Unity Video/Control Center).
Aiming and Focusing
For iCS lenses, use the web interface or software to adjust zoom and focus. For CS lenses, you must manually zoom and focus the lens elements before tightening the screws, then use the software to reinitialize the lens and perform final auto-focusing.
Storage and Settings
Insert a microSD card (Class 10 recommended) into the rear slot to enable onboard storage. Access the web interface to enable this feature. The camera automatically obtains an IP address via DHCP; if unavailable, it defaults to the 169.254.0.0/16 subnet.
Troubleshooting
If the camera is not functioning as expected, check the LED indicators. If the camera is unresponsive or network issues persist, perform a factory reset by using a paperclip to press and hold the firmware revert button on the rear of the camera for three seconds.
Practical help
Common problems
Green LED is off and amber is on
Perform a factory reset using the physical firmware revert button.
Camera not focusing correctly (CS lens)
Manually focus the lens elements before tightening screws, then use the 'Reinitialize Lens' option in the system page.
No IP address obtained
Check DHCP server or use the ARP/Ping method to assign a static IP.
Before use
- Small slotted screwdriver (5/64" or 2 mm blade width)
- UL-listed mounting bracket (min 0.7 kg capacity)
- PoE (Class 3) or 12-24 V DC power source
- Network cable
- microSD card (Class 10 or better) for onboard storage
Specs in practice
- Seamless Failover
- Allows the camera to switch between Aux power and PoE without interrupting operation.
Images and diagrams
- The I/O terminal block diagram shows connections for digital input/output, audio, and RS-485 control.
- The rear view diagram identifies the location of the firmware revert button, power block, and Ethernet port.
Model compatibility
- Requires administrator user setup before operation.
- Supports CS or iCS lenses.
- Compatible with Avigilon Unity Video and Control Center software.

Manual page author
Emily Carter
User documentation editor
Prepares concise manual descriptions and highlights the most useful setup, operation, and maintenance information for readers.