Automotive / Car Audio
User Manual for Banda Audioparts Electra 12K Amplifier
Get the most out of your Banda Audioparts Electra 12K amplifier. This guide covers wiring diagrams, LED indicator meanings, technical specifications, and troubleshooting steps.
Table of contents
Manual images
Click an image to enlargeQuick Guide
The Banda Audioparts Electra 12K is a high-performance car audio amplifier. Before installation, ensure you have an external fuse installed. The amplifier requires a stable power supply and proper ventilation to operate correctly. Always verify that your speaker impedance matches the amplifier's rated impedance to prevent damage.
Description and Connections
The amplifier features a power supply unit and a front panel with LED indicators for status monitoring.
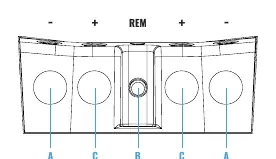
Power Supply Unit
- GND: Connect to the vehicle chassis (Ground).
- 12VDC INPUT (+): Connect to the positive battery terminal.
- REM: Connect to the remote antenna/head unit signal.
Front Panel LEDs
- Blue (ON): Indicates the amplifier is powered on.
- Red (SHORT): Indicates output distortion (clipping), short circuit, or thermal protection.
- Yellow (Flashing): Indicates low battery voltage.
Wiring Examples
The amplifier is designed for 1 ohm load operation. Ensure all connections are secure and cables are of sufficient gauge.
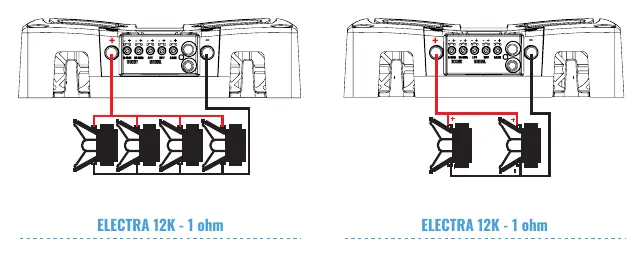
- 4 Woofers or Subwoofers: Connect 4 ohms woofers in parallel to achieve a 1 ohm load.
- 2 Woofers or Subwoofers: Connect 2 ohms woofers in parallel to achieve a 1 ohm load.
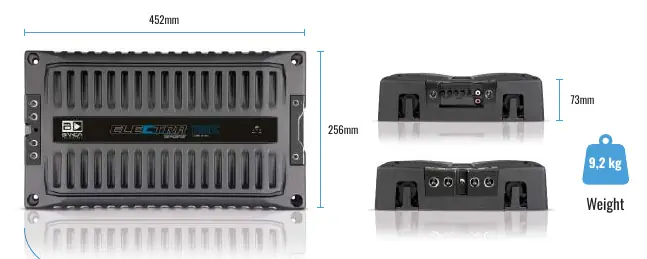
Technical Specifications
- Efficiency: 76%
- Input Voltage: 9 - 15V
- Input Impedance: 100K Ohms
- Frequency Response: 20Hz - 500Hz
- Recommended Fuse: 600A
- Power Supply Cables: 70mm (min. recommended)
Troubleshooting
If you encounter issues, check the LED status on the front panel:
- Blue & Red LED On: Amplifier has reached the operating temperature limit. Ensure proper ventilation.
- Blue LED on, Red flashing: Short circuit in audio output or impedance is below the rated limit. Check speaker cables and impedance.
- Flashing Yellow LED: Input voltage is below 9V. Check battery charge and power cable connections.
- Red & Yellow LED on: Internal problem. Please contact an authorized service center.
Warranty
The warranty is valid for 12 months from the date of purchase. It covers manufacturing defects but does not cover damage from accidents, improper installation, or unauthorized alterations. For repairs, contact the dealer or Banda Audioparts directly at Rua Manoel Joaquim Filho, 353, Paulínia - SP, Brazil, or via email at [email protected].
Manufacturer information
Banda Audioparts
Practical help
Common problems
Blue & Red LED On
Amplifier overheating. Ensure the unit is in a well-ventilated place and the ventilation system is not obstructed.
Blue LED on and Red flashing
Short circuit or impedance too low. Check speaker connection cables and ensure speaker impedance is not below the amplifier's rated limit.
Flashing Yellow LED
Input voltage below 9V. Check battery charge and ensure there are no voltage drops in power cables or connections.
Before use
- Ensure the amplifier is installed in a well-ventilated area.
- Install an external fuse (600A recommended).
- Verify that speaker impedance matches the amplifier's rated impedance.
- Use at least 70mm power supply cables.
- Check that all power and speaker connections are secure.
Specs in practice
- Input Voltage
- Operating range is 9V to 15V.
- Recommended Fuse
- 600A is required for safe operation.
- Input Sensitivity
- Accepts signals from ~300mV to 8V.
Images and diagrams
- Wiring Example 1: 4 woofers (4 ohms each) connected in parallel results in a 1 ohm load.
- Wiring Example 2: 2 woofers (2 ohms each) connected in parallel results in a 1 ohm load.
Model compatibility
- Designed for 1 ohm load operation.

Manual page author
David Miller
Documentation analyst
Organizes user manual content into clear summaries, with attention to model details, product context, and everyday usability.