Health / Medical Imaging
User Manual for Barco Nio Fusion 12MP Medical Display
Comprehensive user guide for the Barco Nio Fusion 12MP medical display. Includes installation instructions for single and dual workstation setups, KVM switch configuration, OSD menu navigation, cleaning procedures, and technical...
Table of contents
Manual images
Click an image to enlargeQuick guide from the manual
The Barco Nio Fusion 12MP is a high-resolution medical display designed for diagnostic purposes. This manual provides essential information for installation, daily operation, and maintenance. Key features include support for single or dual workstation setups, integrated KVM switching, and advanced calibration tools via the OSD menu.
Installation and setup
The display supports two primary configurations:

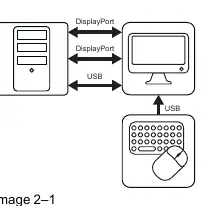
- Single workstation setup: Connects to one workstation using two DisplayPort cables for full 12MP resolution at full refresh rate.
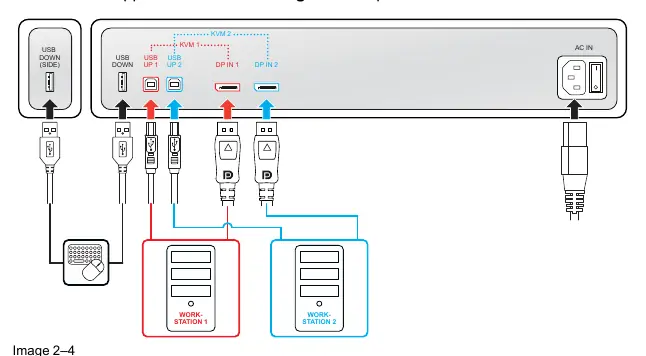
- Dual workstation setup: Connects to two workstations using one DisplayPort cable each. Requires KVM switch configuration via the OSD menu to control both workstations with a single keyboard and mouse.
Installation steps:
- Ensure a compatible Barco MXRT display controller is installed in your workstation.
- Remove the connector cover to access ports.
- Connect DisplayPort and USB cables according to your chosen setup (Single or Dual).
- Route cables through the cable clips and stand channels.
- Re-install the connector cover.
- Connect the mains cable to a grounded outlet and switch the power to position 'I'.
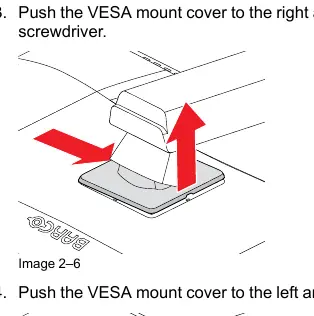
VESA-mount installation: The display is compatible with VESA 100 mm mounts. To install, unlock the stand locking mechanism, place the display face down on a soft surface, remove the VESA mount cover, unscrew the fixation screws, and attach the panel to the VESA mount using 4 M4 screws.
Daily operation
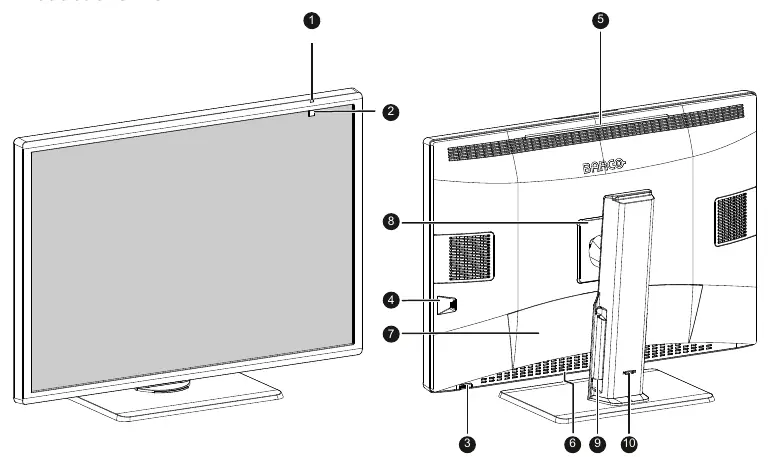
The display is operated primarily using the jog dial located on the unit.
- Jog dial functions: Press to activate the shortcut bar or confirm selections. Turn left/right to scroll through menus. Press and hold for 3 seconds to cancel or exit. Double-press to cycle SoftGlow light modes or switch KVM inputs.
- SoftGlow lights: Provides task and wall lighting to reduce eye fatigue. Brightness is adjustable via the OSD menu.
- OSD menu: Access by pressing the jog dial and selecting the menu icon. If locked, hold the jog dial to the right for 5 seconds.
Advanced operation
The OSD menu allows for detailed configuration:
- Calibration: Includes Embedded QA for calibration and compliance tests. Barco recommends using QAWeb Enterprise for centralized management.
- Viewing modes: Choose between Diagnostic (full luminance) and Text (reduced luminance) modes.
- Image settings: Configure EDID format, image scaling, and grayscale conversion modes.
- Power management: Enable DPMS and Hibernate modes to optimize display lifetime and reduce power consumption.
Cleaning the display
Use a soft, lint-free cloth (microfiber or gauze) with an approved cleaning/disinfecting product. Suitable agents include 70% ethanol, 100% isopropanol, or 0.5% Chlorehexidine in 70% ethanol/isopropanol. Do not spray liquid directly onto the display. Avoid using abrasive materials, strong solvents, or paper-based cloths.
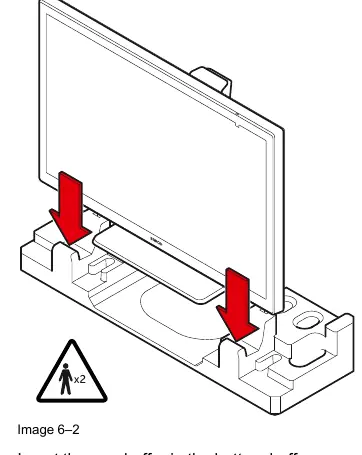
Repackaging instructions
To repack the display, move it to the lowest position and lock the stand. Place the display into the bottom buffer on a stable surface (requires 2 persons). Insert the rear buffer, position the front buffer, and slide the accessory box and cables into the dedicated cavities before sealing the box.
Technical specifications
The Nio Fusion 12MP features a 30.9" LCD panel with a native resolution of 12MP (4200 x 2800 pixels). It supports 2x DisplayPort 1.2 inputs and includes 2x USB-B upstream and 2x USB-A downstream ports. Power consumption is 105 W nominal, with < 0.5 W in hibernate mode.
Practical help
Common problems
Display not powering on
Ensure the mains cable is connected and the power switch is in position 'I'.
KVM switch not working
Ensure the display is configured for dual workstation setup and KVM is enabled in the OSD menu.
Image retention
Use a screen saver and avoid displaying static images for prolonged periods.
OSD menu locked
Hold the jog dial to the right for 5 seconds until the 'OSD menu unlocked' message appears.
Before use
- Verify all cables (Mains, Video, USB) are connected.
- Ensure a compatible Barco MXRT display controller is installed.
- Check if KVM switch configuration is required for your setup.
- Remove the connector cover to access ports.
- Ensure the display is on a stable surface or VESA mount.
Specs in practice
- Contrast Ratio
- 1500:1 (panel typical).
- Power Consumption
- 105 W (nominal), < 0.5 W (hibernate).
- Viewing Angle
- 178° (H, V).
Images and diagrams
- Connector layout showing USB and DisplayPort ports.
- VESA mount installation steps.
- Repackaging sequence using buffers.
Model compatibility
- Requires Barco MXRT display controller.
- QAWeb Enterprise version 2.5 or later recommended.
- Older MXRT-5600/7600 controllers supported only for single workstation setup.

Manual page author
Michael Turner
Technical manual editor
Reviews PDF manuals for structure, safety notes, and practical product details so readers can find the right information quickly.