Health / Medical Imaging
User Manual for LG 14HQ901G Digital X-Ray Detector
Comprehensive user guide for the LG 14HQ901G Digital X-Ray Detector. Includes setup instructions, wired and wireless connection configurations, battery management, software installation, and detailed technical specifications.
Table of contents
Manual images
Click an image to enlargeQuick guide from the manual
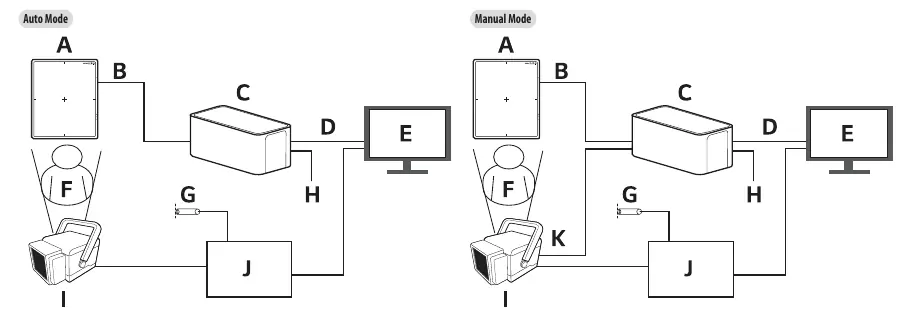
The LG 14HQ901G is a digital X-ray detector designed for medical imaging. This manual covers the installation, connection, and maintenance of the detector, control box, and associated software. Key operations include battery management, configuring wired or wireless network connections, and setting up the trigger cable for manual X-ray generation.
Battery Management
The detector uses a hot-swappable battery system.
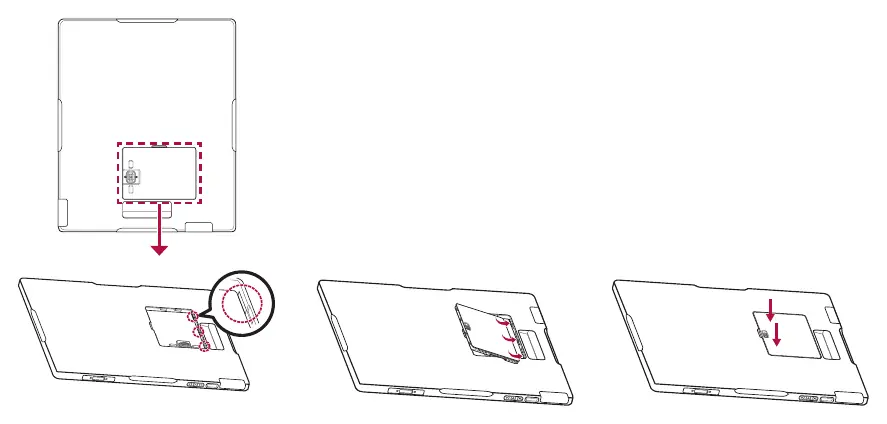
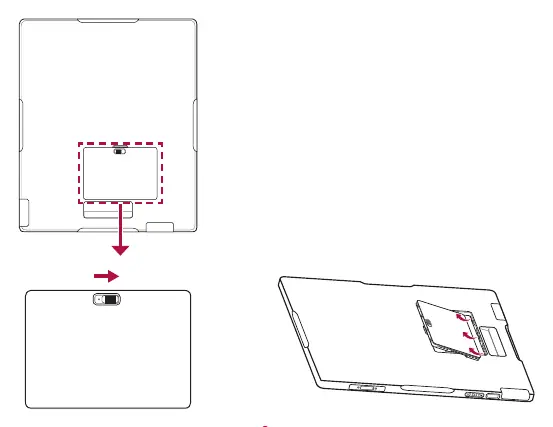
- Assembling: Check the direction of the holes inside the detector, align the battery, slide it into the holes, and press the other side to secure it.
- Removing: Slide the battery lock button in the indicated direction and lift the battery out.
- Hot-Swap: The detector remains powered for one minute after the battery is removed. Ensure a charged battery is inserted within this time to prevent the detector from turning off. Data collection and calibration are unavailable during a hot-swap.
Cable Connections
The control box connects to the detector, PC, and X-ray generator.
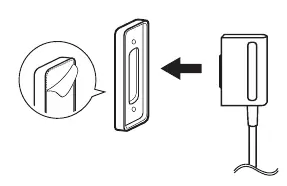
- Main Cable: Connects the control box to the detector. Up to two detectors can be connected.
- LAN Cable: Connects the control box to the PC.
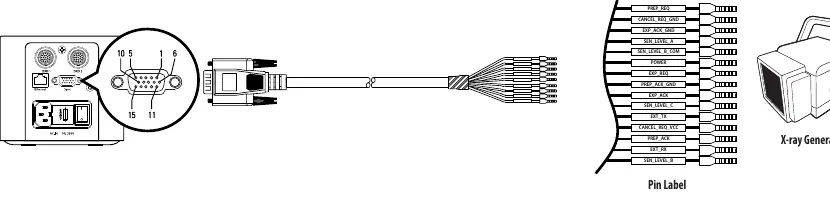
- Trigger Cable: Required for manual mode. Connects the control box to the X-ray generator. Not necessary in automatic mode.
- AC-IN: Connects the AC power cord.
Network & PC Setup
The detector supports wired and wireless connections.
- Wired Mode: Connect via LAN cable. Requires manual IP configuration on the PC (IP: 10.10.10.2 ~ 10.10.10.254, Subnet: 255.255.255.0, Gateway: 10.10.10.1).
- Wireless Mode: Supports Station mode (via external AP) and AP mode (detector internal AP). Use the Wired/Wireless Connection button to switch modes.
- PC Requirements: Intel i5, 8GB RAM, 500GB disk, Dual Ethernet 100/1000 Mbps, Windows 7/8.1/10 (64-bit), and a monitor with at least 1920x1080 resolution.
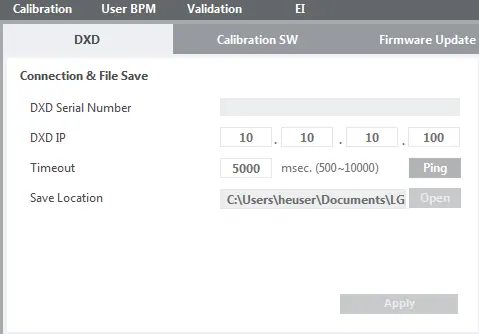
Calibration Software
The Calibration Software is used to configure the detector and verify connections.
- Installation: Launch the installation file and follow on-screen instructions.
- Uninstallation: Use the Control Panel (Programs and Features) or the installation file of the same version.
- Connection Check: Use the [Ping] button in the software to verify the connection to the detector IP (10.10.10.100).
Technical Specifications
The detector features an Oxide TFT sensor with a 140 um pixel pitch. It supports both wired (Gigabit Ethernet) and wireless (802.11 a/b/g/n/ac) data transmission. The energy range is 40 kVP to 150 kVp. The battery provides approximately 8 hours of performance on a 90-second shooting cycle.
Environmental Requirements
Ensure the operating environment meets the following criteria:
- Temperature: 10 °C to 35 °C (Operation).
- Humidity: 0% to 80% (Operation).
- Pressure: 70 kPa to 106 kPa (Operation).
Manufacturer information
LG Electronics
Practical help
Common problems
Detector turns off during battery hot-swap
Ensure a charged battery is inserted within one minute of removing the old one.
Ping test fails in Calibration Software
Verify PC network adapter settings: IP address must be in the 10.10.10.2-254 range, Subnet Mask 255.255.255.0, Default Gateway 10.10.10.1.
Wireless connection issues
Ensure the AP and detector are as close as possible with no obstacles. Check that the correct SSID (LGEDXD or LGEDXD_SOFTAP) is selected.
Before use
- Clean the wall surface before attaching the main cable holder.
- Verify PC meets minimum requirements (Intel i5, 8GB RAM, 500GB disk).
- Ensure the battery is fully charged.
- Confirm the X-ray generator is compatible with the trigger cable pinout if using manual mode.
- Check that the AC switch on the control box is set to the ON position.
Specs in practice
- Trigger Mode
- Manual Mode requires a trigger cable; Auto Mode (Auto Exposure Detection) does not.
- Energy Range
- The detector is rated for X-ray energy between 40 kVP and 150 kVp.
Images and diagrams
- Trigger Cable Pinout: Details the 15-pin connection between the control box and X-ray generator.
- Wired Connection: Illustrates the signal path from the Detector to the Control Box and then to the PC.
Model compatibility
- Oxide TFT condition table applies only to 14HQ901G-B and 17HQ901G-B models.
- IEEE 802.11ac is not available in all countries.
- Recommended AP: Cisco models (e.g., Linksys EA9200).

Manual page author
Emily Carter
User documentation editor
Prepares concise manual descriptions and highlights the most useful setup, operation, and maintenance information for readers.