Health / Medical Imaging
User Manual for LG 14HQ901G-B Flat Panel Digital X-ray Detector
Quick guide for the LG 14HQ901G-B Flat Panel Digital X-ray Detector. Learn about cleaning, component functions, LED indicators, battery charging, and control box operation.
Table of contents
Manual images
Click an image to enlargeQuick Guide
This manual provides essential operating instructions for the LG 14HQ901G-B Flat Panel Digital X-ray Detector. Key operations include managing the detector's power, switching connection modes (Ethernet/Station/AP), and monitoring status via LED and OLED indicators. Always ensure the device is turned off before cleaning and use only authorized components.
General Description
The 14HQ901G-B is an X-ray imaging device designed to acquire and process X-ray images digitally. It utilizes amorphous silicon and a high-performance scintillator to achieve a resolution of 3.6 lp/mm with a pixel pitch of 140 um. The device must be used in conjunction with an operating PC and an X-ray generator, supporting both wired and wireless data transmission.
Product Components
The standard package includes the following items:
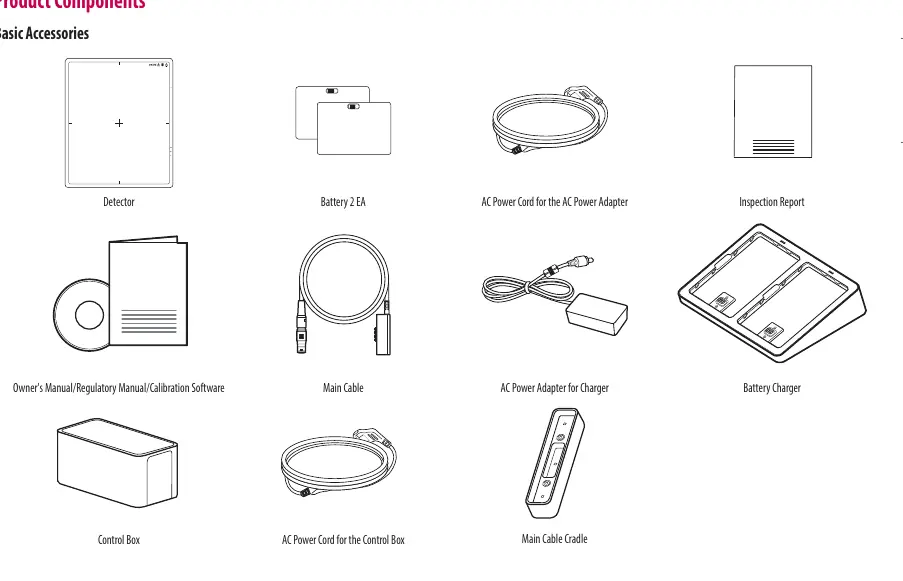
- Detector
- Battery (2 EA)
- AC Power Cord (for Adapter and Control Box)
- Main Cable
- AC Power Adapter (for Charger)
- Battery Charger
- Control Box
- Main Cable Cradle
- Documentation (Owner's Manual, Regulatory Manual, Calibration Software)
Detector Operation
The detector features several buttons and indicators on its side panel:

- Power Button: Press and hold for 1 second to turn on; press and hold for 5 seconds to turn off.
- Wired/Wireless Connection Button: Press for at least 1 second to switch between Ethernet, Station, and AP modes.
- Function Switch Button: Press for at least 1 second to cycle through menus (Check connection mode, video acquisition, image auto save). Press and hold for 3 seconds to change on/off settings.
- Factory Reset: Press and hold the Wired/Wireless Connection button and the Function Switch button simultaneously for at least 10 seconds.
Battery and Charger
The detector uses a Lithium ion polymer battery. The battery charger is a 2-port cradle type. Charging status is indicated by LEDs on the charger:
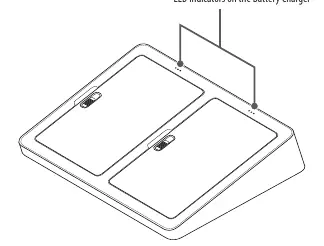
- 0-30%: Blinking LED
- 30-70%: Blinking LED
- 70-99%: Blinking LED
- 100%: Solid LED
If the LED does not turn on during charging, check the connection or reinstall the battery.
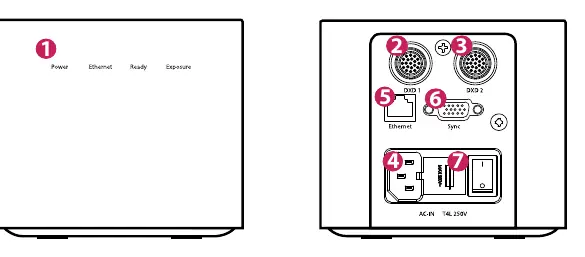
Control Box
The Control Box manages the interface between the detector and the X-ray generator. LED indicators on the front panel display the status of Power, Ethernet, Ready (X-ray Generator active), and Exposure. The back panel contains ports for DXD 1, DXD 2, Ethernet, and Sync.
Cleaning
Cleaning must be performed by medical professionals. Turn off the detector and remove the power cable before cleaning. Use a soft cloth soaked in a recommended cleaner and rub lightly with no more than 1 N of force. Recommended chemicals include Isopropanol 70%, Ethanol 70%, 0.9% NaCl solution, and Biospot 500 ppm. Do not use benzene, thinner, acids, or alkaline cleaners.
Manufacturer information
LG Electronics
Practical help
Common problems
System error indicated by LEDs (White blinking + Green blinking + Green blinking)
A system error has occurred. Please contact the manufacturer.
Battery not charging
Check for connection errors. Reinstall the battery into the charger.
Ethernet disconnected
Check the Ethernet cable connection; the LED will blink green if disconnected.
Before use
- Ensure the detector is turned off before cleaning.
- Use only authorized components (LAN cable > CAT5E, medical grade power cords).
- Verify battery charge status on the charger before use.
- Ensure the device is connected to an operating PC and X-ray generator.
Specs in practice
- Battery Charging Time
- Typically 3 hours for the Lithium ion polymer battery.
Images and diagrams
- The detector side panel contains the power button, connection button, function button, and status LEDs.
- The control box back panel features ports for DXD 1, DXD 2, Ethernet, and Sync.
Model compatibility
- Must be used with an operating PC and an X-ray generator.
- LAN cables must be more than CAT5E standard.
- Power cords must meet US medical grade or local safety regulations.

Manual page author
Michael Turner
Technical manual editor
Reviews PDF manuals for structure, safety notes, and practical product details so readers can find the right information quickly.