Tools / Saws
User Manual for Bauer 2072C-B 20V Cordless 6-1/2 Inch Circular Saw
Complete user manual for the Bauer 2072C-B 20V Cordless Circular Saw. Includes detailed instructions for blade installation, depth and bevel adjustments, safe operation, maintenance, and troubleshooting.
Quick answers from the manual
Quick answer
- The Bauer 2072C-B is a 20V cordless circular saw. It requires a 3.0 Ah or greater battery. Always remove the battery before making adjustments or changing the blade. p. 1, 10
Key actions
- Mounting the blade p. 10
- Adjusting depth p. 10
First start
- Charge the battery, attach it to the saw, ensure guards are functional, and allow the blade to reach full speed before cutting. p. 10, 11
Problems and fixes
Tool will not start
Check battery connection, charge level, or internal damage.
p. 13Maintenance and reset
- Clean the inside of the upper guard after use to prevent sawdust accumulation. p. 11
Technical specifications
| Parameter | Value | Meaning | Pages |
|---|---|---|---|
| No Load Speed | 4000/min | Rotational speed without load | p. 8 |
Where to find it in the PDF
- Functions Diagram p. 9
- Blade Mounting p. 10
Table of contents
Manual images
Click an image to enlargeQuick Guide from the Manual
The Bauer 2072C-B is a 20V cordless circular saw designed for cutting wood. For best results, use a 3.0 Amp Hour battery or greater. Always ensure the battery is removed before performing any adjustments, such as changing the blade or setting the depth. Wear appropriate eye protection and ensure the work area is clean and well-lit before operation.
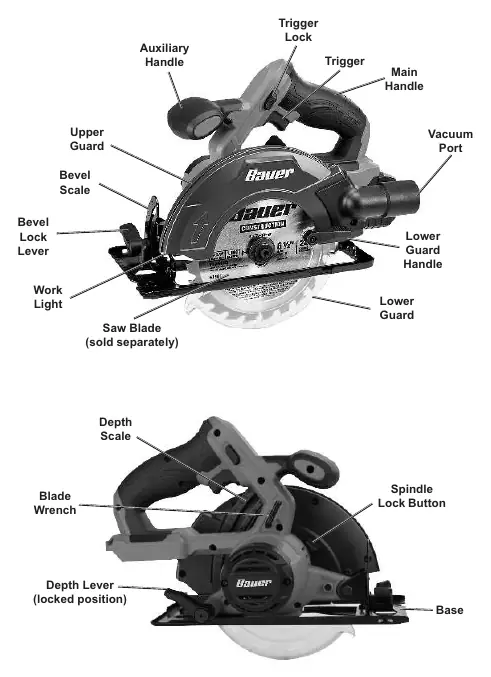
Product Overview
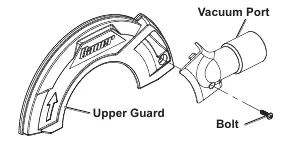
The saw features a main handle, auxiliary handle, trigger lock, and trigger for operation. It includes a vacuum port for dust collection, a bevel scale for angle adjustments, and a depth lever for controlling the depth of cut. The blade is protected by upper and lower guards.
Setup and Adjustments
Mounting and Removing the Blade
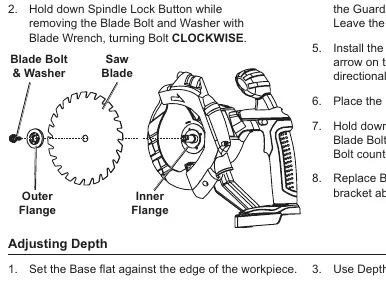
- Remove the blade wrench from the handle bracket.
- Hold the spindle lock button and turn the blade bolt clockwise to remove it.
- Remove the outer flange and the old blade.
- Install the new blade, ensuring the directional arrow matches the arrow on the upper guard.
- Replace the outer flange, bolt, and washer, turning the bolt counter-clockwise to tighten.
Adjusting Depth and Bevel
To adjust the cutting depth, raise the depth lever, set the base against the workpiece, and tighten the lever. To adjust the bevel, loosen the bevel lock lever, set the desired angle using the scale, and tighten the lever securely before use.
General Operating Instructions
- Ensure the trigger is locked before attaching a fully charged battery.
- Hold the saw with both hands (main and auxiliary handles).
- Align the saw with the cut line.
- Push and hold the trigger lock, then press the trigger.
- Allow the blade to reach full speed before contacting the workpiece.
- After cutting, release the trigger and wait for the blade to stop completely.
Maintenance
Before each use, inspect the tool for loose hardware, cracked parts, or battery issues. After use, wipe the tool with a clean cloth and remove the battery. Periodically clean the inside of the upper guard to prevent sawdust accumulation, which can interfere with the lower guard operation.
Practical help
Common problems
Tool will not start
Check if the battery is properly connected, charged, or if there is internal damage.
Tool operates slowly
Do not force the tool to work too fast; check if the battery is wearing out.
Overheating
Ensure the blade is sharp and aligned, and that motor vents are not blocked.
Before use
- Ensure the battery is fully charged.
- Inspect the blade for sharpness and damage.
- Verify that all guards are in place and moving freely.
- Check that all adjustment knobs and levers are tight.
- Wear ANSI-approved safety goggles.
Specs in practice
- No Load Speed
- 4000/min
- Maximum Blade Diameter
- 6-1/2 inch (165mm)
Images and diagrams
- The functions diagram identifies the trigger, trigger lock, vacuum port, and adjustment levers.
- The blade mounting diagram illustrates the correct order of the inner flange, blade, outer flange, and bolt.
Model compatibility
- Requires Bauer 20V Li-ion battery (57007) and charger (57006), sold separately.
- Do not use high-speed steel, abrasive, metal-cutting, or masonry-cutting blades.

Manual page author
David Miller
Documentation analyst
Organizes user manual content into clear summaries, with attention to model details, product context, and everyday usability.