Power / Batteries & Chargers
Bauer 20V Hypermax Lithium Rapid-Plus Charger Owner's Manual
Quick guide for the Bauer 20V Hypermax Lithium Rapid-Plus Charger (Model 57006). Includes charging instructions, LED status indicators, safety warnings, and maintenance tips.
Quick answers from the manual
Quick answer
- The Bauer 57006 is a 20V Lithium-Ion Rapid-Plus Charger. To charge, plug the unit into a 120VAC outlet and slide the battery pack onto the charger. Monitor the LED lights to determine charging status. p. 5, 6
Key actions
- Plug the charger into a grounded 120VAC, 60Hz receptacle. p. 6
- Slide the battery pack onto the charger. p. 6
First start
- Place the charger on a dry fireproof surface in a room where the temperature is from 50–104° F. p. 6
Problems and fixes
Only Red LED blinks
Battery/Charger out of temp range or problem. Allow to reach proper temp.
p. 6
Green and Red LEDs both blink
Battery or Charger may be damaged. Have inspected by a qualified technician.
p. 6Maintenance and reset
- Wipe external surfaces of the charger with a clean cloth after use. p. 7
Technical specifications
| Parameter | Value | Meaning | Pages |
|---|---|---|---|
| Input Rating | 100-120VAC, 50-60Hz, 75W | Power input requirements | p. 5 |
| Output | 20VDC / 3.0A | Charging output | p. 5 |
Where to find it in the PDF
- Safety Information p. 2, 3, 4
- Operating Instructions p. 6
- Specifications p. 5
Table of contents
Quick Guide
The Bauer 20V Hypermax Lithium Rapid-Plus Charger is designed to charge 20V Lithium-ion battery packs. Before use, ensure the charging area is dry, fireproof, and maintains a temperature between 50°F and 104°F. Do not use extension cords with this charger.
Safety Warnings
- Fire Hazard: Do not place the charger on flammable surfaces like carpets or rugs. Keep at least 1 foot away from flammable objects.
- Electrical Safety: Do not expose the charger to rain or wet conditions. Charge indoors only.
- Battery Safety: Do not charge damaged, cracked, or leaking battery packs. Keep battery terminals away from metal objects like coins or keys to prevent shorting.
- Pacemakers: People with pacemakers should consult their physician before use due to electromagnetic fields.
Operating Instructions
- Place the charger on a dry, fireproof surface.
- Examine the battery pack for damage.
- Plug the charger into a grounded 120VAC, 60Hz receptacle.
- Slide the battery pack onto the charger.
- Monitor the LED indicators during the charging process.
- Once charged, unplug the charger and press the battery button to release the pack.
LED Indicators
- Red LED blinking: The battery pack or charger is outside the correct charging temperature range or there is a problem. Allow the unit to reach proper temperature.
- Green and Red LEDs both blinking: The battery pack or charger may be damaged. Have it inspected by a qualified technician.
- Green LED solid and Red LED blinking: The battery pack is currently charging.
- Green and Red LEDs both solid: The battery pack is fully charged.
Maintenance
- Before each use: Inspect the charger for loose hardware, damaged wiring, or cracked parts.
- After use: Wipe external surfaces with a clean cloth.
- Servicing: Do not open the base or adapter. There are no user-serviceable parts inside.
Specifications
- Input Rating: 100-120VAC, 50-60Hz, 75W
- Output: 20VDC / 3.0A
- Battery Type: Li-ion
Practical help
Common problems
Only Red LED blinks
The battery or charger is out of the correct temperature range or there is a fault. Allow the unit to reach the proper charging temperature.
Green and Red LEDs both blink
The battery pack or charger may be damaged. Have them inspected by a qualified technician before attempting to charge again.
Before use
- Inspect the charger for loose hardware or damaged wiring.
- Ensure the battery pack is a 20V Lithium-ion type.
- Verify the charging area is dry and fireproof.
- Ensure the ambient temperature is between 50°F and 104°F.
- Check that the charger vents are not obstructed.
Specs in practice
- Input Rating
- 100-120VAC, 50-60Hz, 75W power requirement.
- Battery Type
- Compatible with Li-ion batteries.
Images and diagrams
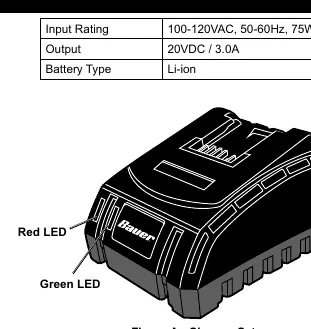
- Figure A illustrates the charger unit, identifying the locations of the Red and Green LED indicators.
Model compatibility
- Use only with designated 20V Lithium-ion battery packs.
- Do not use extension cords with this charger.
- Charge indoors only.

Manual page author
Emily Carter
User documentation editor
Prepares concise manual descriptions and highlights the most useful setup, operation, and maintenance information for readers.