Tools / Power Tools
Bauer 20V Brushless Impact Wrench Owner's Manual
Quick guide for the Bauer 20V Brushless Impact Wrench (models 2085C-BR and 2083CR-B). Includes setup, operation, mode selection, maintenance, and troubleshooting.
Quick answers from the manual
Quick answer
- The Bauer 20V Brushless Impact Wrench is a cordless tool for driving fasteners. It requires a Bauer 20V Li-Ion battery and impact-rated sockets. It features three speed modes and a direction switch that also acts as a trigger lock. p. 6, 8
Key actions
- Set direction: Push switch right for forward, left for reverse, center to lock. p. 8
- Change mode: Press the Mode Selector button to cycle through modes 1-3. p. 9
First start
- Charge the battery, attach an impact-rated socket, set the direction switch, and press the trigger. p. 7, 8
Problems and fixes
Tool will not start
Check battery connection, charge, or replace battery if worn out.
p. 11Maintenance and reset
- Wipe external surfaces with a clean cloth after use and store in a dry area. p. 10
Technical specifications
| Parameter | Value | Meaning | Pages |
|---|---|---|---|
| RPM | 0-2300 | Rotational speed | p. 6 |
| BPM | 0-2400 | Impact rate | p. 6 |
Where to find it in the PDF
- Specifications p. 6
- Operating Instructions p. 8
Table of contents
Manual images
Click an image to enlargeQuick guide from the manual
The Bauer 20V Brushless Impact Wrench is designed for tightening and loosening fasteners. For best results, use a 3.0 Amp Hour battery or greater. Always ensure the direction switch is in the center (locked) position when the tool is idle, during setup, or when changing sockets. The tool features variable speed control and three operating modes.
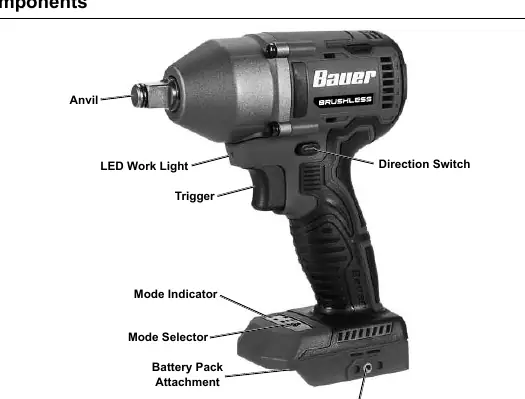
Product Overview
The tool consists of an anvil, LED work light, trigger, direction switch, mode indicator, mode selector, battery pack attachment, and belt clip attachment.
Setup
- Battery Charging: Charge the battery pack after unpacking and before first use. Follow the instructions included with your specific battery and charger.
- Socket Attachment: Only use impact-rated square drive sockets. Push the socket onto the anvil until it snaps securely into place. To remove, pull the socket forward off the anvil.
- Belt Clip: Attach the belt clip to either side of the tool using the supplied screw.
Operation
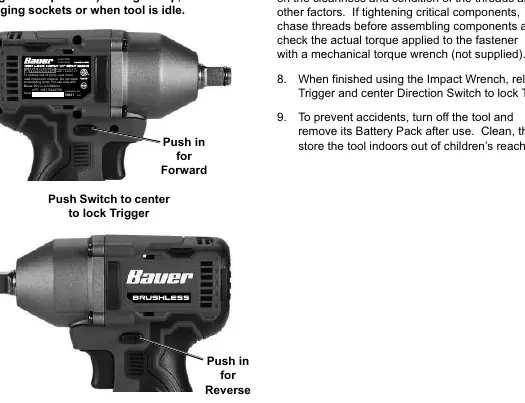
- Direction Switch: Push the switch to the right for clockwise rotation (Forward). Push to the left for counter-clockwise rotation (Reverse). Push to the center to lock the trigger.
- Variable Speed: Apply more pressure to the trigger to increase speed; lessen pressure to decrease speed.
- Mode Selection: Press the Mode Selector button to cycle through the three available speed modes. Mode 1 is the slowest, and Mode 3 is the fastest.
- LED Light: The LED light turns on when the trigger is pressed and turns off 5 seconds after release.
Maintenance
- Before Each Use: Inspect the tool for loose hardware, cracked battery packs, or binding parts.
- After Use: Wipe external surfaces with a clean cloth.
- Storage: Disconnect the battery pack and store the tool in a dry, indoor area out of reach of children.
- Battery Disposal: Recycle or dispose of Li-ion batteries properly. Do not crush, incinerate, or heat above 140°F.
Practical help
Common problems
Tool will not start
Check if the battery is properly connected, charged, or if the battery pack is worn out. Ensure there are no obstructions on the battery contacts.
Tool operates slowly
Do not force the tool to work too fast; allow it to work at its own rate. Check if the battery pack is wearing out.
Overheating
Do not force the tool. Ensure motor housing vents are not blocked. Clean vents using compressed air while wearing proper safety gear.
Before use
- Charge the battery pack fully.
- Inspect the tool for any damage or loose parts.
- Ensure the direction switch is in the center (locked) position.
- Use only impact-rated sockets.
- Ensure the work area is clean and well-lit.
Images and diagrams
- The direction switch is located above the trigger; push right for forward, left for reverse, and center to lock.
- The mode selector button is located on the base of the tool near the battery attachment.
Model compatibility
- Use only Bauer 20V Li-Ion batteries.
- Use only impact-rated accessories.

Manual page author
Emily Carter
User documentation editor
Prepares concise manual descriptions and highlights the most useful setup, operation, and maintenance information for readers.