Tools / Saws
Owner's Manual for Bauer 1775C-B Cordless Reciprocating Saw
Quick guide for the Bauer 1775C-B Cordless Reciprocating Saw. Includes setup, blade installation, operation instructions, maintenance, and troubleshooting.
Quick answers from the manual
Quick answer
- The Bauer 1775C-B is a cordless reciprocating saw. It requires a Bauer 20V Li-Ion battery and charger (sold separately). Always remove the battery before changing blades or performing maintenance. p. 1, 7
Key actions
- Install the blade by lifting the Blade Clamp Release Lever, inserting the blade, and releasing the lever. p. 8
- Adjust the shoe by pressing the Shoe Lock and sliding the shoe to the desired position. p. 7
First start
- Charge the battery, insert it into the tool, install a blade, and adjust the shoe before operation. p. 7, 8
Problems and fixes
Tool will not start
Check battery connection and charge status.
p. 11Technical specifications
| Parameter | Value | Meaning | Pages |
|---|---|---|---|
| No Load Speed | 0-3000/min | p. 6 | |
| Stroke Length | 1-1/8" (29mm) | Blade travel distance | p. 6 |
Where to find it in the PDF
- Safety Information p. 2, 3, 4, 5
- Specifications p. 6
- Setup and Operation p. 7, 8, 9
- Maintenance p. 10
- Troubleshooting p. 11
Table of contents
Manual images
Click an image to enlargeQuick guide from the manual
This document provides essential instructions for the Bauer 1775C-B Cordless Reciprocating Saw. Always ensure the battery pack is removed before performing any adjustments, blade changes, or maintenance to prevent accidental starting. The tool requires a Bauer 20V Li-Ion battery and charger (sold separately).
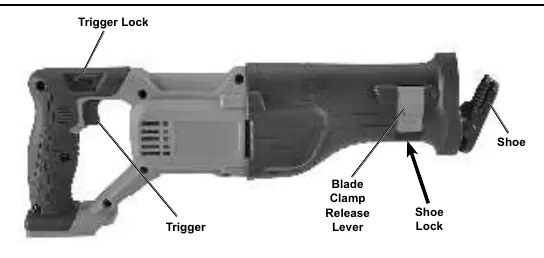
Product Overview
The saw features a variable speed trigger, a trigger lock for safety, an adjustable shoe to control cutting depth, and a blade clamp release lever for tool-free blade changes.
Setup
Installing the Battery Pack
Ensure the trigger is in the OFF position. Insert a fully charged battery pack into the battery receptacle until it clicks into place. To remove, press the button on the battery pack and slide it out.
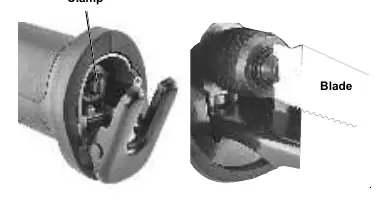
Installing/Removing the Blade
- Lift the Blade Clamp Release Lever up.
- Insert the blade fully into the clamp with the teeth pointing downward.
- Release the lever to lock the blade in place.
- Pull on the blade with a gloved hand to ensure it is securely locked.
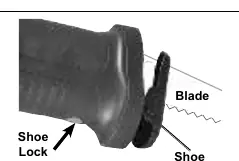
Adjusting the Shoe
Press and hold the Shoe Lock to extend or shorten the shoe position. Release the lock once the desired position is achieved.
Operation

General Cutting
- Install the blade and adjust the shoe.
- Ensure the trigger lock is engaged (to the right) before attaching the battery.
- Hold the saw with two hands, keeping fingers behind the handle recess.
- Disengage the trigger lock (push to the left).
- Rest the shoe on the workpiece and squeeze the trigger to start.
- Allow the saw to reach full speed before making contact with the material.
Plunge Cutting
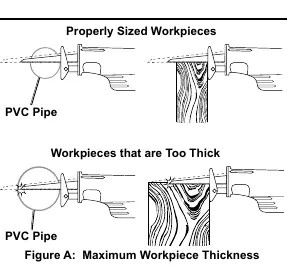
Plunge cutting is suitable for plywood and thin board panels. Do not attempt this on thick, hard wood or metal. Clearly mark the line of cut, place the shoe on the workpiece with the blade not touching the material, start the tool, and slowly rotate the tool on the shoe until the blade penetrates the material.
Maintenance
Before each use, inspect the tool for damage, loose hardware, or binding parts. After use, wipe external surfaces with a clean cloth. Store the tool in a dry, indoor area away from children and metal objects.
Troubleshooting
If the tool will not start, check the battery connection and charge. If performance decreases, check for worn carbon brushes or a dull blade. If the tool overheats, ensure the motor housing vents are not blocked and allow the tool to work at its own rate.
Practical help
Common problems
Tool will not start
Check if the battery pack is properly connected and charged. Ensure there are no obstructions in the battery receptacle.
Performance decreases over time
Check if the carbon brushes are worn or if the blade is dull/damaged. Replace as necessary.
Overheating
Ensure the motor housing vents are not blocked. Allow the tool to work at its own rate without forcing it.
Before use
- Inspect the tool for any damage or loose parts.
- Ensure the battery pack is fully charged.
- Check that the blade is sharp and securely installed.
- Clear the work area of children, pets, and hazards.
- Wear appropriate personal protective equipment, including safety goggles.
Specs in practice
- No Load Speed
- 0-3000/min (RPM). Controls the cutting speed based on trigger pressure.
- Stroke Length
- 1-1/8" (29mm). The distance the blade travels back and forth.
Images and diagrams
- Trigger Lock: Located on the handle, prevents accidental activation.
- Blade Clamp Release Lever: Located at the front, allows for quick blade changes.
- Shoe: The front metal piece that rests against the workpiece to stabilize the cut.
Model compatibility
- Requires Bauer 20V Li-Ion battery (57007).
- Requires Bauer 20V Li-Ion charger (57006).
- Blades are sold separately.

Manual page author
Emily Carter
User documentation editor
Prepares concise manual descriptions and highlights the most useful setup, operation, and maintenance information for readers.