Tools / Power Tools
User Manual for Bauer 2028E-B Portable Electric Pipe Threader
Comprehensive user guide for the Bauer 2028E-B Portable Electric Pipe Threader. Includes setup instructions, operating procedures, maintenance tips, safety guidelines, and troubleshooting steps.
Quick answers from the manual
Quick answer
- The Bauer 2028E-B is a portable electric pipe threader. It requires a 120V power source and is designed for threading standard schedule 40 steel pipe using included dies ranging from 1/2" to 2". p. 1, 7
Key actions
- Install Die p. 9
- Threading p. 11
First start
- Ensure the trigger is in the off-position before plugging in. Secure the pipe in a vise and support it with the clamp assembly. p. 9, 10
Problems and fixes
Tool will not start
Check power, circuit breaker, or thermal reset button.
p. 13Maintenance and reset
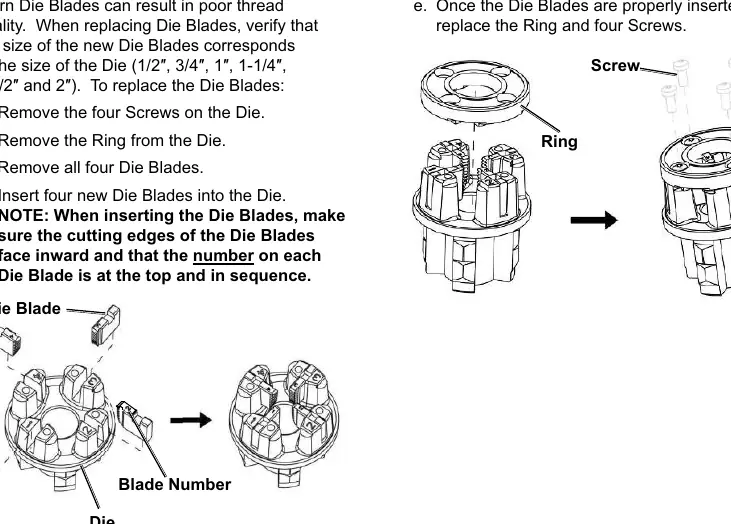
- To replace die blades, remove the four screws on the die, remove the ring, replace the blades (ensuring cutting edges face inward and numbers are in sequence), and reassemble. p. 12
Technical specifications
| Parameter | Value | Meaning | Pages |
|---|---|---|---|
| Electrical Rating | 120VAC / 60Hz / 12A | Power requirements | p. 7 |
Where to find it in the PDF
- Functions p. 8
- Tool Set Up p. 9
- Troubleshooting p. 13
Table of contents
Manual images
Click an image to enlargeQuick guide from the manual
The Bauer 2028E-B is a portable electric pipe threader designed for threading standard schedule 40 steel pipe. Before use, ensure the work area is clean, well-lit, and free of hazards. Always wear appropriate personal protective equipment, including eye protection. The tool must be properly grounded or double-insulated. Always use the provided support device (clamp assembly) to secure the pipe during operation.
Functions
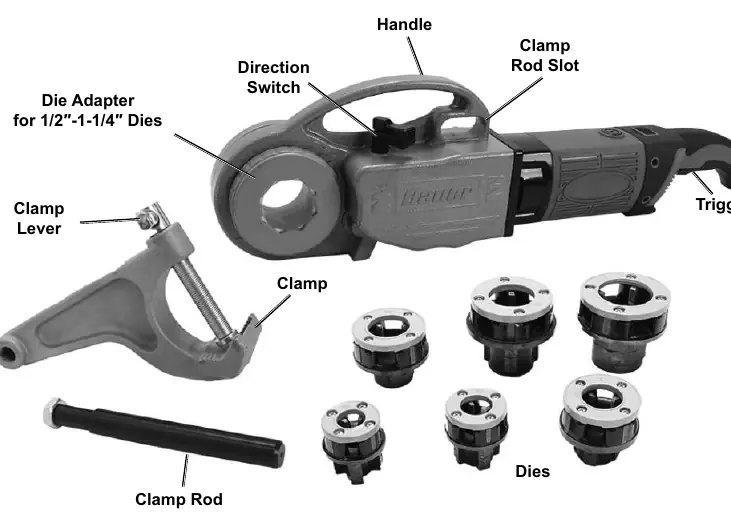
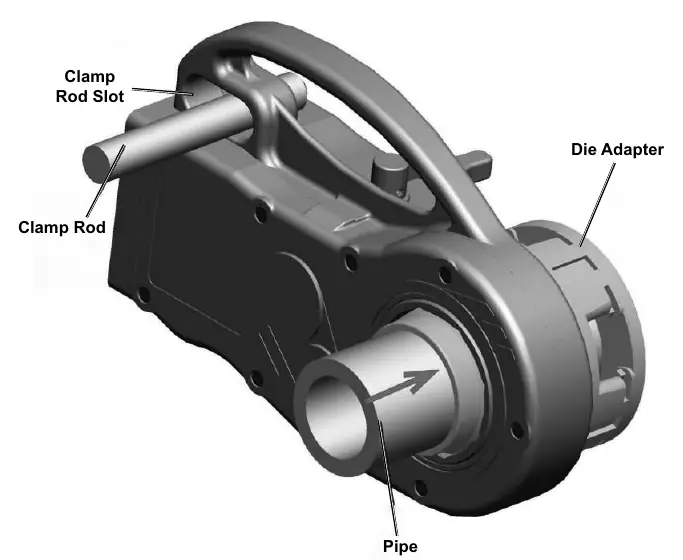
The tool features a trigger, direction switch, handle, and a clamp rod slot. Dies are inserted into the die adapter or directly into the pipe threader depending on the size (1/2" to 1-1/4" use the adapter; 1-1/2" and 2" do not).
Tool Set Up
To set up the tool:
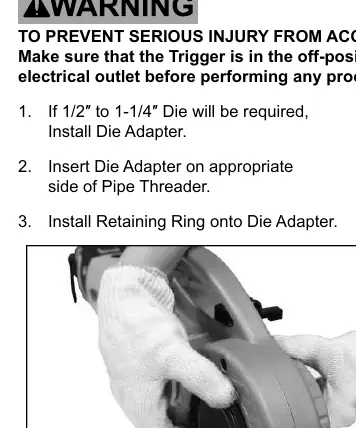
- Ensure the trigger is in the off-position and the tool is unplugged.
- Install the die adapter if using 1/2" to 1-1/4" dies.
- Install the retaining ring onto the die adapter.
- Select the appropriate die for the pipe size.
- Insert the die into the adapter or threader and ensure it is secured.
- Fill the included oil can with thread cutting oil.
Workpiece and Work Area Set Up
Secure the pipe in a proper pipe vise (sold separately). Use the clamp assembly to support the pipe during threading. Screw the clamp rod into the clamp and ensure the pipe is secured. Insert the pipe into the toothless end of the die, ensuring the inside diameter of the die matches the outside diameter of the pipe.
General Operating Instructions
Keep the pipe end and die threads sufficiently oiled at all times. Use the direction switch to select the rotation direction. While holding the handle, press the trigger. If the die does not engage, use a block of scrap wood to apply slight pressure. Stop threading when the end of the die is flush with the end of the pipe. To finish, release the trigger, reverse the direction switch, and squeeze the trigger to reverse the die off the pipe.
Maintenance
Before each use, inspect the tool for loose hardware, misalignment, or damaged cords. After use, wipe external surfaces with a clean cloth. To replace die blades, remove the four screws on the die, remove the ring, replace the blades (ensuring cutting edges face inward and numbers are in sequence), and reassemble.
Practical help
Common problems
Tool will not start
Check that the cord is plugged in, check the power outlet/circuit breaker, or press the thermal reset button on the tool.
Tool operates slowly
Do not force the tool; allow it to work at its own rate. Ensure the extension cord is not too long or too small in diameter.
Pipe doesn't fit Die
Ensure the die size is appropriate for the pipe, check that the pipe is chamfered, and ensure the pipe is inserted from the correct side.
Dies break
Ensure die blades are sufficiently lubricated and installed in the correct order with cutting edges facing inward.
Before use
- Inspect tool for loose hardware or damage
- Ensure work area is clean and well-lit
- Verify pipe is chamfered
- Check die size compatibility
- Ensure proper oiling of die blades
Specs in practice
- Electrical Rating
- 120VAC / 60Hz / 12A
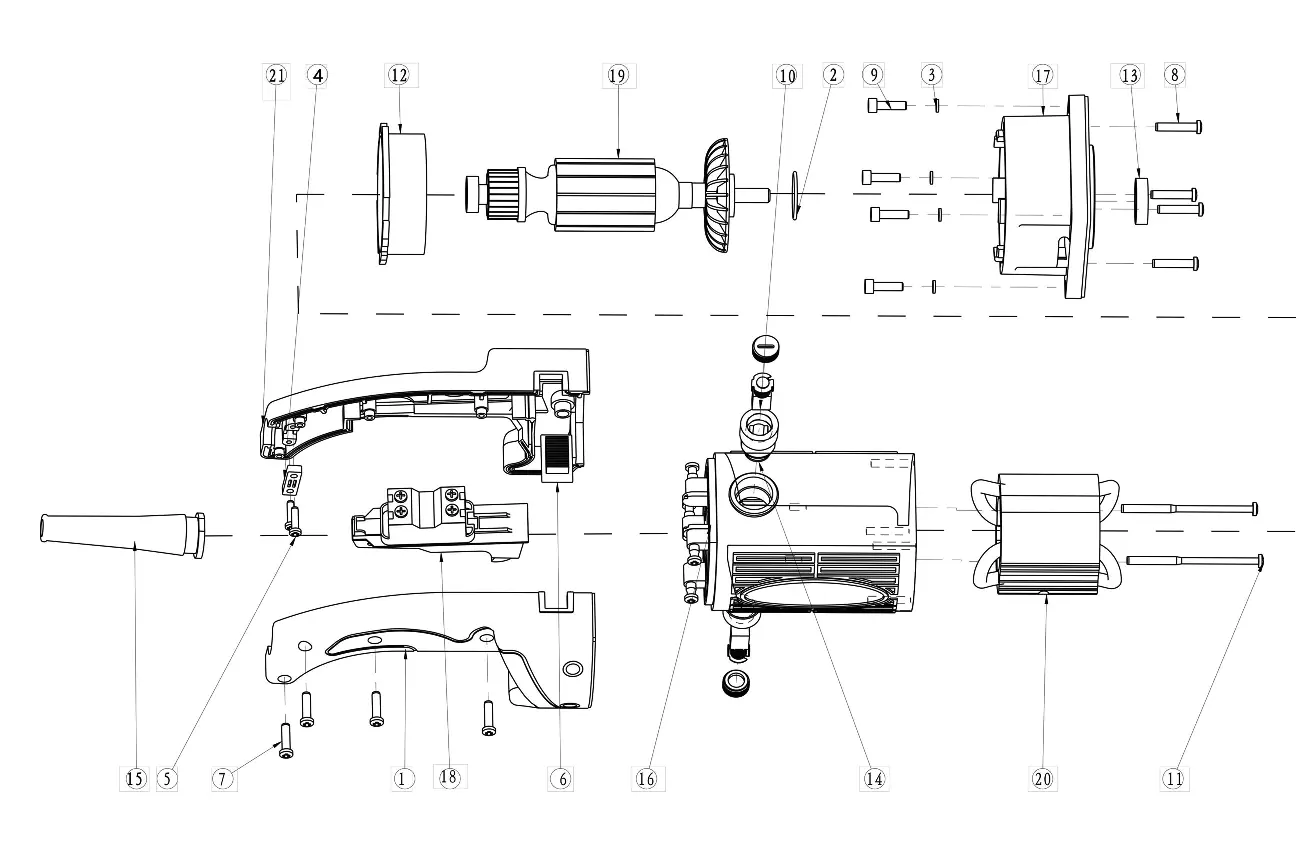
Images and diagrams
- Gear Box Assembly
- Motor Assembly
- Dies Assembly
Model compatibility
- Dies are intended for use on standard schedule 40 steel pipe.

Manual page author
David Miller
Documentation analyst
Organizes user manual content into clear summaries, with attention to model details, product context, and everyday usability.