Tools / Grinding Tools
Owner's Manual for Bauer 2161CR-B 20V Brushless Cordless Angle Grinder
Quick guide for the Bauer 2161CR-B 20V Brushless Cordless Angle Grinder. Includes setup instructions, safety warnings, grinding/sanding procedures, and troubleshooting.
Quick answers from the manual
Quick answer
- The Bauer 2161CR-B is a 20V cordless angle grinder. It requires a Bauer 20V Li-Ion battery and charger (sold separately). Always use accessories rated for at least 10,500 RPM. p. 1, 9
Key actions
- Installing the side handle p. 10
- Installing a grinding wheel p. 11
- Adjusting the wheel guard p. 12
First start
- Ensure the battery is charged, install the side handle, attach the guard, and mount the appropriate accessory before operation. p. 10, 11, 12
Show 4 more answers Show less
Problems and fixes
Tool will not start
Check battery connection, charge level, and thermal reset breaker.
p. 15Maintenance and reset
- Periodically clean motor vents with dry compressed air and inspect for damage before each use. p. 14
Technical specifications
| Parameter | Value | Meaning | Pages |
|---|---|---|---|
| No Load Speed | 10,500/min | Maximum rotational speed | p. 9 |
| Spindle Thread | 5/8"-11 UNC | Thread size for accessories | p. 9 |
Where to find it in the PDF
- Safety Information p. 2, 3, 4, 5
- Specifications p. 9
- Operation p. 13
- Maintenance p. 14, 15
Table of contents
Manual images
Click an image to enlargeQuick guide from the manual
This manual provides essential safety, setup, and operation instructions for the Bauer 2161CR-B 20V Brushless Cordless Angle Grinder. Always read the full safety information before use. The tool is designed for grinding, sanding, and wire brushing. Ensure you use a 3.0 Amp Hour battery or greater for best results.
Safety Information
General Safety: Always wear ANSI-approved eye protection and NIOSH-approved breathing protection. Keep the work area clean and well-lit. Do not operate in explosive atmospheres.
Tool Safety: Never leave the tool unattended with the battery connected. Do not force the tool; let it operate at its own rate. Always use the auxiliary handle. Ensure the guard is securely attached and positioned to protect the operator.
Battery Safety: Keep the battery pack dry. Do not open, drop, short-circuit, or incinerate the battery. Charge only with the specified Bauer 20V charger.
Setup
Installing Side Handle: The side handle can be installed on either the left or right side of the gear housing. Screw the threaded end into the selected position and tighten securely.
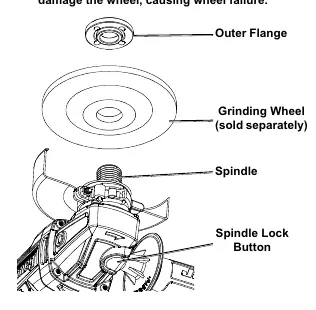
Installing Grinding Wheel: Ensure the wheel is rated for at least 10,500 RPM, is 4-1/2" or smaller, and has a 7/8" arbor hole. Press the spindle lock button, remove the outer flange, place the wheel on the spindle, and re-thread the outer flange. Do not overtighten.
Adjusting Wheel Guard: Unlock the guard clasp, rotate the guard to the desired position to shield yourself, and lock the clasp back in place.
Operation
Grinding and Wire Brushing: Grip the tool firmly in both hands. Slide the power switch forward to start. Allow the tool to reach full speed before touching the material. Apply the wheel at a 10°–15° angle. If the tool bogs down, use lighter pressure.
Sanding: Wipe the surface clean before starting. Attach the sanding disc to the backing pad. Maintain uniform pressure and move the tool in a pattern to ensure even sanding.
Maintenance
Cleaning: Before each use, inspect for damage, loose hardware, or binding parts. After use, wipe the tool with a clean cloth. Periodically blow dust out of the motor vents using dry compressed air. Store the tool and accessories in a dry, indoor area out of reach of children.
Practical help
Common problems
Tool will not start
Check if the battery is properly connected, charged, or worn. Ensure the thermal reset breaker (if equipped) has not tripped.
Tool operates slowly
Decrease pressure on the workpiece and ensure the battery is fully charged.
Overheating
Do not force the tool; allow it to work at its own rate. Clean blocked motor housing vents.
Before use
- Inspect tool for damage, loose parts, or binding.
- Ensure the power switch is in the off-position before inserting the battery.
- Verify the accessory is rated for at least 10,500 RPM.
- Ensure the wheel guard is securely attached and positioned.
- Wear appropriate personal protective equipment (eye protection, gloves).
Show more Show less
Specs in practice
- No Load Speed
- 10,500/min (RPM)
- Spindle Thread
- 5/8"-11 UNC
- Max Accessory Diameter
- 4-1/2" (115mm)
Images and diagrams
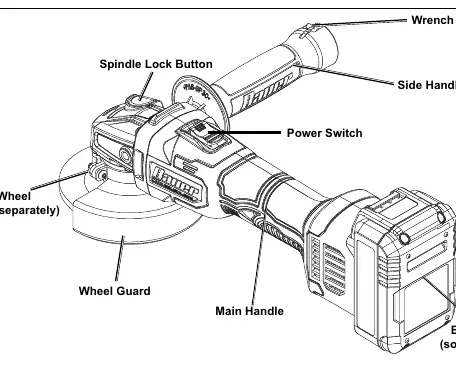
- The components diagram identifies the Spindle Lock Button, Power Switch, Side Handle, Wheel Guard, and Battery Pack location.
Model compatibility
- Requires Bauer 20V Li-Ion Battery Pack (57007) and Charger (57006).
- Do not use accessories that require liquid coolants.

Manual page author
Michael Turner
Technical manual editor