Tools / Grinding Tools
Bauer 8" 4.8 AMP Grinder and Belt Sander Combo Owner's Manual
Quick guide for the Bauer 2327E-B 8" Grinder and Belt Sander Combo. Includes assembly instructions, safety warnings, maintenance, belt replacement, and troubleshooting.
Quick answers from the manual
Quick answer
- The Bauer 2327E-B is a combination 8-inch bench grinder and belt sander. This manual provides instructions for assembly, safe operation, maintenance, and troubleshooting. p. 1
Key actions
- Replace Grinding Wheel p. 9
- Replace Sanding Belt p. 12
- Adjust Belt Tracking p. 10
First start
- Mount the tool to a stable workbench, install the spark arrestor, eye shield, work rest, and work stop before plugging in. p. 7, 8
Show 4 more answers Show less
Problems and fixes
Tool will not start
Check power, circuit breaker, or thermal reset button.
p. 13Maintenance and reset
- If the tool won't start, check the thermal reset breaker (if equipped) and press the reset button. p. 13
Technical specifications
| Parameter | Value | Meaning | Pages |
|---|---|---|---|
| Electrical Rating | 120VAC / 60Hz / 4.8A | Power requirements | p. 6 |
| No Load Speed | 3590/min | Rotational speed | p. 6 |
Where to find it in the PDF
- Assembly p. 7, 8
- Operation p. 9, 10, 11
- Maintenance p. 12, 13
Table of contents
Manual images
Click an image to enlargeQuick Guide
The Bauer 2327E-B is a combination 8-inch bench grinder and belt sander. This manual provides essential instructions for safe operation, assembly, and maintenance. Always wear ANSI-approved eye protection and NIOSH-approved breathing protection when using this tool.
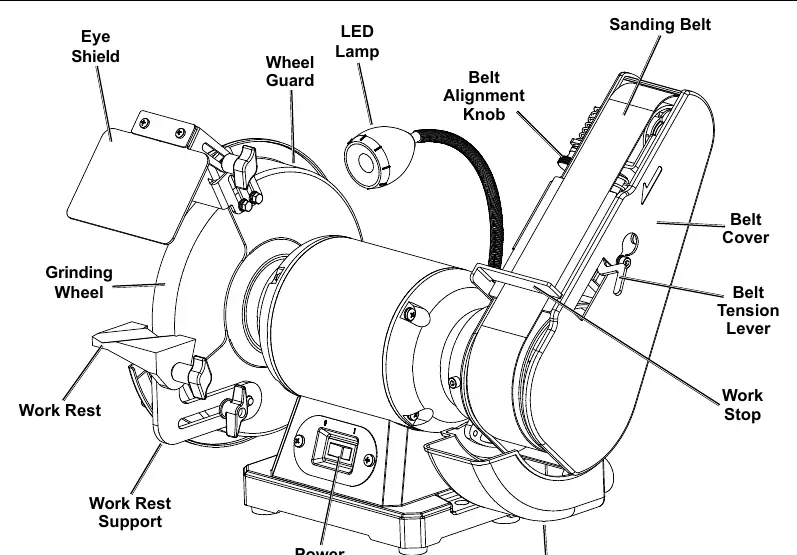
Assembly
Before use, ensure the tool is mounted securely to a stable workbench. Follow these assembly steps:
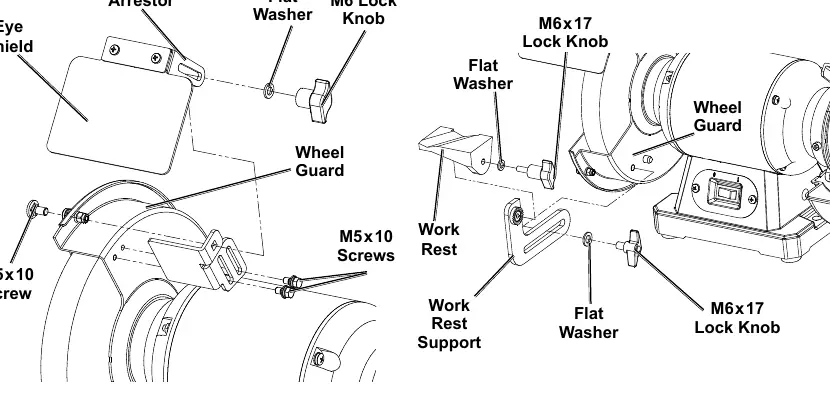
- Spark Arrestor: Attach to the Wheel Guard using two M5x10 Hex Bolt Assemblies.
- Eye Shield: Attach to the Spark Arrestor bracket using the M6x12 Square Neck Screw, Flat Washer, and M6 Lock Knob.
- Work Rest: Attach the Work Rest Support to the Wheel Guard using the M8x12 Lock Knob and Flat Washer. Then, attach the Work Rest to the support using the M6x17 Lock Knob and Flat Washer. Ensure it is perpendicular to the wheel.
- Work Stop: Fit across the top of the Sanding Belt and secure with two M5x10 Cap Screws and Washers.
Operation
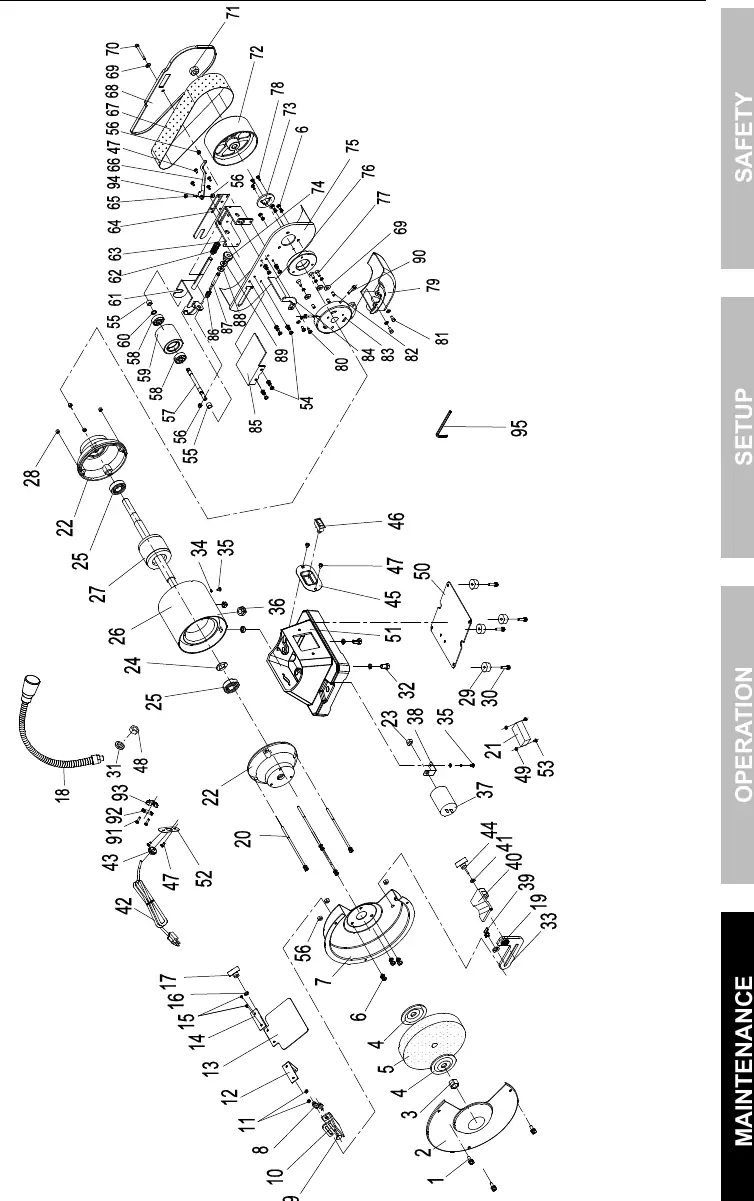
Grinding Wheel Replacement:
- Unplug the tool.
- Loosen Locking Screws and remove the Wheel Guard Cover.
- Place a wooden wedge between the wheel and work rest to prevent rotation.
- Remove the M16 Lock Nut, Outer Flange, and the old wheel.
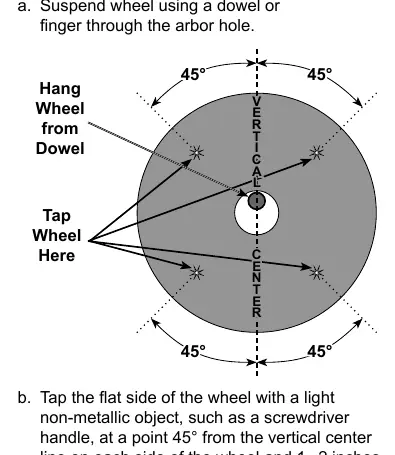
- Inspect the new wheel (ring-test) before mounting.
- Install the new wheel, replace the flange, and tighten the lock nut (do not overtighten).
Sanding Belt Replacement:
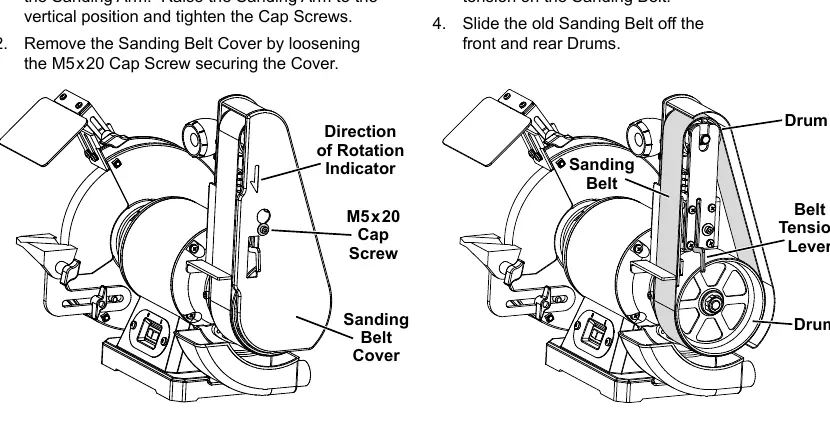
- Loosen the two M5x12 Cap Screws to raise the Sanding Arm.
- Remove the Sanding Belt Cover.
- Push the Belt Tension Lever up to release tension.
- Slide the old belt off and install a new 2" x 28" belt, ensuring the directional arrows on the inside match the rotation.
- Tighten the belt using the Tension Lever and replace the cover.
Maintenance
- Cleaning: Wipe external surfaces with a clean cloth after use. Periodically blow dust out of motor vents using dry compressed air.
- Inspection: Before each use, check for loose hardware, damaged cords, or cracked parts.
- Storage: Keep accessories in a dry area above freezing.
Troubleshooting
- Tool will not start: Check power connection, circuit breaker, or thermal reset button.
- Tool operates slowly: Reduce pressure, check extension cord gauge, or allow the tool to work at its own rate.
- Overheating: Clear blocked motor vents, reduce pressure, or use a proper extension cord.
- Wood burns: Clean or replace the sanding belt and use less pressure.
Practical help
Common problems
Tool will not start
Check power connection, ensure the outlet is powered, check the circuit breaker, or press the thermal reset button on the tool.
Tool operates slowly
Reduce pressure on the workpiece, ensure the extension cord is not too long or thin, and allow the tool to work at its own rate.
Overheating
Clear blocked motor vents, reduce pressure, and ensure the extension cord is of the correct gauge.
Wood burns while sanding
Clean or replace the sanding belt and apply less pressure.
Before use
- Inspect for loose hardware
- Check for damaged cord or wiring
- Ensure all guards are in place and secure
- Check grinding wheel for cracks or damage
- Verify proper grounding of the power outlet
Show more Show less
Specs in practice
- Electrical Rating
- 120VAC / 60Hz / 4.8A
- No Load Speed
- 3590/min
- Grinding Wheel Dimensions
- 1" x 8" with 5/8" arbor
- Sanding Belt Size
- 2" W x 28" L
Images and diagrams
- Assembly of spark arrestor and eye shield
- Work rest and work stop installation
- Grinding wheel replacement procedure
- Sanding belt replacement procedure
Model compatibility
- Use only identical replacement parts
- Sanding belt size: 2" x 28"

Manual page author
Emily Carter
User documentation editor